100% Working Ways to Compress QuickTime Video on Mac
QuickTime player, commonly known for video playback, holds a hidden gem – video compression. Many users overlook its ability to seamlessly compress and shrink the size of (4K) videos on both macOS and Windows. The benefits are clear: save storage space and effortlessly share videos without compromising quality.
This blog post will walk you through the process, ensuring your resulting files maintain visual integrity. If you're unsure how to harness QuickTime's compression powers, follow our detailed guide below. Say goodbye to large file sizes and hello to efficient video sharing!
Part 1. How to Compress a Video with QuickTime
QuickTime Player is the default media player for macOS, making it a handy tool to compress videos effortlessly. While the steps differ for Windows users, the core process remains unchanged. Let's delve into the quick and straightforward guide.
- On Mac, navigate to your Applications folder and fire up QuickTime Player. Once launched, click "File" and select "Open File" to import the video file you wish to compress.
- With your video loaded, click "File" again, but select "Export As." QuickTime Player offers various output resolution options, such as 4K (if applicable), 1080p, 720p, 480p, and even Audio Only. Opt for a lower resolution to downscale the video and reduce its size effectively.
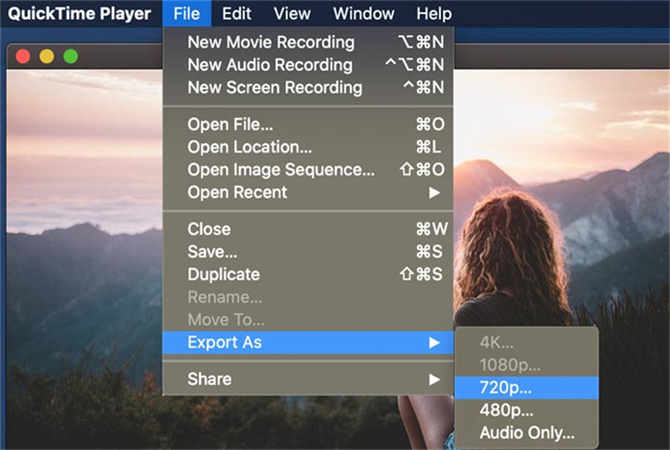
For those seeking a unified solution, upgrading to the QuickTime Player Pro version enables the compression and resizing of 4K/2K videos within a single tool. This streamlines the process, eliminating the need for multiple tools and enhancing efficiency in handling various video compression needs.
In essence, whether in its free or Pro version, QuickTime Player provides users with an accessible and user-friendly means to compress and resize videos, catering to diverse preferences and requirements.
Part 2. How to Compress a Video on QuickTime Pro
QuickTime Player Pro offers a straightforward solution for compressing QuickTime videos, making the process accessible to users with varying levels of technical expertise. With this version, you can easily reduce the size of your (4K) videos by adjusting resolution, dimensions, frame rate, and bit rate. Follow these simple steps to compress your QuickTime videos efficiently.
Upgrade your QuickTime Player to the Pro version to begin the compression process. Once upgraded, open QuickTime Player and click File in the menu's upper left corner. From the drop-down menu, select Open File.

- Locate the video you want to compress on your macOS or Windows PC and load it into QuickTime Pro by clicking the "Open" button.
- Before proceeding, it's advisable to ensure that your video has no synchronization issues between video and audio. Play your (4K 2160p) video to check for desynchronization problems.
- Navigate to the "File" menu and select "Export" to initiate the compression process.
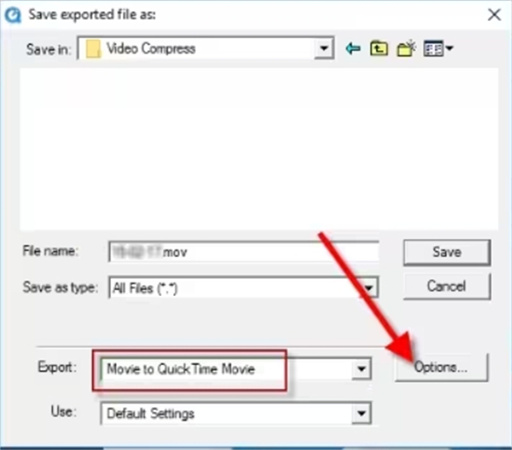
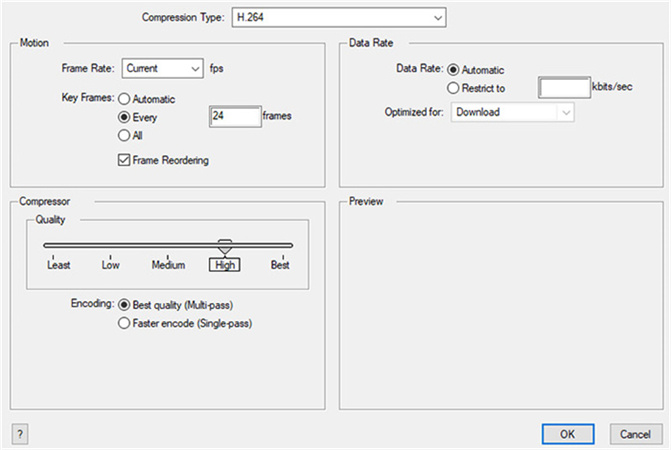
In the "Export" section, click the hide option and choose "Movie to QuickTime Movie." Click on the "Option" button and select either H264 or HEVC as the compression type under "Settings" in the "Video" zone.

Head to the "Motion" section to lower the frame rate and change keyframes, further compressing your 4K/2K/1080p video. In the "Data Rate" section, reduce the bit rate according to your preference. Click "OK" to confirm.

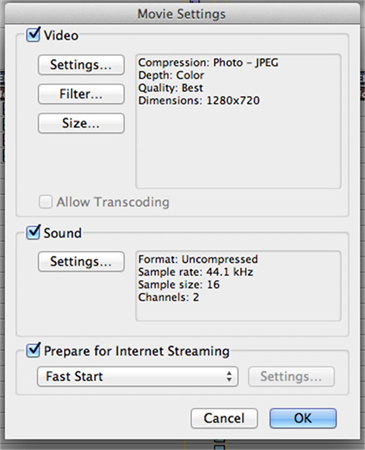
Return to the "Movie Settings" window and click the "Size" button to enter the video dimension (crop) section. Crop your video to eliminate unwanted bars and resize it accordingly. Click "OK" to exit from the settings interface.

- Once you've adjusted the necessary settings, click the "Save" button to start compressing your videos using QuickTime Player Pro.
Optional: Trim Your Video
Use the "Trim" feature under the "Edit" category for additional size reduction. This allows you to cut unnecessary clips from your video, shortening its length and making your (4K Ultra HD) video even smaller.
QuickTime Player Pro simplifies video compression, offering a user-friendly interface for adjusting various parameters to suit your compression needs. Following these steps ensures a smooth and efficient compression experience, even for users unfamiliar with the Pro version.
Part 3. How to Compress QuickTime Video with Best Video Compressor Program
In this part, we'll guide you on how to compress QuickTime videos using HitPaw Univd (HitPaw Video Converter), our recommended software packed with a powerful video compression feature. Unlike QuickTime, HitPaw Univd offers a seamless experience, supporting a wide range of formats, allowing for batch conversion, and providing additional tools for video editing.
Why Choose HitPaw Univd for QuickTime Video Compression
HitPaw Video Compressor feature provides overwhelming compress features to make QT video compression easy and quick.
- Supports 1000+ formats, so you can compress QuickTime videos as well as any other video.
- Cutting-edge ensures the best quality after compression.
- Provides different compression level to satisfy different demands.
- Real-time preview
- Batch compress videos at 120x faster speed
- 20+ other must-have features for video, audio, and images.
- Intuitive interface
The Steps to Compress Quick Time Video on Mac with HitPaw Univd:
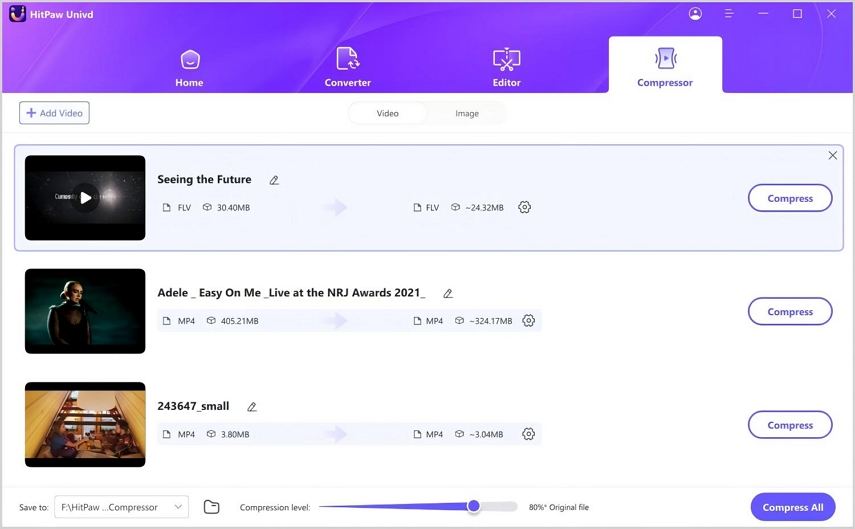
Step 1:Install and launch the HitPaw Univd on your computer. Navigate to the Toolbox and choose the "Video/Image Compressor" feature.

Step 2:In the Video tab, click "Add Video" to import the video(s) you want to compress. Optionally, you can rename the video title by clicking the pen icon.

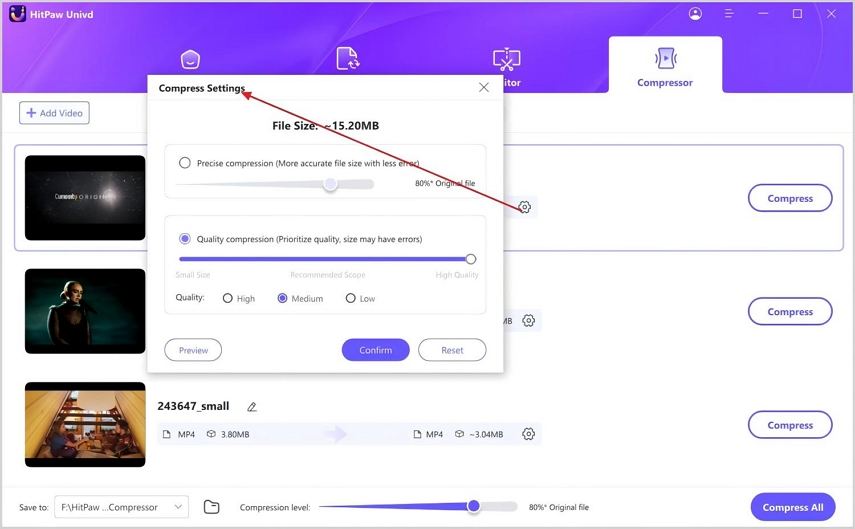
Step 3:Access compression settings by clicking the gear icon on a file. Choose an appropriate compression level and quality for the selected file. The format list includes "Original" and "MP4" options. Use the "Preview" button to see the compression effects. Click Confirm to save your settings.

Step 4:Click "Compress" to compress the selected file or "Compress All" to compress all files simultaneously.

Step 5:Access the compressed video(s) in the output folder once the compression is complete.
Part 4. Comparison between QuickTime and HitPaw Univd
In video compression, two popular tools stand out—QuickTime and HitPaw Univd. While both serve the purpose of compressing videos, they differ in various aspects. Let's explore these variations through a straightforward comparison.
| Features/Tool | HitPaw Univd | QuickTime |
|---|---|---|
| Supported Operating System | Windows and Mac | Mac |
| Supported formats | Almost all video & audio formats | Limited to MP4, MOV, and a few others working on Mac |
| Compression Speed | 120x faster | Decent |
| Advanced Settings | Offers more customization options | Limited |
| Video editing | Comes with a complete editor that supports trimming, cutting, cropping, and performing other editing functions | Not supported |
| Preview function | Yes | Not supported |
| Batch processing | Yes, supports processing multiple files at a time | Not support |
The choice between QuickTime and HitPaw Univd depends on your specific needs. QuickTime may suffice if you're in an Apple-centric environment and prefer simplicity. However, for a more versatile and user-friendly experience with support for various formats, HitPaw Univd emerges as a compelling option.
The Bottom Line
When compressing QuickTime videos on your Mac, the decision concerns your preferences and requirements. QuickTime is a reliable choice if you value a straightforward approach within the Apple ecosystem. Its simplicity aligns seamlessly with an Apple-centric environment.
On the other hand, for those seeking a broader and user-friendly solution compatible with various formats, the HitPaw Video Compressor stands out. With its versatility, HitPaw offers an appealing alternative, ensuring a smooth and efficient compression experience. Ultimately, the choice is yours, tailored to your unique needs and the versatility you seek in managing your video files on Mac.





 HitPaw Edimakor
 HitPaw VikPea (Video Enhancer)


Share this article:
Select the product rating:
Joshua Hill
Editor-in-Chief
I have been working as a freelancer for more than five years. It always impresses me when I find new things and the latest knowledge. I think life is boundless but I know no bounds.
View all ArticlesLeave a Comment
Create your review for HitPaw articles