How to Compress MP4 on Mac (MacBook, iMac, iMac Pro, etc)
Creating or watching a video in high resolution is a beautiful experience, and almost everyone intends to opt for this way. However, storing high-resolution videos means these videos will cover a lot of extra space on the Mac.
Thus, compressing the video files to reduce their size will be a good decision, provided doing so doesn't affect the quality of your video. We'll tell you how to compress an MP4 file on Mac without causing too much video quality loss.
Part 1. The Easiest Way to Compress MP4 on Mac in Batch and No Quality Loss
You want to compress MP4 Mac and are looking for an appropriate video compressor for Mac. The best way to compress MP4 files without even losing the slightest video quality is to acquire the services of HitPaw Univd (HitPaw Video Converter). It is a multidimensional tool that offers far more services than any single tool.
Apart from creating a breathtaking user interface, HitPaw Univd will help you enjoy the advanced and professional features, making the compression process smooth and effortless.
So, when compressing the video files, you shouldn't think even once before taking the HitPaw Univd on board.
- Allows you to compress MP4 Mac without affecting the resolution of the video
- It comes up with the intuitive user interface
- Supports the 1000+ audio and video formats
- Allows you to edit your videos appropriately
- Download the videos from 10000+ online websites
- 100% safe for your Mac
How to compress an MP4 file on Mac via HitPaw Univd for Mac:
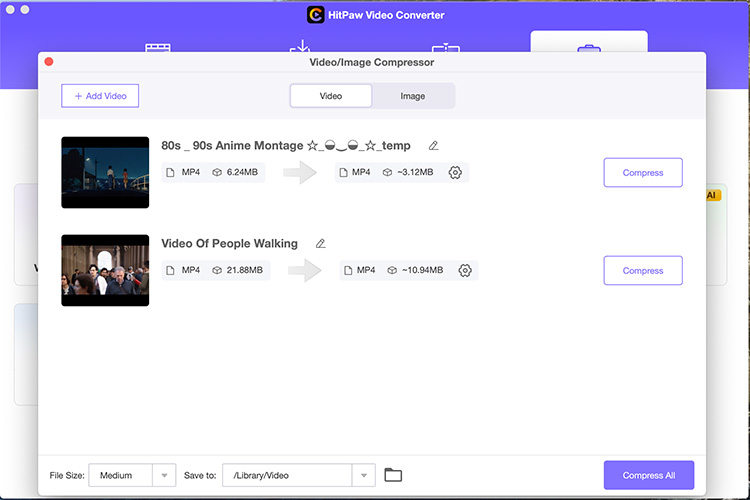
Step 1.Install the HitPaw Univd on your Mac and launch the software afterward. After entering the HitPaw Univd's main interface, select the Toolbox icon and hit the Video/Image Compressor.

Step 2.After visiting the video tab, click on the ''Add Video'' icon.

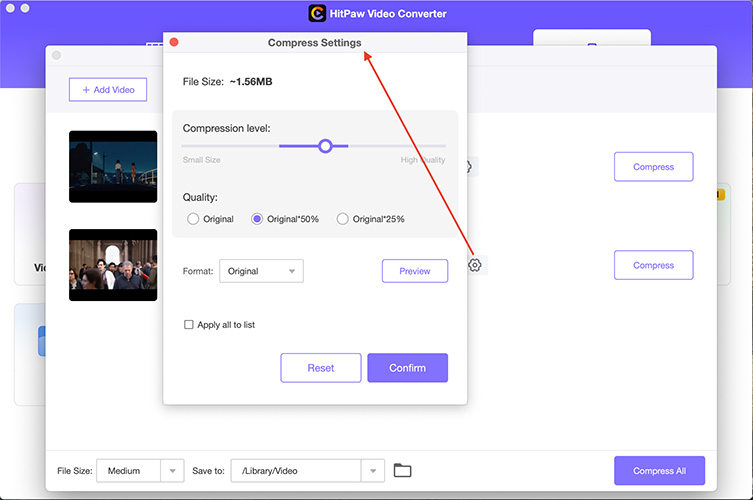
Step 3.You can select the befitting compression level after tapping the gear icon. The format list comes up with the MP4 and Original options. Next, click on the ''Preview'' icon to preview the compression effects. Save the settings by hitting'' Confirm.''

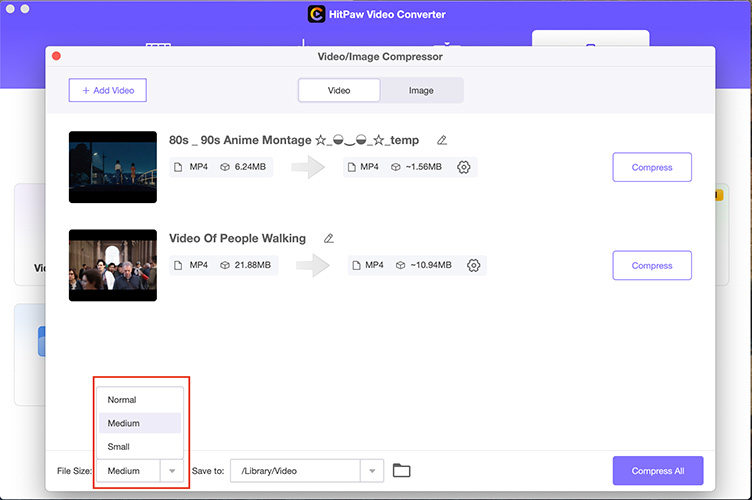
Step 4.When you select a compression level, it applies to all the files. The most recommended level is medium. You can see the video's size after and before compression.

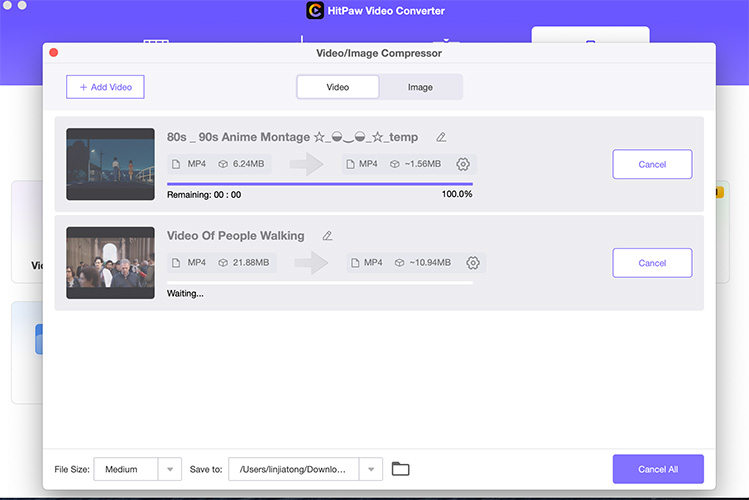
Step 5.Click on the ''Compress'' icon to start compressing the video file.

Part 2. Compress a MP4 File on Mac Using QuickTime
QuickTime is a brilliant built-in tool for Mac that supports various video and audio formats. Since QuickTime also serves you as an editor, you can easily compress MP4 Mac.
Here's how to compress a MP4 file on Mac through QuickTime.
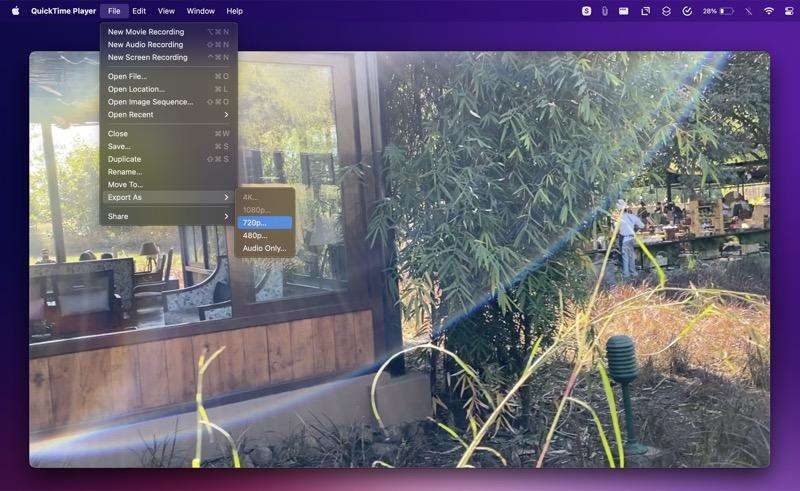
Step 1.Launch QuickTime and visit the folder containing the video you'd like to compress. Next, select the video and tap on the ''Open'' icon.
Step 2.Tap the ''File'' icon and select the ''Export As'' icon. Select the desired output video resolution to proceed ahead

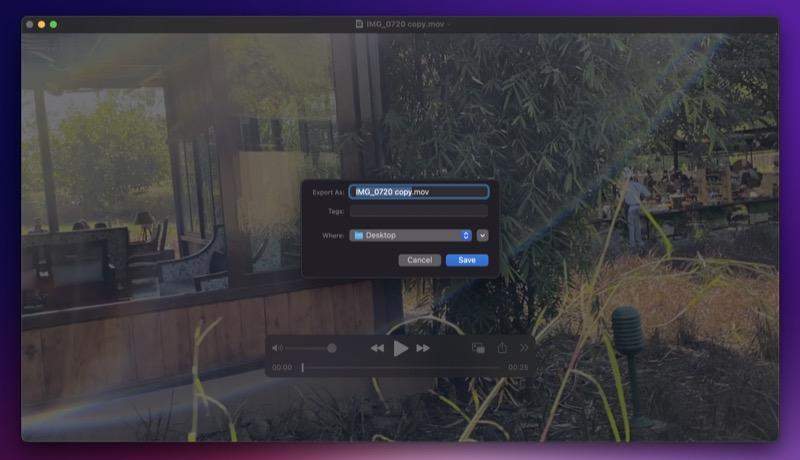
Step 3.After visiting the Export window, enter the file name and choose the folder you'd like to export the compressed file. Complete the proceedings by hitting the ''Save'' icon.

Cons:
- QuickTime might tinker with the resolution of your videos.
- The compression process might take longer than usual.
Part 3. How to Compress MP4 on Mac using iMovie
iMovie is another breathtaking tool video editor introduced by Apple that allows you to perform various video editing techniques on your videos. If you want to resize or compress MP4 file, iMovie will be a good video compressor for Mac. It supports video compression and comes up with an effortless user interface.
Here's how to compress MP4 file on Mac via iMovie
Step 1.After launching the iMovie software on your Mac, you'll need to click on the ''Import Media'' icon to upload the video file you'd like to compress.

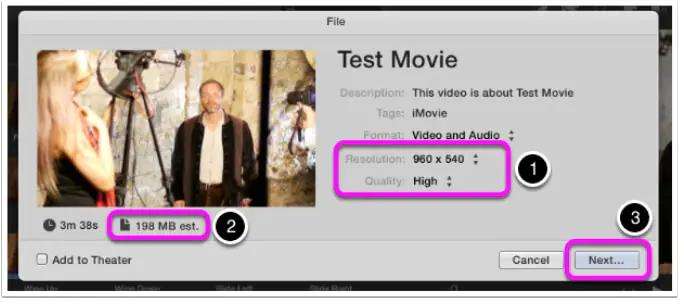
Step 2.Once you add the file to the main interface of iMovie, the details about format, tags, description, quality, resolution, and format will eventually appear. Now, you can alter the quality and resolution of your added file via arrows. If you want to compress video Mac, hit the ''Next'' icon.

Step 3.Rename the processed video file and select the location where you'd want to save the file. Next, tap the '' Save'' icon to compress the video file.

Cons:
- It doesn't maintain the original quality of the video when compressing it.
- It takes a lot of time to compress the video.
Part 4. How to Compress MP4 on Mac using Mac via Finder
Mac Finder could be a simple and easy way to compress MP4 Mac. It also allows you to change the frame rate, bitrate, codec, resolution, and more. Follow the step-by-step guide below to learn how to compress an MP4 on Mac.
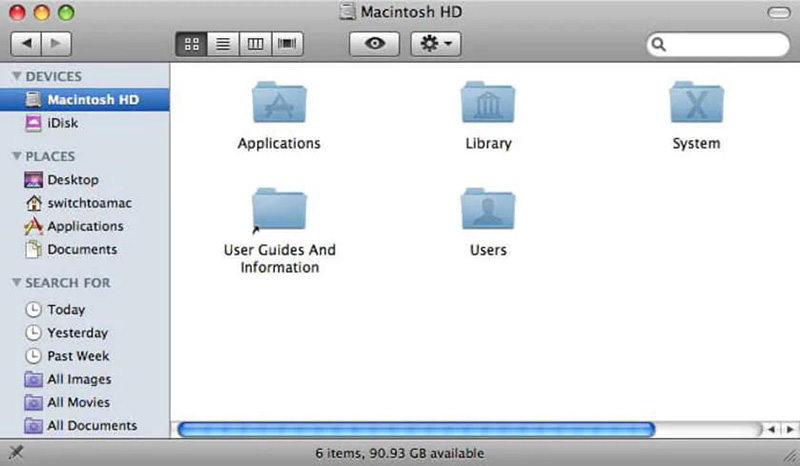
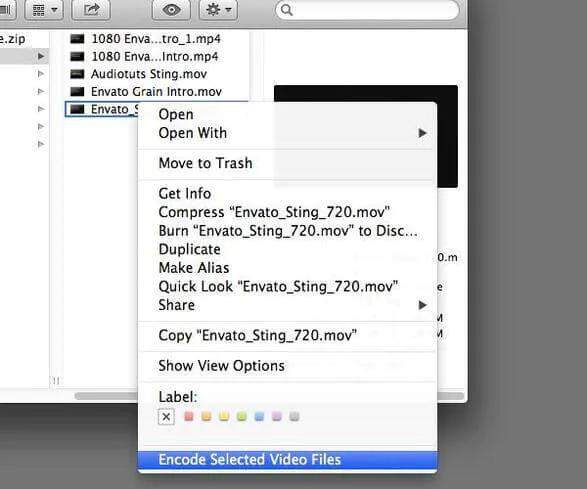
Step 1.Launch the Mac Finder app on the Mac system and locate the files you want to compress. You can use the tabs on the left column to browse the files.

Step 2.Open the desired MP4 files by clicking the Control+click. Next, choose the Encode selected video file.

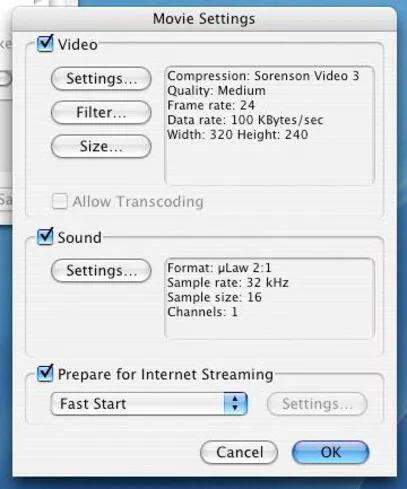
Step 3.A new Encode Media Window will eventually appear, helping you set your output video options. You can now change the video parameters. Change the video resolution and select the destination location you'd like to save the video files. Tap on the ''Continue'' icon to proceed ahead.
Step 4.Press the ''OK'' icon to begin the file compression and conversion process, which will only take a few moments before getting your job done.

Part 5. How to Compress MP4 on Mac using Handbrake
You can also opt for the handbrake if you intend to shrink MP4 file size Mac. It is a terrific tool that allows you to perform various functions on your video, including video compression. Here's how to compress a video on Mac through Handbrake.
Step 1.After downloading and installing the handbrake on your Mac, tap on the ''Source'' icon to import the desired files in the main interface of handbrake.
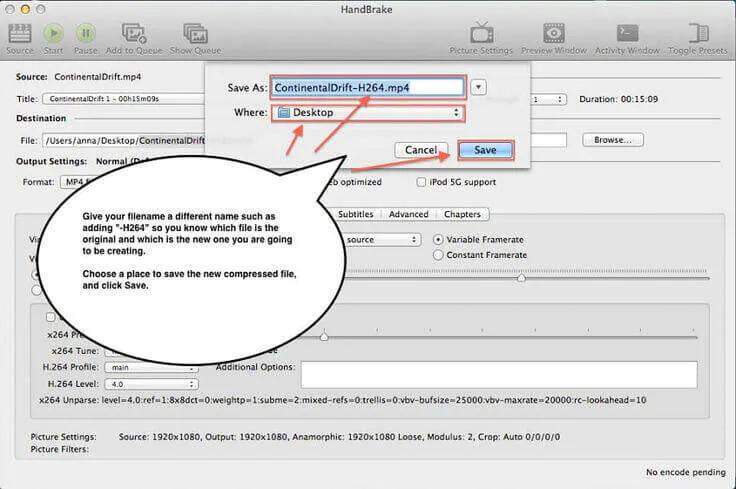
Step 2.After adding the desired MP4 file, you'll need to tap on Browse and select the output file name and the destination where you'd like to save the video. Confirm the action by hitting the '' Save'' icon.

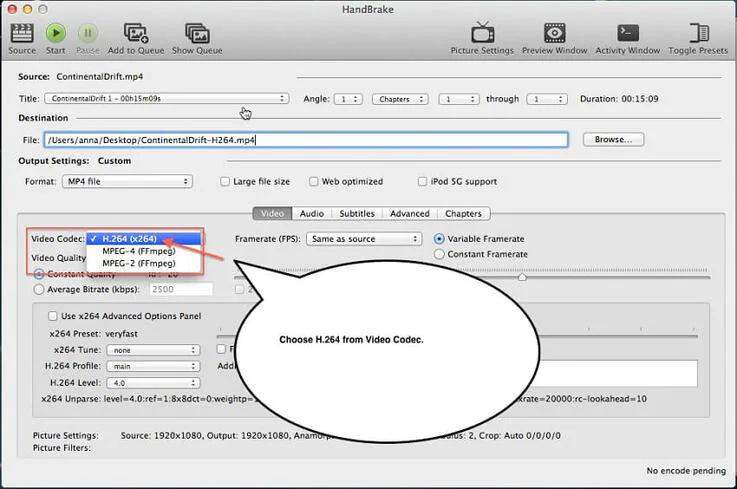
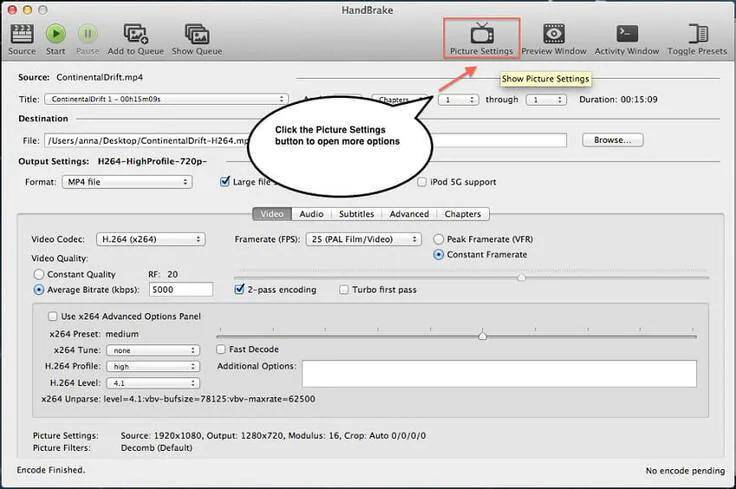
Step 3.Navigate to the Output Settings option and select the output file's video format. After selecting the video codec, you'll need to select the High Profile preset.

Step 4.You'll need to tap on the '' Picture Settings'' icon to alter the resolution.

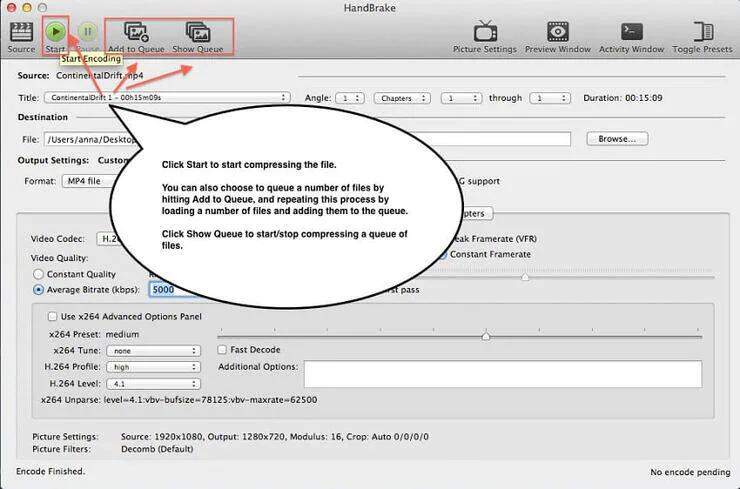
Step 5.After putting everything in order, tap on the ''Start'' icon to compress the video.

The Sum Up
This post could be helpful if you need to learn how to compress a MP4 video on Mac. It comes up with terrific ways to compare MP4, as we were keen to introduce methods that don't tinker with the overall quality of the video.
Of all the methods we've revealed in this post, HitPaw Univd for Mac is the best video compressor Mac. It is a highly recommended software for reducing MP4 file size Mac.





 HitPaw Edimakor
 HitPaw VikPea (Video Enhancer)


Share this article:
Select the product rating:
Joshua Hill
Editor-in-Chief
I have been working as a freelancer for more than five years. It always impresses me when I find new things and the latest knowledge. I think life is boundless but I know no bounds.
View all ArticlesLeave a Comment
Create your review for HitPaw articles