How to Convert MP4 to MP3 with Audacity and Its Best Alternative
Converting MP4 files to MP3 format can be essential for various purposes such as creating audio versions of videos for easy listening, extracting audio tracks from video files, or reducing file size for storage or sharing.
Audacity, a popular open-source audio editing software, offers a straightforward method to perform this conversion. In this guide, we'll walk you through the process of Audacity mp4 to mp3 converter, as well as introduce you to its best alternative for those seeking a different approach or additional features.
Section 1: How to Audacity Convert MP4 to MP3
Here are steps to convert mp4 to mp3 audacity:
- Step 1. Download Audacity And FFmpeg Library. You can download Audacity for free through its official website.
- Step 2. Open Audacity and select Edit > Preferences.
- Step 3. Select Libraries. It will say “FFmpeg library not found”. Click the Download button and you will be taken to an Audacity FAQ website where you can learn about the FFmpeg library, then click Installing FFmpeg and download the FFmpeg installer.
- Step 4. Click on the downloaded FFmpeg file and complete the installation. Pay attention to the destination location. By default, FFmpeg for Audacity will be stored in C:\Program Files\FFmpeg for Audacity.
- Step 5. Restart Audacity. If you have installed FFmpeg elsewhere, you will need to open the Libraries preferences again and find the FFmpeg folder manually.
- Step 6. Now, drag and drop the MP4 file into Audacity or import the video file from File > Import.
- Step 7. Edit the audio track as needed. Finally, click File > Export > Export as MP3. Then follow the onscreen prompts to save the MP3 file to a local folder.
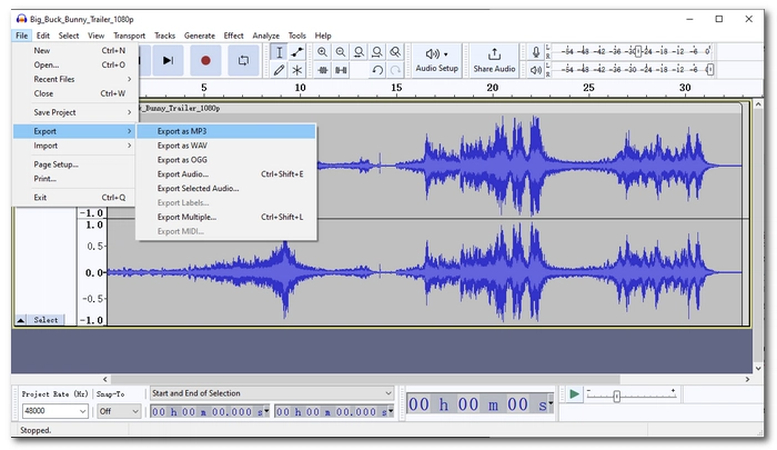
Now we have completed the entire process of how to convert MP4 to MP3 using Audacity.
Pros of using Audacity:
- Free and Open-Source
- ICross-Platform Compatibility
- Versatile Editing Tools
- Support for Multiple File Formats
- Extensive Plug-in Support
Cons of using Audacity:
- Steep Learning Curve
- Limited Multitrack Editing
- Occasional Stability Issues
- Basic Interface Design
- Lack of Real-Time Effects Processing
Section 2: Best Alternative for MP4 to MP3 Converter
HitPaw Univd (HitPaw Video Converter) stands out as a robust solution for converting MP4 to MP3 files with efficiency and precision. Designed with user convenience and reliability in mind, HitPaw Univd offers a seamless conversion experience, making it the ideal choice for individuals seeking a trusted tool for MP4 to MP3 conversion.
Key Features of HitPaw Univd:
- High-Quality Conversion: HitPaw Univd ensures that your MP4 files are converted with utmost accuracy and fidelity, preserving the original image quality without degradation.
- Wide Format Support: Apart from HEIC conversion, HitPaw Univd supports a plethora of popular image formats, including JPEG, PNG, BMP, and more, ensuring compatibility across various platforms and devices.
- User-Friendly Interface: With its intuitive and user-friendly interface, the HitPaw Video Converter simplifies the conversion process, allowing users of all skill levels to effortlessly convert HEIC files with just a few clicks.
- Fast and Efficient: HitPaw Univd utilizes advanced algorithms to deliver swift conversion speeds, enabling users to convert HEIC files quickly and efficiently, saving valuable time and resources.
- Reliability and Trustworthiness: Backed by a reputation for reliability and trustworthiness, HitPaw Univd provides users with peace of mind, knowing that their HEIC files are converted accurately and securely.
-
Step 1: Download HitPaw Univd. Head to the HitPaw website and download the HitPaw Univd free on Mac or Windows.
-
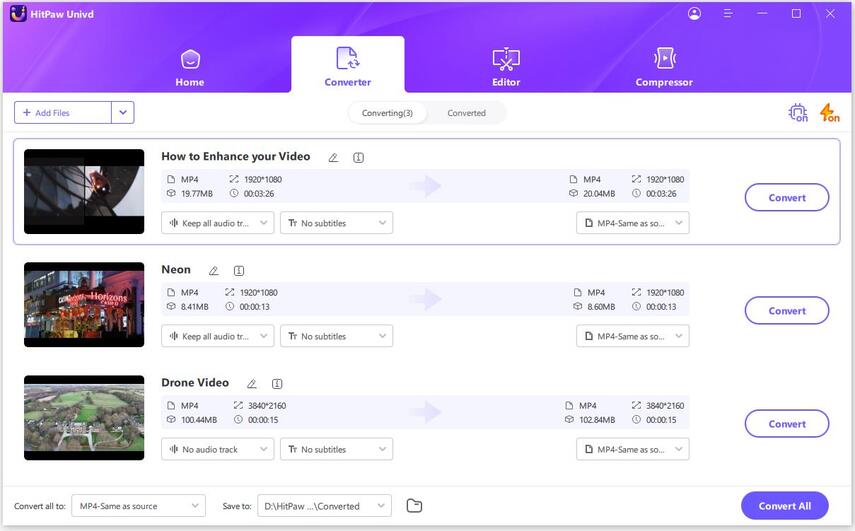
Step 2: Launch HitPaw Univd and click Convert.

-
Step 3: Upload the MP4 video from your PC and.

-
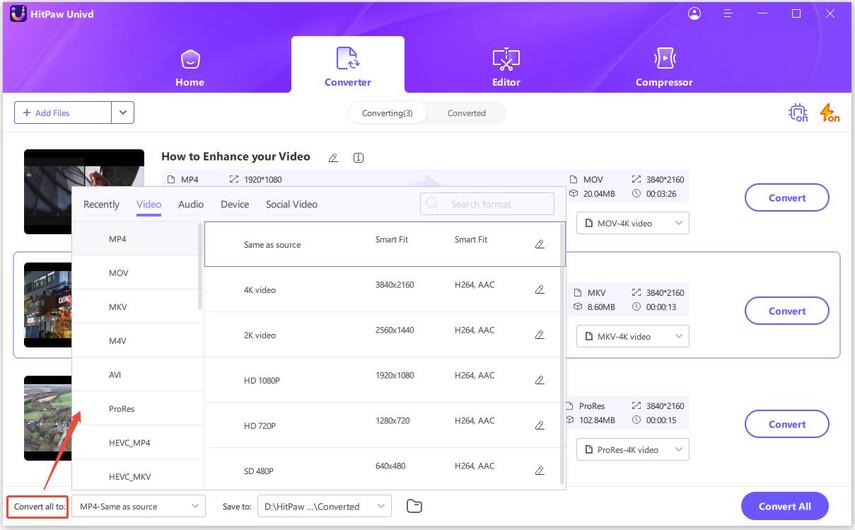
Step 4: Select the MP3 format you desire.

-
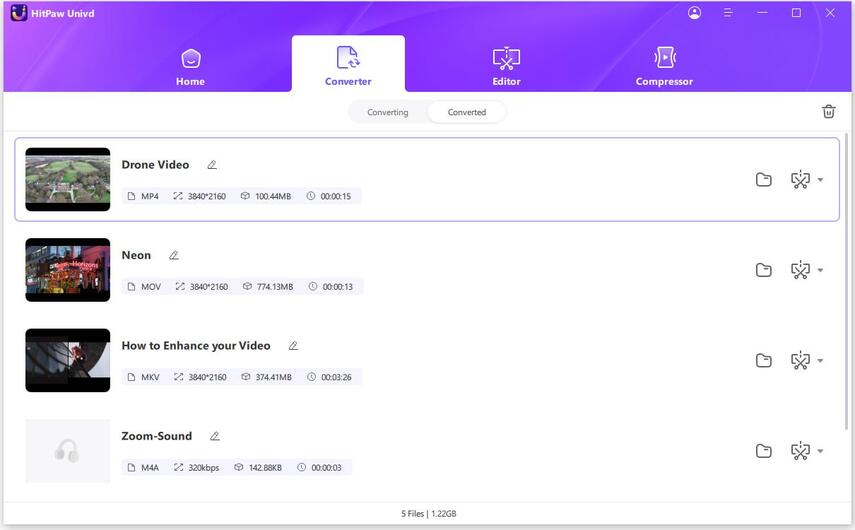
Step 5: Go to Converted. Then click the folder to check converted MP3 file.

Watch the following video to learn more details:
Section 3: FAQs about Converting MP4 to MP3 with Audacity
Q1. Why should I adjust the mp3 settings in Audacity?
A1. Adjusting MP3 settings in Audacity allows control over the balance between audio quality and file size. Tailoring settings ensures compatibility across devices and platforms while optimizing encoding for specific needs like streaming or archival purposes, granting flexibility in achieving desired audio outcomes.
Q2. How do I adjust the mp3 settings in Audacity?
A2. To adjust MP3 settings in Audacity, import the audio file, then navigate to "File" > "Export" > "Export as MP3...". In the export dialog, tweak options like bitrate and quality to suit preferences or requirements. Higher bitrates offer better quality but result in larger files. Finally, click "OK" to finalize the export.
Conclusion
In conclusion, this blog post highlights the use of Audacity mp4 to mp3 is the best method to convert video to mp3 audio. By adjusting MP3 settings in Audacity, users can control audio quality and file size, ensuring compatibility and optimizing encoding for various needs.
However, for hassle-free conversion, readers are encouraged to explore HitPaw Univd. Its user-friendly interface and robust features make it the go-to tool for effortlessly converting MP4 files, enhancing workflow efficiency and overall user experience.



 HitPaw Edimakor
 HitPaw VikPea (Video Enhancer)


Share this article:
Select the product rating:
Joshua Hill
Editor-in-Chief
I have been working as a freelancer for more than five years. It always impresses me when I find new things and the latest knowledge. I think life is boundless but I know no bounds.
View all ArticlesLeave a Comment
Create your review for HitPaw articles