How to Burn iMovie to DVD on Mac
iMovie, a beloved part of Apple's iLife suite for MacOS and iOS, empowers users to craft stunning movies and trailers easily. If you've created a captivating project in iMovie, you might wonder how to export it and burn it to a DVD, perfect for playing on a big TV screen with your loved ones.
However, Apple significantly changed in 2011 with OS X 10.7 Lion, excluding iDVD from the iLife bundle. Consequently, newer versions of iMovie lack the export to DVD option for burning tasks.
We've got you covered with an alternative solution. This guide explores how to burn iMovie projects to DVDs using a third-party DVD authoring program. Prepare to share your masterpieces with family and friends for an unforgettable movie night experience!
Part 1. How to Burn a DVD from iMovie with iDVD
iMovie is a fantastic tool for creating and editing videos, but sometimes you may want to preserve your video works and play them on DVD players or other devices. If you're wondering how to burn an iMovie project to a DVD, you can use iDVD, a popular choice for creating DVDs on Mac computers. Let's go through the steps of burning an iMovie project to DVD with iDVD.
Before we dive into the process, it's important to note that iDVD has been discontinued since 2011. As of 2018, it is no longer preinstalled on Macs shipping with OS X 10.7 Lion or later, and it's not available on the Mac App Store with other iLife apps. However, if your Mac already has iDVD, you can use it to export and burn your iMovie project to DVD.
The Steps to Burn DVD from iMovie with iDVD
Step 1. Export iMovie Videos to iDVD
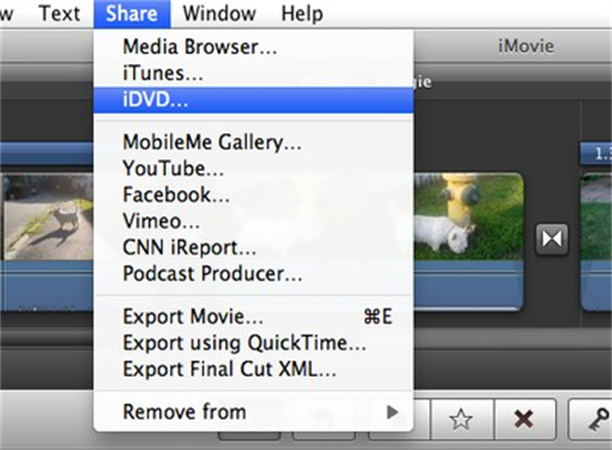
Once you've finished your iMovie project, go to iMovie's top menu bar and choose "Share > iDVD." This action will open iDVD and import your iMovie project, which may take a few minutes. Note that it's best to export videos of less than 60 minutes to iDVD for optimal results.
Step 2. Create DVD Menu (Optional)
iDVD interface will appear after the project is imported. Click "Themes" at the bottom right corner to add a DVD menu to your video. Additionally, if you wish to include other local videos alongside your iMovie project before burning to DVD, you can click "Media."Step 3. Start Burning iMovie to DVD
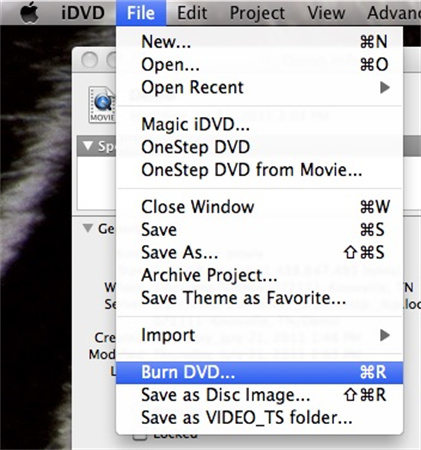
After everything is set up, insert a blank DVD into your Mac's CD-ROM/DVD drive. Then, go to the iDVD menu bar and select "File > Burn DVD." iDVD will begin the burning process, and your iMovie project will be saved on a DVD.
Following these steps, you can easily burn your iMovie project to a DVD using iDVD, preserving and enjoying your video creations on various devices. Though iDVD may no longer come pre-installed on newer Macs, if you have access to it, it remains a reliable tool for creating DVDs with your iMovie videos.
Part 2. How to Burn iMovie to DVD without iDVD
If you are using a newer Mac without iDVD preinstalled, you have to look for an alternative way to burn iMovie videos to DVD without iDVD. Then look no further than HitPaw Univd (HitPaw Video Converter)! This powerful software is designed to make DVD burning a breeze, allowing you to create stunning DVDs from your iMovie projects effortlessly.
Why Choosing HitPaw Univd for DVD Burning?
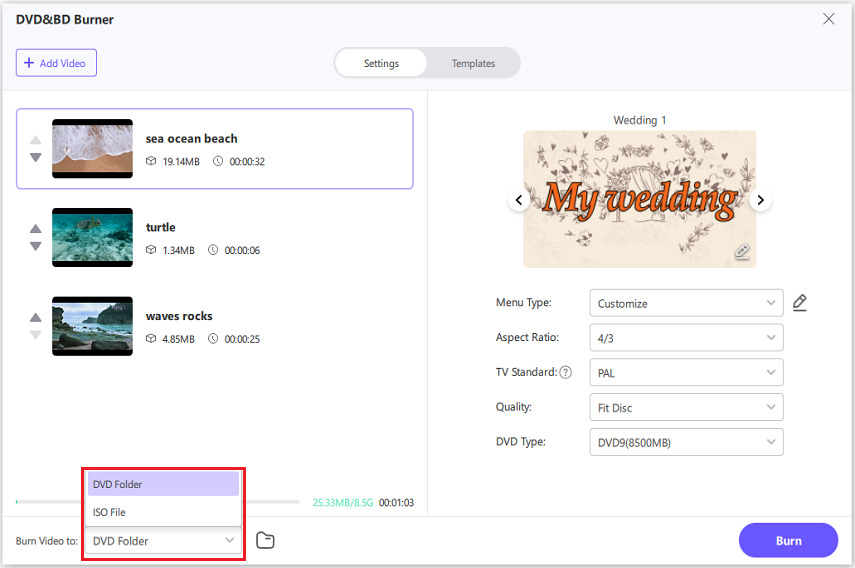
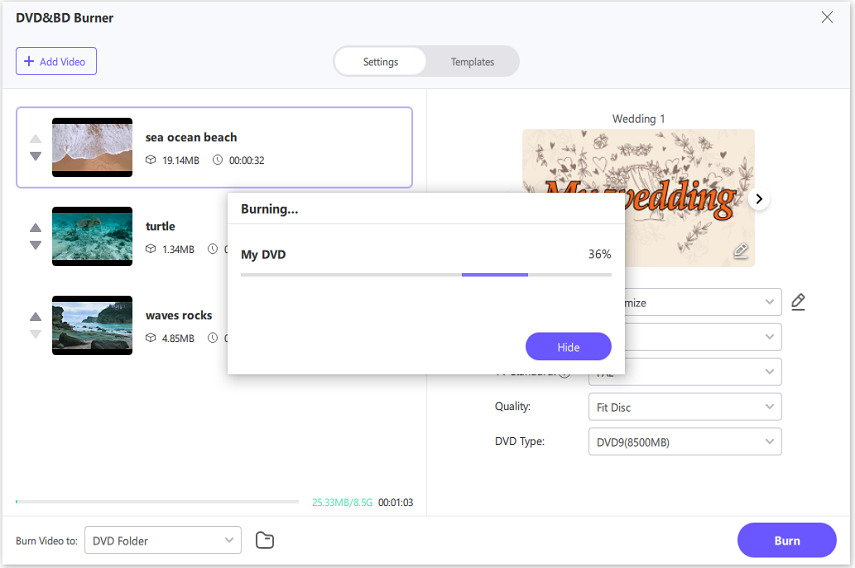
HitPaw Univd is a user-friendly and feature-rich tool that caters to macOS 10.13 and above users. With its DVD burner feature, you can quickly transform your iMovie videos into professional-looking DVDs. The software supports burning from over 1000 video formats to DVD disc, DVD folder and ISO file.
Not only does HitPaw Univd provide a smooth DVD-burning experience, but it also offers stylish DVD templates to make your DVDs stand out. Choose from a beautifully designed menu to give your DVD a polished and personalized touch.
The Benefits of HitPaw Univd for DVD Burning:
- Easy and Intuitive: HitPaw Univd boasts a simple interface that even beginners can navigate effortlessly. Burn your iMovie videos to DVD with just a few clicks.
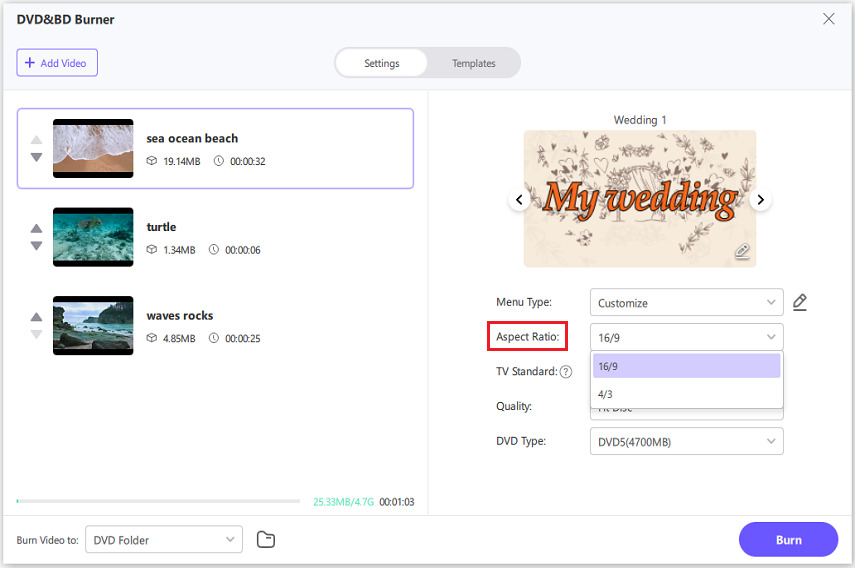
- Versatile DVD Settings: Customize your DVD label, select the aspect ratio (16:9 or 4:3), and choose TV standard (NTSC or PAL) to match your preferences and region.
- Flexible DVD Quality and Type: Adjust the quality according to your requirements. Select between DVD-5 and DVD-9 for different storage capacities.
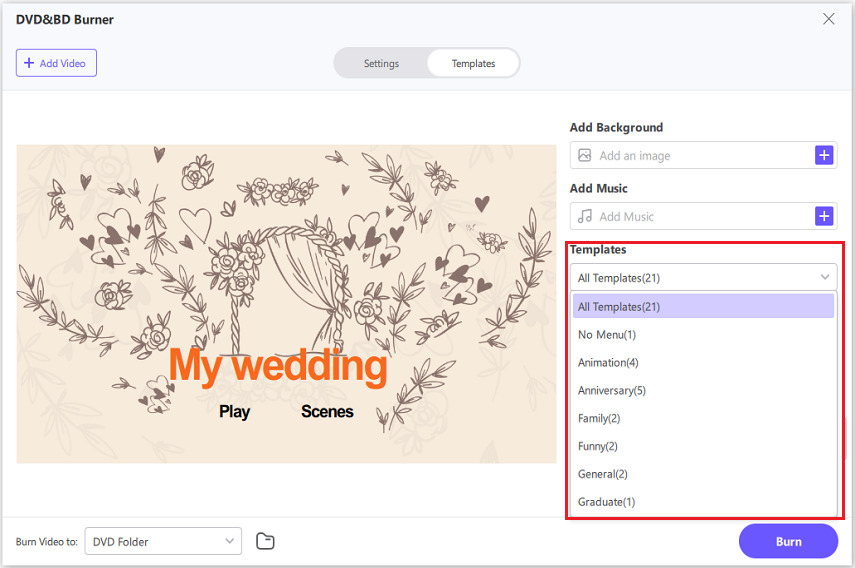
- Stunning DVD Templates: Personalize your DVD with various templates and options, including background customization, background music, and DVD title editing.
Step-by-Step Guide to Burn iMovie to DVD with HitPaw Univd
Free install HitPaw Univd to Mac, and follow the guide below to burn a DVD from iMovie videos.
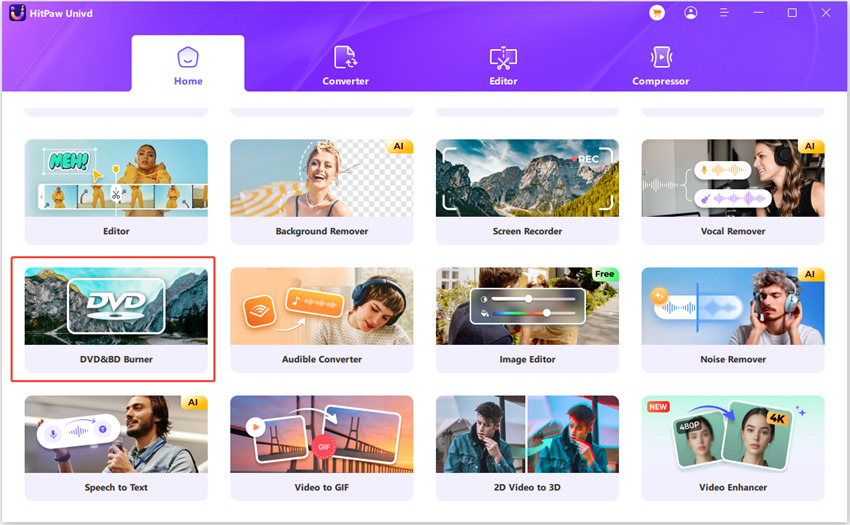
Step 1: Launch HitPaw Univd after installation, and select the DVD Burner feature from the Toolbox.

Step 2: Add your iMovie videos to the HitPaw DVD Burner interface by dragging, dropping, or using the Add button.

Step 3: Customize your DVD settings, including label, aspect ratio, TV standard, quality, and type.

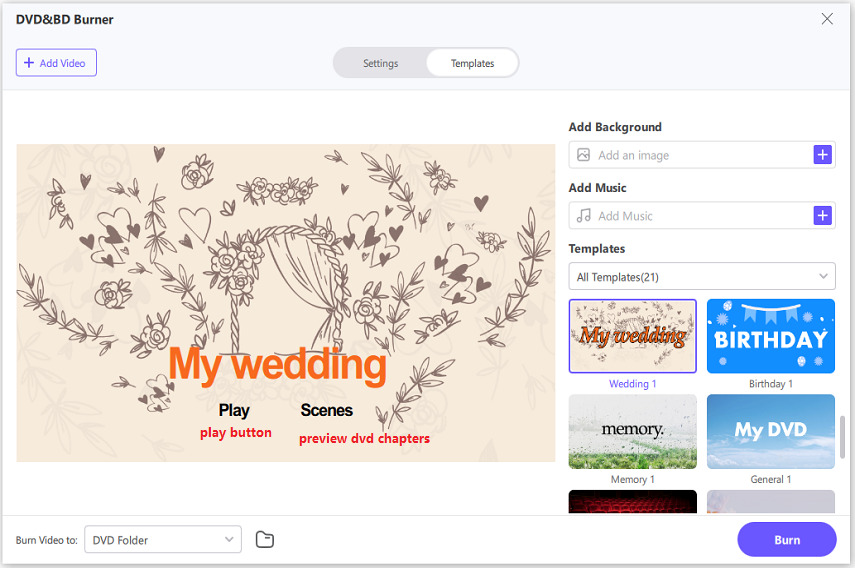
Step 4: Explore the Templates tab, choose a preferred DVD template, and customize it according to your style.

Step 5: Preview your DVD slideshow easily, playing through scenes and chapters.

Step 6: Select your desired output file type - DVD, DVD Folder, or ISO File.

Step 7: Click the Burn button to initiate the speedy DVD-burning process.

With HitPaw Univd, burning iMovie to DVD without iDVD has never been more accessible. This powerful video converter also supports burning DVD on Windows.
Part 3. Other Alternative Ways to Burn DVDs from iMovie on Mac
1. How to burn iMovie to DVD with Finder
Although iDVD has been discontinued on Mac, users can still burn video to DVDs using Finder on macOS versions later than 10.13. While this method is convenient, it's important to note that Finder burns data DVDs that may not play on regular DVD players. Instead, they typically work on computers or modern DVD players that support data DVDs.
If you want to burn an iMovie video to DVD without iDVD, follow this step-by-step tutorial using Finder:
You will need:
- A blank DVD-R or DVD-RW disc
- A Mac computer with a built-in DVD drive or an external disc drive
- Insert the blank DVD-R or DVD-RW into the Mac's DVD drive.
- Open Finder and select the blank DVD from the left side of the window. It will usually be named "Untitled DVD."
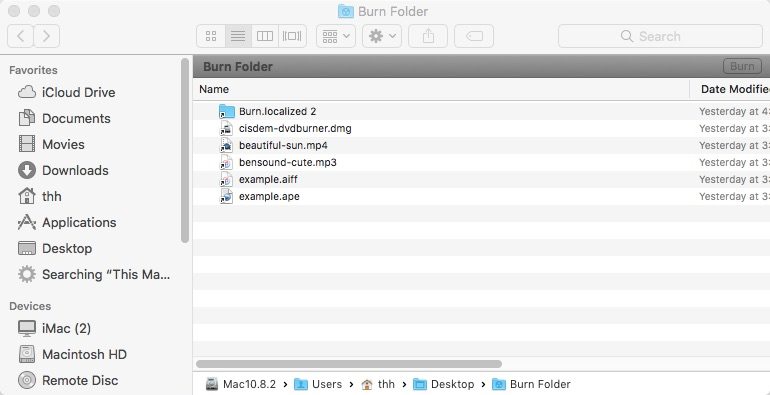
- Click on the DVD icon to open it. Copy the iMovie video you want to burn and paste it into the DVD folder.
Click "File" in the upper-left menu bar, and a drop-down menu will appear. Select "Burn to Disc" from the menu. You can change the DVD name in the pop-up window and select a burn speed. Once you've made the desired changes, click the "Burn" button to export the iMovie video to DVD.

Keep in mind that the duration of the data DVD will be limited to around 20 minutes due to its capacity of 4.7GB, which is the standard size of a DVD-R disc. Additionally, remember that data.
2. Burn iMovie Project to DVD with Burn for Mac
With Burn for Mac, you can easily export your iMovie videos to various discs, with interactive menus and top-notch quality. This user-friendly app offers advanced options, allowing you to personalize your DVD with file permissions, disc icons, and file dates.
Before you get started, make sure you have the following:
- A blank DVD
- A Mac computer (with an external disc drive if necessary)
- Burn for Mac app
1. Launch Burn on MacBook and Set Up the Project
After installing Burn for Mac, open the application and click on the video tab. You can name your DVD and select "DVD" from the pop-up menu to ensure compatibility.2. Add the iMovie Video to the Project
Click the "+" button and add your iMovie video to the list with a simple drag-and-drop. The best part? Burn for Mac supports most video formats, so you don't need to worry about compatibility. If the format is not supported, the app will handle the conversion.3. Burn Your iMovie Project to DVD
Insert a blank DVD into your Mac's disc drive and click the Burn button in Burn for Mac. Relax as the app works magic, converting and burning your iMovie project to a high-quality DVD.
FAQs
Q1. What is the best software to burn iMovie to DVD?
A1.
Regarding burning iMovie projects to DVD, several options are available. Some popular methods include using macOS's built-in iDVD application or third-party software like Burn or Wondershare DVD Creator. However, for a seamless and efficient experience, we highly recommend HitPaw Univd.
With HitPaw Univd, you can easily convert your iMovie projects to DVD format without compromising quality. It's user-friendly interface and powerful features make it the perfect choice for beginners and experienced users. Say goodbye to complex processes and enjoy hassle-free DVD burning with HitPaw Univd.
Q2. What is the Difference between Data DVD and Video DVD?
A2.
Data DVDs and Video DVDs serve different purposes and have distinct formats. A Data DVD is primarily used for storing various files, such as documents, photos, or music. It functions similarly to a USB drive and allows easy file transfer and storage.
On the other hand, a Video DVD is specifically designed for video playback on DVD players or computers. It uses a specific format known as MPEG-2 and typically contains video content in DVD-compliant structures. Unlike Data DVDs, Video DVDs are not designed for general file storage but for the seamless playback of video content on compatible devices.
The Bottom Line
Mastering the art of burning iMovie projects to DVD on Mac opens up a world of possibilities. The tools and instructions provided in this guide are here to assist you every step of the way. Now, you can seamlessly play your creations on DVD players, distribute them to family and friends, and cherish the joy of sharing your work in physical form.
Additionally, having physical copies is a reliable backup, ensuring your hard work is safe and secure. For the best DVD-burning experience without iDVD, we highly recommend using HitPaw Univd. This powerful and user-friendly tool will elevate your DVD-burning process to new heights.






 HitPaw Edimakor
 HitPaw VikPea (Video Enhancer)


Share this article:
Select the product rating:
Joshua Hill
Editor-in-Chief
I have been working as a freelancer for more than five years. It always impresses me when I find new things and the latest knowledge. I think life is boundless but I know no bounds.
View all ArticlesLeave a Comment
Create your review for HitPaw articles