4 Ways to Burn DVD on Windows 10 with or without Software
Burning DVDs on Windows 10 involves copying digital media to a blank DVD-R or DVD-RW. Generally, people create DVDs to back up their important files or data, create movies, store music, or archival data. However, before you start with DVD Burning on Windows 10, you should identify your requirements and the options available. For instance, you might need to burn a DVD without software or with software. This guide will walk you through the steps required to burn DVDs on Windows 10 with or without software. So, let's get started and learn how to burn DVDs on Windows 10!
Part 1. What Does Burn DVD Mean?
So, do you want to know what "burn a DVD" means? Well, it's not as complicated as you may think. Essentially, burning a DVD is the process of copying digital information from your computer onto a DVD disc. This allows you to store data and watch movies, listen to music, and play games on your DVD player or computer.
On the other hand, ripping a DVD refers to the process of extracting digital information from a DVD to your computer's hard drive.
Now, let's delve into the specifics of how to burn a DVD in Windows 10, with or without software. Whether you're a beginner or a seasoned pro, we've got you covered!
Part 2. How to Burn DVD on Windows 10 Free without Third-party Software
Are you looking for a way to burn DVDs on your Windows 10 computer without having to download additional software? Well, look no further! Burning DVDs has become easier than ever — and now it’s free.
Here are two simple ways to burn discs with the tools already available to you on Windows 10. With these tips, not using third-party programs won’t be an issue at all, so keep reading if you want step-by-step instructions that will make burning DVDs quick and painless!
1. How to Burn DVD on Windows 10 Using File Explorer
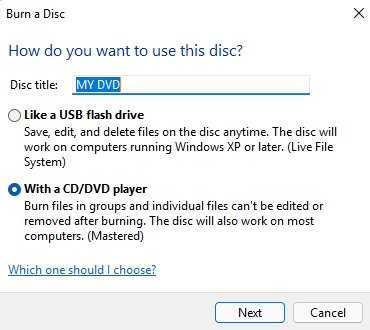
Windows File Explorer can help to burn DVD on Windows 10. There are two options - “Like a USB flash drive” and “With a CD/DVD player”.
Pros and Cons of using File Explorer:
The most significant advantage is that you don't need any additional software or tools to burn DVDs. You can easily drag and drop files to the DVD and get it burned in just a few clicks. On the other hand, File Explorer doesn't offer as many options as the dedicated burning software. You can't create menus or chapters or customize the burning settings like speed or quality.
The Steps to Burn a DVD on Windows 10 using File Explorer using “Like a USB flash drive” option:
The “Like a USB flash drive” option can save, edit and delete files on the disc anytime.
- Insert a blank DVD into your computer's DVD drive.
File Explorer will automatically open the "Burn a Disc" window. Give a name to your disc and choose the first option - "Like a USB flash drive".

Click "Next," and the DVD will be formatted and prepared for burning.
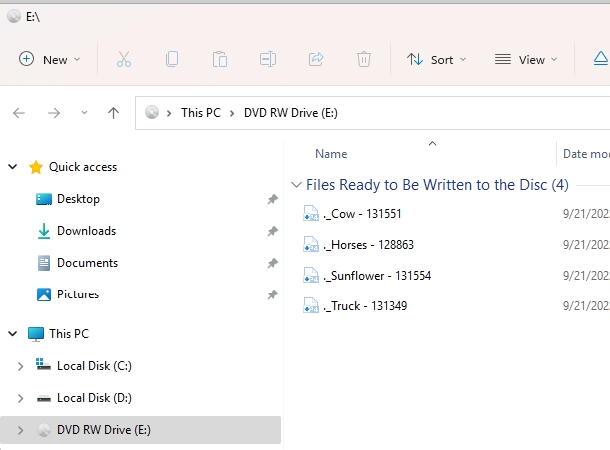
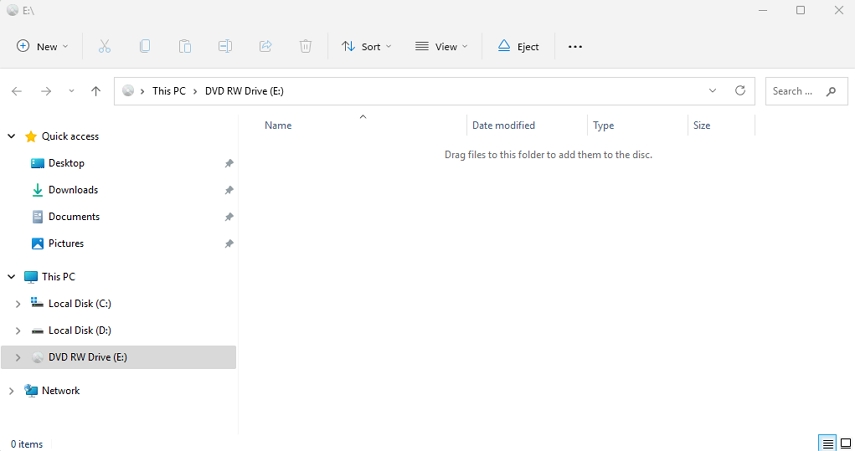
Once the formatting is complete, a new window will appear. Simply drag and drop the files you want to burn into the DVD drive.

The Steps to Burn a DVD on Windows 10 without Software using “With a CD/DVD player” option:
The “With a CD/DVD player” option will burn files in groups and individual files can’t be edited or recovered after burning.
- Insert a blank DVD into your computer's DVD drive. The File Explorer will automatically open the "Burn a Disc" window. Choose “With a CD/DVD Player”.
In the next window, add videos to the target location. A prompt - "You have files waiting to be burned to disc" from Windows Explorer will pop up.

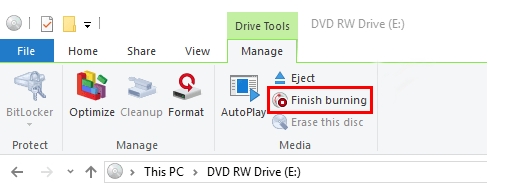
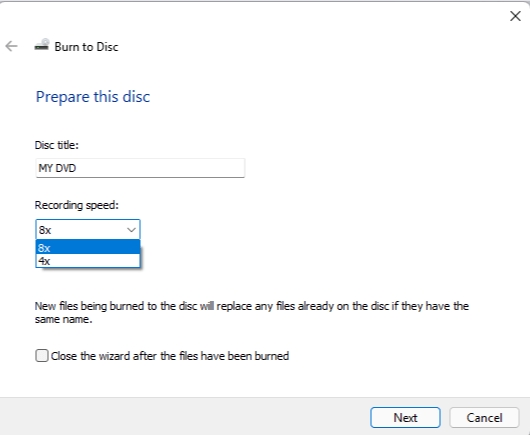
Tap on “Drive Tools” from the menu tabs and click “Finish burning” option to activate the “Burn to Disc” Window.

Choose a recording speed as 4X or 8X.

- Click the Next button to send all files to the disc for burning. After finishing, the disc will drop out from the optical drive automatically.
2. Windows Media Player -Free DVD Burning Software for Windows 10
Windows 10 has an in-built DVD burning tool in Windows Media Player that enables you to create DVDs for free without the need for third-party software.
Features and Pros:
- Windows Media Player is an excellent option for burning DVDs as it has a range of features, including:
- Supports burning a large number of files up to 4.7 GB to a DVD 5 disc and 8.5 GB to a DVD 9 disc.
- Allows you to burn many music files, pictures, and videos in different formats.
- Easy to use.
Step-by-Step Guide to Burn DVDs using Windows Media Player
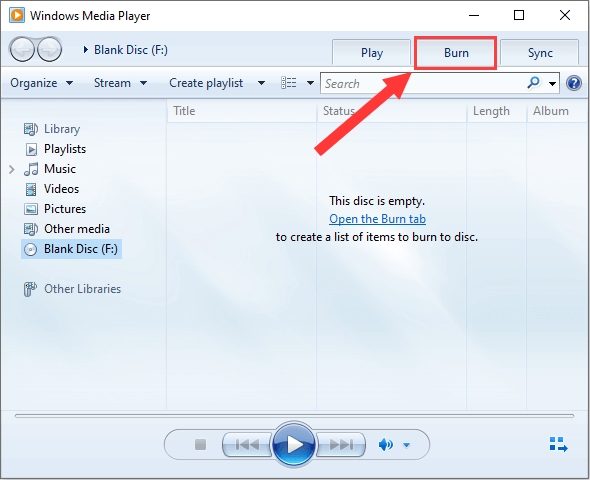
- Insert a blank DVD disc into the DVD drive of your computer and open Windows Media Player.
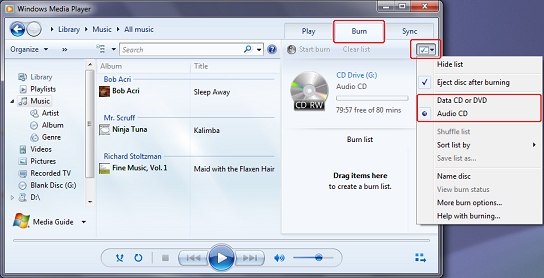
Click the "Burn" tab at the interface's top-right corner.

- Drag and drop all the files you wish to burn to the DVD in the burn list section.
- Check the capacity of the left side of the screen to ensure that all chosen files will fit onto the disk.
Under the "Burn options" icon, select "Data DVD."

- Click the "Start Burn" button to initiate the burning process.
Part 3. HitPaw Univd (HitPaw Video Converter) -Burn Any Video to DVD with Stylish Menu
Burning DVD on Windows 10 without software is possible. The free tools don’t support all video files and don’t provide customize choices. HitPaw DVD Burner is a professional DVD burning software that supports 300+ video formats and create DVD menu fast and stylish.
Highlights of DVD Burner Feature in HitPaw Univd
- Burn videos to DVD disc, DVD folder and ISO file
- Supports 300+ formats including MP4, AVI, MOV, TS, etc.
- Burn videos with high quality and fast speed
- Built-in DVD templates and menus to personize your DVD
- Customize DVD menu by changing background image, music, and text
- Support both Windows and Mac systems
How to Burn a DVD in Windows 10 using HitPaw Univd
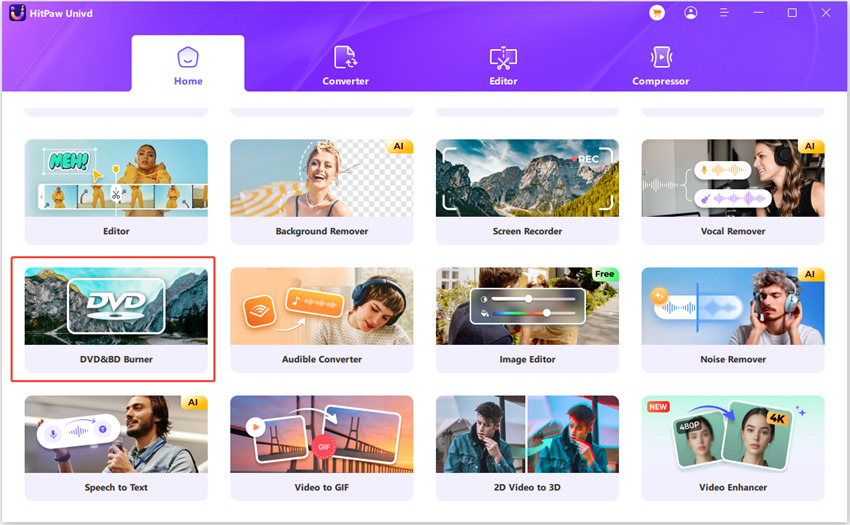
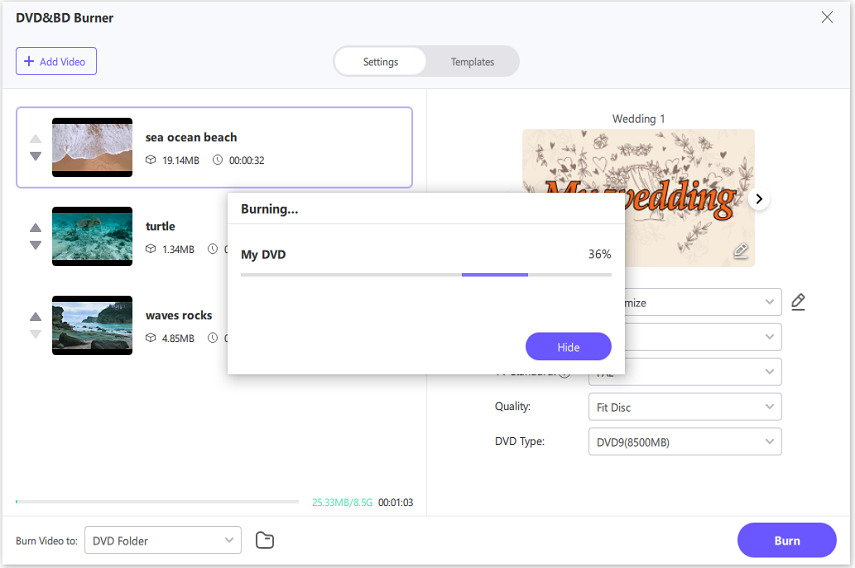
Step 1. Free install HitPaw Univd to computer, and select DVD Burner feature from the Toolbox.

Step 2. Click Add Video to add videos to the program.

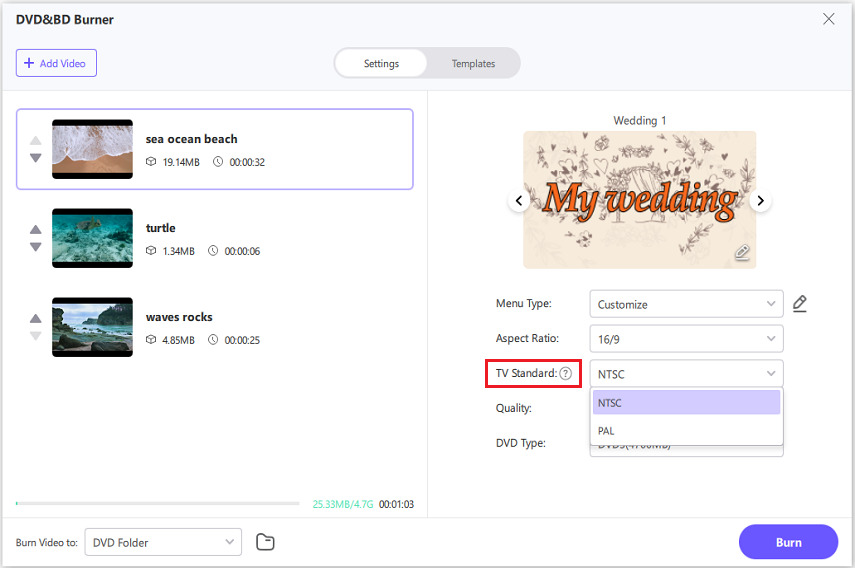
Step 3. You can set up DVD label, menu type, aspect ratio, TV standard and quality of the target DVD or DVD folder/ISO.

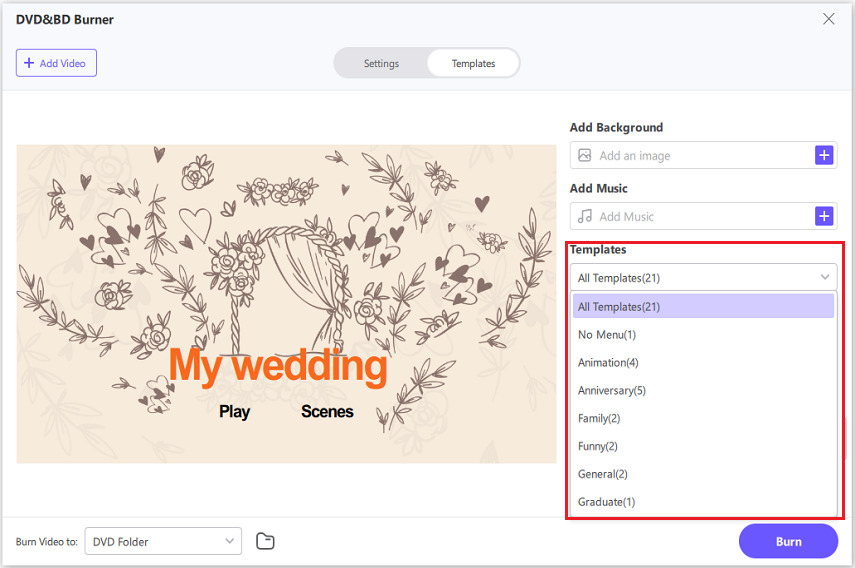
Step 4. In the Templates, you can select a DVD template from the drop-down options.

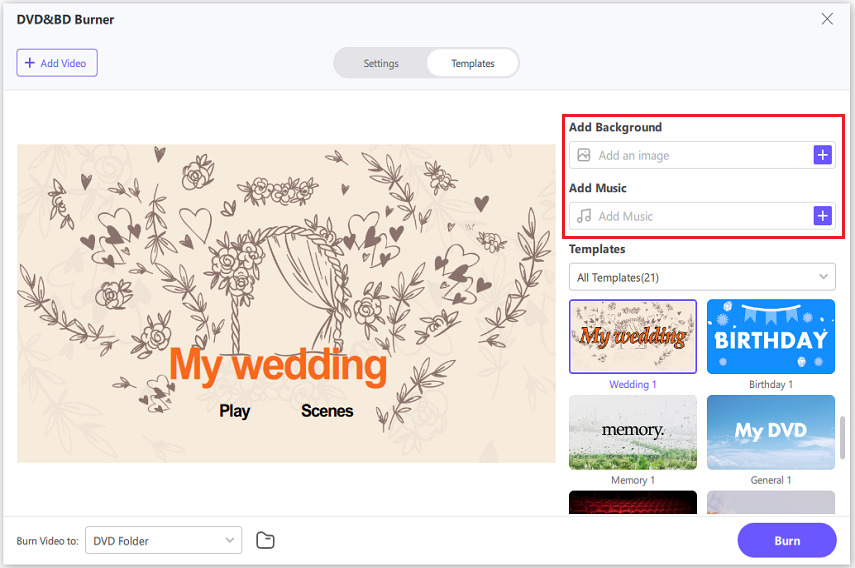
Step 5. You can change background image, and add background music for the disc.

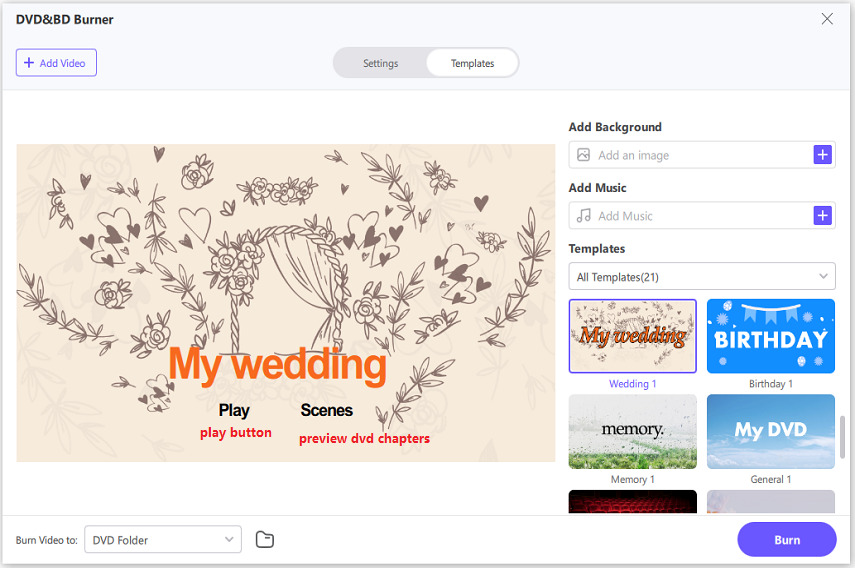
Step 6. Preview DVD before burning.

Step 7. Finally, back to the home page and click the Burn button to start burning DVD in Windows 10.

In addition to burn videos to DVD, HitPaw Univd also supports converting DVD to digital, converting videos, audio, images, downloading videos from online sites, and even AI tools.
Part 4. How to Burn a DVD on Windows with Command Prompt
If you have an ISO file, you can burn ISO to DVD on Windows 10 using Command Prompt. This method is not suitable for those who are not familiar with command lines.
Step-by-Step Guide:
- Click the "Start" button on your computer and type "CMD" in the search bar. Select "Command Prompt" from the list.
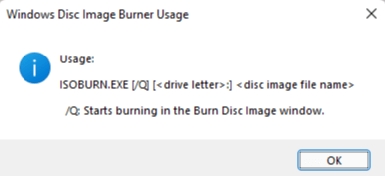
In the Command Prompt window, type "isoburn" or "isoburn.exe" to get a syntax guide for the "Windows Disc Image Burner" utility.

- Once you're familiar with the usage, type in your syntax. For example, if you want to burn an ISO file named "My_DVD.iso," located in the file path "C:\Users\Administrator\Desktop\iso-image," onto a DVD with the drive letter "e:", your syntax would be: "isoburn /q e: C:\Users\Administrator\Desktop\iso-image\My_DVD.iso."
- Press "Enter" to start the burning process and wait for the Windows Disc Image Burner utility to finish.
- Once completed, you'll have a newly burned DVD ready for use.
It's important to note that this method is only suitable for burning ISO images to DVD and is only supported in Windows 7 and above. If you're uncomfortable using the Command Prompt, other, simpler DVD-burning software options are available for download or purchase. With this simple guide, though, burning a DVD on your Windows computer needn't be daunting.
The Bottom Line
In conclusion, burning a DVD in Windows 10 does not need to feel intimidating or overly complicated. The built-in tools like File Explorer and Windows Media Player can burn videos to DVD without software. The drawbacks of these tools are that they support limited video formats, does not have stylish DVD menu and have relatively slow speed.
On the contrast, a professional DVD burning software like HitPaw Univd can burn any videos to DVD on Windows 10/11/8/8.1 or Mac systems in a several clicks. It provides stylish DVD templates and fast DVD burning speed.





 HitPaw Edimakor
 HitPaw VikPea (Video Enhancer)



Share this article:
Select the product rating:
Joshua Hill
Editor-in-Chief
I have been working as a freelancer for more than five years. It always impresses me when I find new things and the latest knowledge. I think life is boundless but I know no bounds.
View all ArticlesLeave a Comment
Create your review for HitPaw articles