[Detailed Guide] How to Convert WAV to MP3 Using VLC?
Have you ever come across a situation where you have an audio file in WAV format, but your device or media player only supports MP3? Or maybe you have a collection of music files in WAV format that takes up too much storage space.
Well, fret not because VLC Media Player has got your back! In this article, we will guide you on how to convert WAV to MP3 VLC Media Player, and also provide you with an alternative solution that offers faster processing speed and better audio quality.
Part 1. How to Convert WAV to MP3 Using VLC?
VLC Media Player is a popular open-source media player that not only supports various audio and video formats but also offers features like conversion and streaming. Converting WAV to MP3 VLC player is a common query among users seeking to manage their audio files efficiently.
Here are the steps on how to convert WAV to MP3 using VLC.
Step 1: Launch VLC Media Player
Open VLC on your computer by double-clicking on its desktop icon or searching for it in the Start menu. If you don't have VLC installed, you can download and install it from the official website.
Step 2: Add WAV files to VLC
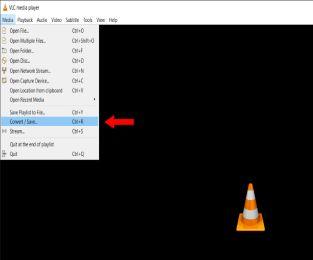
Click on the "Media" tab in the top menu bar and select "Convert/Save" from the drop-down menu. Alternatively, you can use the shortcut key combination of "Ctrl + R".

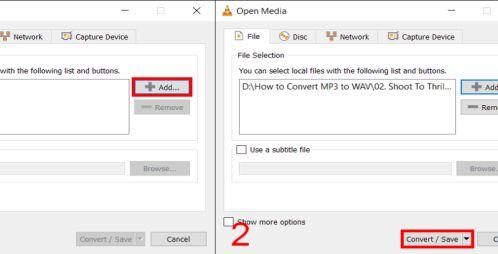
In the new window that opens, click on the "+Add" button and browse for your WAV file(s). You can also drag and drop the files into the window.

Step 3: Choose MP3 as the Output Format
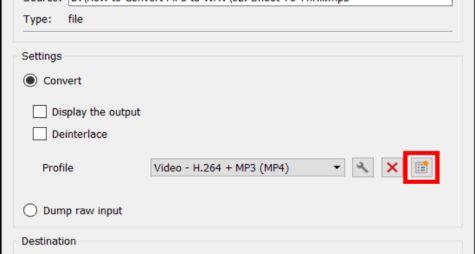
Under "Profile," select "Audio - MP3" from the list of output formats. If you want to change the destination folder or file name, click on the "Browse" button next to it and make the necessary changes.

Step 4: Start Conversion
Click on the "Start" button at the bottom of the window to start the conversion process. You can also choose to convert multiple files in batch mode by selecting "Convert/Save Multiple" under the "Media" tab.
Step 5: Wait for Conversion to Complete
The time taken for conversion will depend on the size and number of files being converted. As the process is completed, you will see a notification at the bottom of the VLC window.
Step6: Access Converted MP3 File
Navigate to the destination folder you specified earlier to find the converted MP3 file. You can now play or use the MP3 file as needed.
That's it! You've successfully used VLC to convert wav to mp3.
Part 2. Pro-Tips. The Best Alternative to VLC Convert WAV to MP3
While VLC is a reliable option for converting WAV files to MP3, some users may experience longer loading speeds and lower audio quality. To overcome these limitations, we recommend using HitPaw Univd (HitPaw Video Converter) as an alternative solution.
This powerful software offers faster processing speed, higher conversion quality, and a user-friendly interface. It also provides a range of editing tools to enhance your audio.
Why Choose HitPaw Univd to Convert WAV to MP3
- Advanced algorithms ensure that your WAV files are converted to MP3 in the shortest time possible.
- No loss in audio quality during the conversion process. It also allows you to manually adjust the bitrate, sample rate, and other audio settings for a personalized experience.
- Offer batch conversion, allowing you to convert multiple files simultaneously.
- A user-friendly interface that makes navigation and operation intuitive for users of all levels.
- Equipped with a comprehensive toolbox that enables users to edit their audio files effortlessly.
Steps on How to Use the Alternative to VLC Convert WAV to MP3
Follow these steps to convert your WAV files to MP3 using HitPaw Univd:
Step 1: Download and Install HitPaw Univd
Download and install HitPaw Univd on your computer from its official website.
Step 2: Add WAV files to the Software
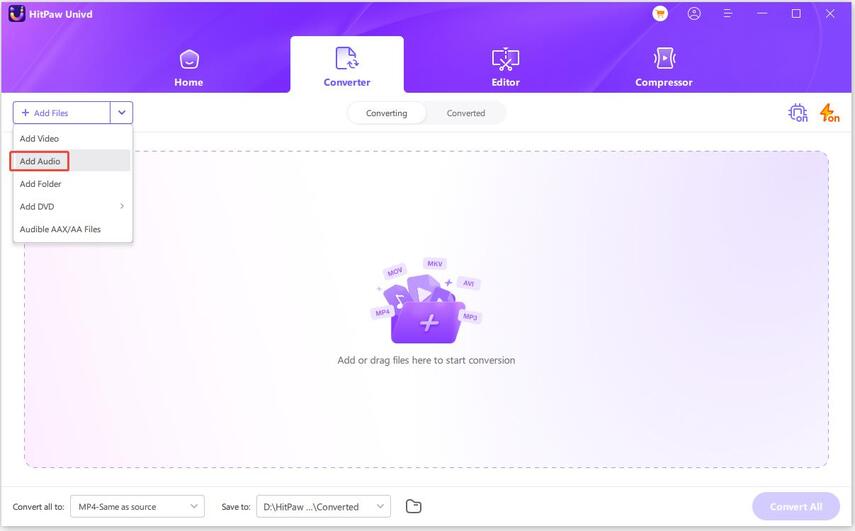
Click on the "Add Files" button in the top left corner, and select your WAV file(s) from your computer. You can also drag and drop the files directly into the software window.

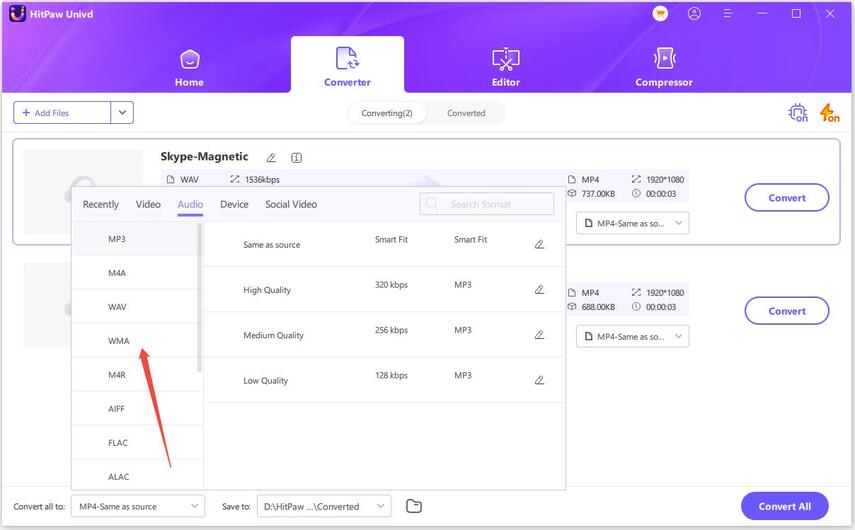
Step 3: Choose MP3 as Output Format
On the bottom right of the screen, select "MP3" as the output format from the drop-down menu. If you want to make any edits to your audio file, click on the "Edit" button next to your added file. You can trim, merge, add effects, or adjust the volume and other settings.

Step 4: Start Conversion
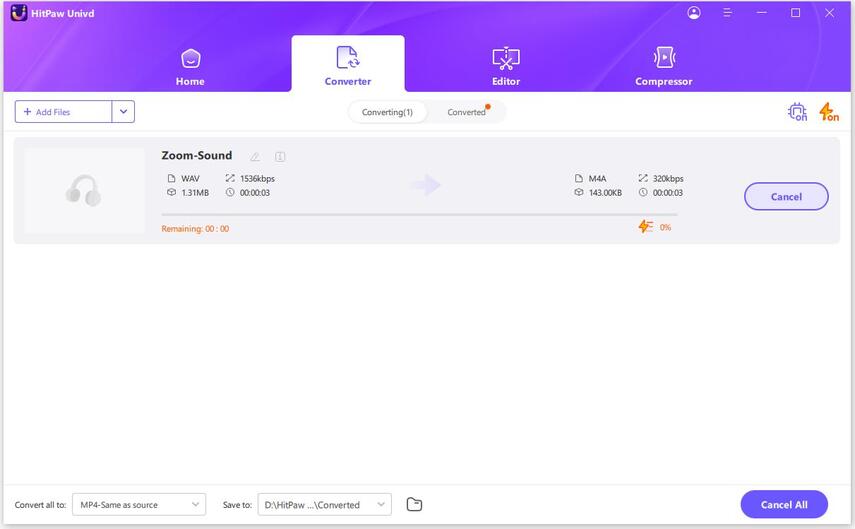
Click on the "Convert" button at the bottom of the screen to start the conversion process. As it completes, you will see a notification on your screen. Once the conversion is done, click on the "Open Folder" button to locate and save your converted MP3 file(s) in your desired destination folder.

Part 3. FAQs of Convert WAV to MP3 VLC
Q1. Why is my VLC not converting to MP3?
A1. VLC might not be converting to MP3 due to several reasons. Firstly, ensure that you have the necessary codecs installed for MP3 conversion. Additionally, verify that the file you're trying to convert is supported by VLC. Sometimes, corrupted files or unsupported formats can cause conversion issues. Lastly, check if there are any conflicting settings or configurations in VLC that might be preventing the conversion process.
Q2. Does VLC support DTS audio?
A2. Yes, VLC does support DTS audio. However, DTS audio might not be directly compatible with certain devices or file formats. In such cases, VLC might require additional plugins or codecs to properly decode and play DTS audio files.
Q3. How to convert DTS to MP3?
A3. To convert DTS to MP3 using VLC, first, ensure that your VLC installation is equipped with the necessary codecs. Then, open VLC and navigate to Media > Convert/Save. In the "File" tab, click "Add" to select the DTS file you want to convert. Next, click on the "Convert/Save" button. In the Convert window, choose MP3 as the output format and specify the destination folder for the converted file. Finally, click "Start" to initiate the conversion process. Once completed, you'll have your DTS file converted to MP3.
Conclusion
Converting audio files from WAV to MP3 format can be efficiently accomplished using VLC Media Player or alternative software like HitPaw Univd.
While VLC offers a free and straightforward solution, HitPaw Univd stands out with its fast processing speed, high conversion quality, and additional editing features, making it a superior choice for those seeking optimal audio conversions.




 HitPaw Edimakor
 HitPaw VikPea (Video Enhancer)

Share this article:
Select the product rating:
Joshua Hill
Editor-in-Chief
I have been working as a freelancer for more than five years. It always impresses me when I find new things and the latest knowledge. I think life is boundless but I know no bounds.
View all ArticlesLeave a Comment
Create your review for HitPaw articles