Understanding HEIC Files on iPhone: What's It and How to Change
In the ever-evolving realm of smartphone photography, iPhones have become more than just communication devices. They have transformed into powerful pocket-sized studios, empowering users to capture life's fleeting moments with breathtaking detail and vivid colors.
This guide dives into the world of HEIC files on iPhones, equipping you with the knowledge and tools to optimize your photo management. Whether you're a seasoned photographer or a casual user, understanding HEIC files will enable you to unlock the full capacity of your iPhone's camera and go to the ever-changing digital landscape with confidence.

Part 1: What are Apple HEIC Files?
HEIC files, short for High-Efficiency Image Container, represent a modern image format adopted by Apple devices, particularly iPhones, starting with iOS 11. This format utilizes advanced compression techniques, resulting in significantly smaller file sizes compared to the traditional JPEG (Joint Photographic Experts Group) format.
This translates to increased storage capacity on your iPhone, allowing you to capture and store more photos without encountering space limitations. Beyond the size reduction, HEIC files offer several advantages over JPEGs. Additionally, HEIC files support advanced features not possible with JPEGs, such as transparency (allowing for the creation of images with invisible backgrounds) and the capacity to store multiple images in a single file (useful for capturing burst photos or creating animated GIFs).
Part 2: The Significance of iPhone Photos HEIC Files on Photography

The adoption of HEIC files on iPhones significantly enhances the overall photography experience. By offering smaller file sizes and higher image quality, HEIC files allow you to capture more precious moments without compromising on detail or storage limitations.
This is particularly beneficial for users who frequently capture high-resolution photos or those with limited storage space on their devices. Furthermore, HEIC files maintain superior color depth and detail compared to JPEGs, especially in areas with subtle color variations or intricate patterns.
Beyond the technical advantages, HEIC files offer increased compatibility with various editing and sharing platforms. As the format gains wider adoption, more platforms are incorporating HEIC support, ensuring seamless sharing and editing of your photos across different applications and devices.
Part 3: How to Convert iPhone Photo HEIC to Other Compatible Formats
While HEIC files offer numerous benefits, there might be situations where you need to convert them to other formats for compatibility reasons. Here, we explore two reliable methods for converting HEIC files on iPhones.
1.Leveraging the Power of HitPaw Univd (HitPaw Video Converter)
For unparalleled efficiency and versatility, consider utilizing HitPaw Univd. This software transcends simple conversion, offering a comprehensive suite of features to enhance your multimedia experience. HitPaw Univd boasts a user-friendly interface and lightning-fast conversion speeds, making it ideal for even the most novice users.
Here's a simplified guide to converting HEIC files using HitPaw Univd:
-
1.Download and install the HitPaw Univd on your computer.
-
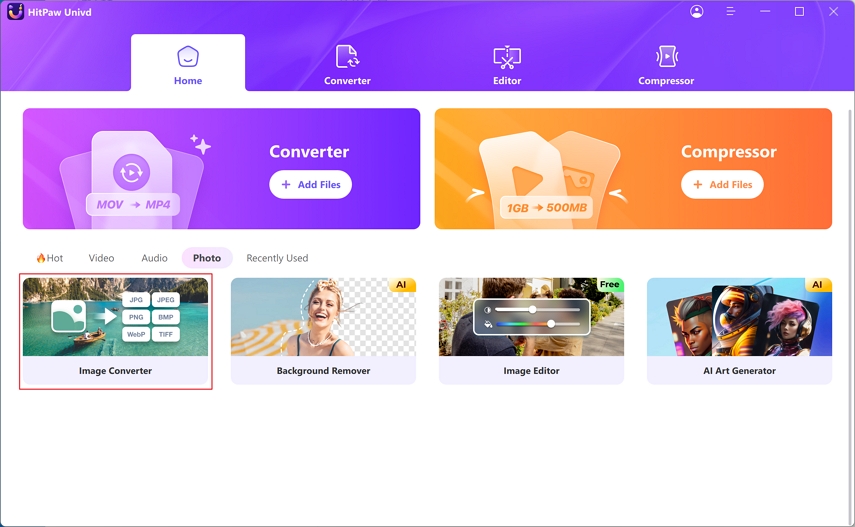
2.Launch the program, then choose the "Tool-Image Converter" tab.

-
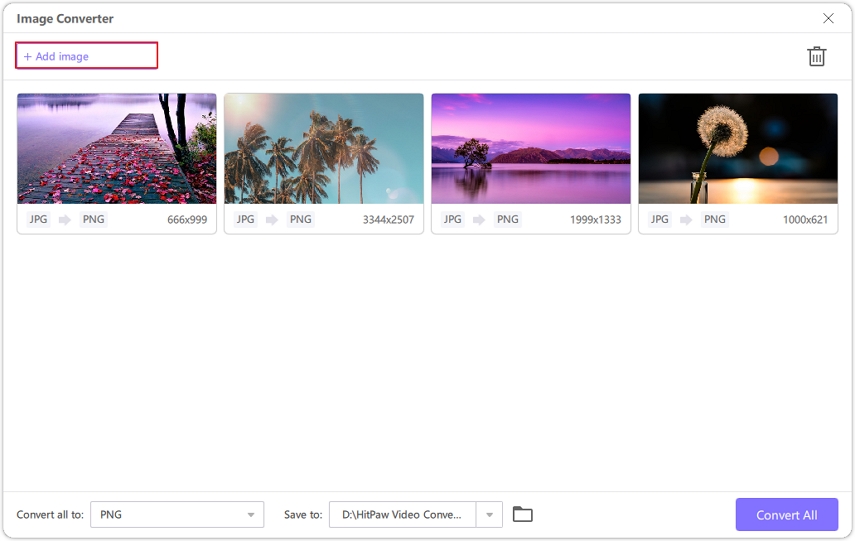
3.To choose HEIC files for conversion, click the "Add Files" button.

-
4.From the "Output Format" option, select the output format that you want. With its broad format support, the HitPaw Univd may be used with almost any platform or program.

Beyond HEIC conversion, HitPaw Univd unlocks a spectrum of possibilities, offering functionalities like video editing, video downloading, and screen recording, making it a valuable addition to your digital toolkit.
2.Utilizing the Convenience of an iPhone App
For on-the-go conversion needs, an alternative method involves using a dedicated HEIC converter app directly on your iPhone. Several reliable options are available on the App Store, offering a convenient solution for quick conversions. Here's a basic outline of how to convert HEIC files using an iPhone app (the specific steps might vary slightly depending on the chosen app):
- 1.Download and install the recommended HEIC converter app on your iPhone.
- 2.Open the app and select the HEIC file you want to convert.
- 3.Choose the output format from the available options.
- 4.Tap the "Convert" or similar button to initiate the process. The app will display the progress and notify you once the conversion is complete.
Part 4: How to Turn off HEIC on iPhone?
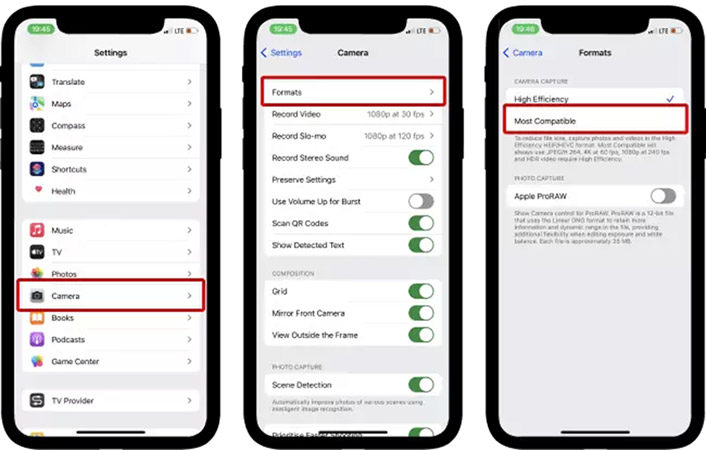
While HEIC files offer numerous advantages, there might be situations where you prefer to capture photos in the traditional JPEG format. Fortunately, iPhones provide the option to disable HEIC capture and revert to JPEG. Here's how to do it:
- 1.Open the "Settings" app on your iPhone.
- 2.Scroll down and tap on "Camera."
- 3.Under the "Formats" section, choose "Most Compatible" instead of "High Efficiency." This setting will ensure your iPhone captures photos in JPEG format going forward.
Conclusion
By understanding the HEIC format and its functionalities, you're equipped to optimize your iPhone photography experience. HEIC files offer smaller file sizes, superior image quality, and advanced features, making them a valuable asset for capturing and storing your precious memories.
Whether you leverage the versatility of HitPaw Univd for efficient conversion or utilize a convenient iPhone app for on-the-go solutions, you have the tools to manage your HEIC files effectively. Remember, understanding and managing these formats empowers you to seamlessly capture, store, share, and edit your cherished moments, ensuring they remain vibrant and accessible for years to come.




 HitPaw Edimakor
 HitPaw VikPea (Video Enhancer)




Share this article:
Select the product rating:
Joshua Hill
Editor-in-Chief
I have been working as a freelancer for more than five years. It always impresses me when I find new things and the latest knowledge. I think life is boundless but I know no bounds.
View all ArticlesLeave a Comment
Create your review for HitPaw articles