6 Best Methods to Fix Grainy Video on Desktop and Mobile
Have you ever captured a beautiful moment only for it to turn out as a grainy video? Whether it's a concert, a family gathering, or a night-time scene, grain can ruin the clarity and quality of your footage. But don't worry! There are several methods available to help you remove grain from video and restore the sharpness and clarity you desire. In this post, we'll guide you through five effective methods to help reduce grain in video and make your footage look as clear as possible.
Part 1. What Causes Grain in Video?
Grain in video, often seen as a rough, blurry, or grainy look, typically appears when the camera fails to capture a clean, sharp image. There are several reasons behind this issue, which are often related to the settings used during filming.
- Low Light Conditions: When shooting in poor lighting, cameras struggle to capture enough light, leading to grainy footage.
- High ISO Settings: A high ISO setting increases the camera's sensitivity to light but also amplifies noise, causing grain.
- Small Camera Sensor: Cameras with smaller sensors tend to produce grainier footage, especially in low light.
- Low Video Resolution: Recording videos at a low resolution sacrifices quality, often resulting in pixelated or grainy images.
- Video Compression: When video files are compressed to reduce size, they lose detail, which can introduce grainy textures.
- Incorrect Camera Settings: Using a narrow aperture or a slow shutter speed can reduce the amount of light captured, causing grain to appear in the video.
Part 2. Fix Grainy Video with Video Enhancer Software
One of the best solutions to fix grainy video is to use a video enhancement tool like HitPaw Univd. This versatile software utilizes AI-powered video enhancement to remove grain and noise, significantly improving video clarity and sharpness. With its advanced models, it enhances details, reduces artifacts, and even supports upscaling to 4K resolution.
Features of HitPaw UniVD

HitPaw Univd - All-in-one Video Solutions for Win & Mac
Secure Verified. 254,145 people have downloaded it.
- Supports over 1000 formats including MP4, AVI, MOV, TS, etc.
- AI-powered video enhancement for superior quality improvement.
- Multiple enhancement models to choose from based on video quality.
- 4K resolution support for sharp, high-quality video output.
- Advanced noise reduction to eliminate grain and noise.
- Versatile toolbox: video converter, video compressor, speech to text, video editor, etc.
Secure Verified. 254,145 people have downloaded it.
Step-by-Step Guide to Remove Grain from Video
Step 1:Free download and install HitPaw Univd on your computer.
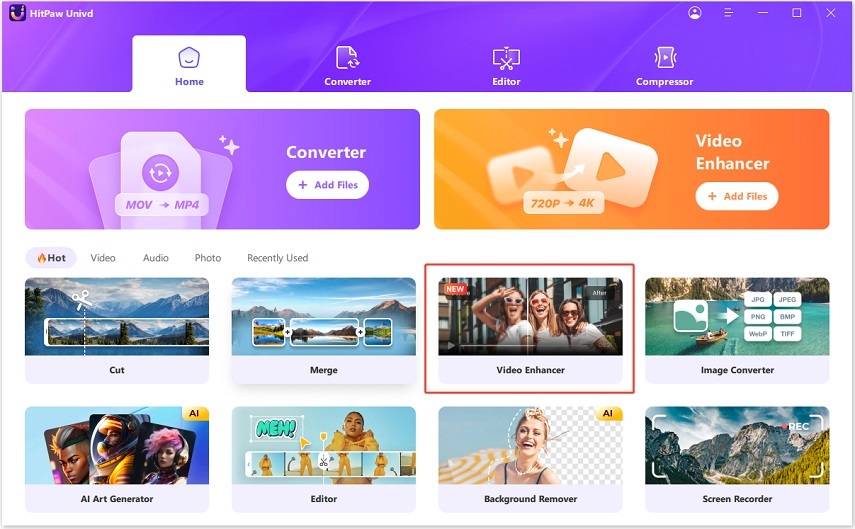
Step 2:Open the program and find the Video Enhancer feature on the main interface. Upload the video that you want to denoise.

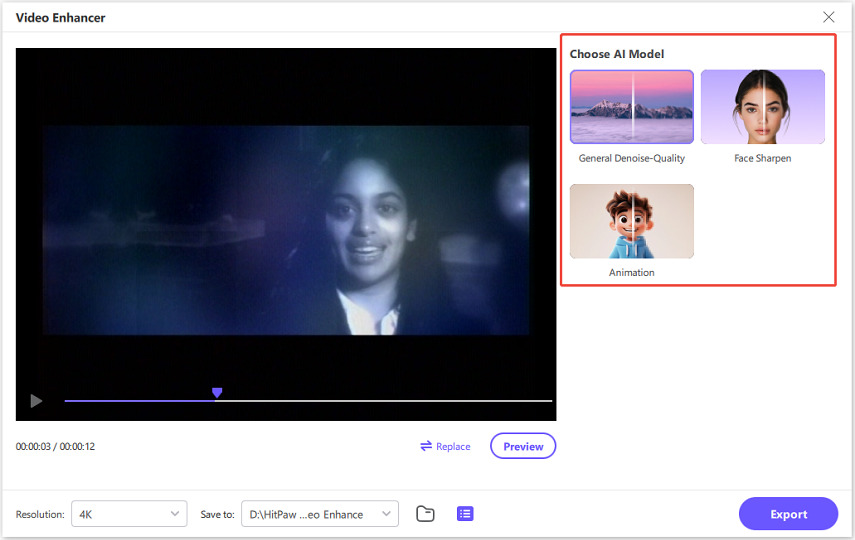
Step 3:To reduce grain in your video, select one of the multiple AI models provided by HitPaw Univd. You can choose the model that best fits your video to enhance its quality.

Step 4:After applying the effect, you can preview the first 45 frames of the improved video. Once you're satisfied with the results, click the "Export" button to enhane the entire video. You can also experiment with other AI models to further enhance details, such as colorizing or stabilizing the video.

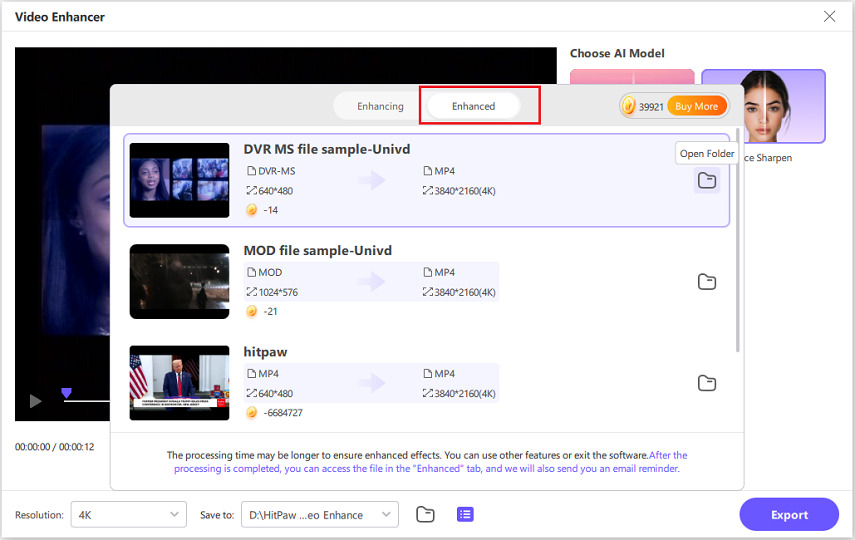
Step 5:When the enhancement process completes, you can find the cleaned-up video from the Enhanced tab.

Part 3. How to Fix a Grainy Video with Final Cut Pro On Mac
For Mac users, Final Cut Pro is a top-tier option for fixing grainy footage. It is a professional video editor known for its wide range of features. It comes with AI-based tools to enhance color and light automatically, plus effective noise reduction options to help you remove grain from video.
Step-by-Step to Reduce Grain with Final Cut Pro
Step 1:First, download Final Cut Pro from the Mac App Store and install it on your Mac.
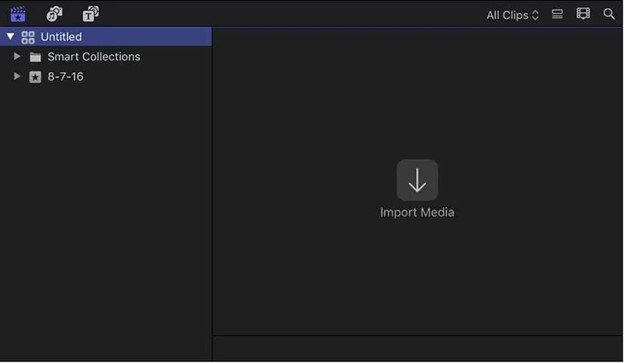
Step 2:Open the software and click on the Import Media button, or go to File > Import > Media to choose the grainy video you want to fix.

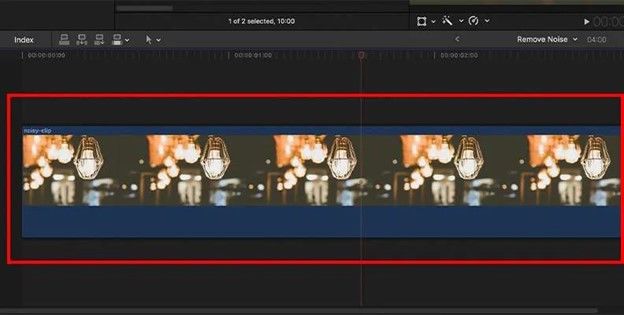
Step 3:Once the video is imported, drag it to the timeline to begin editing.

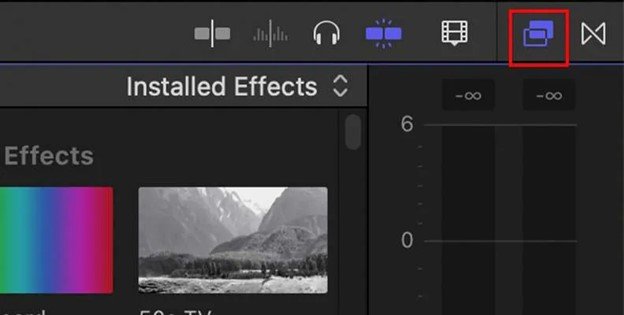
Step 4:In the timeline panel, click on the Effects button located at the top-right corner.

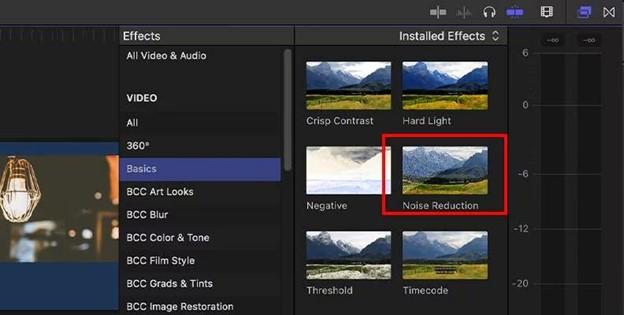
Step 5:Use the search bar to quickly find the Noise Reduction effect, or scroll through the available effects.

Step 6:Either double-click the effect to apply it or drag it directly onto the video in the timeline.

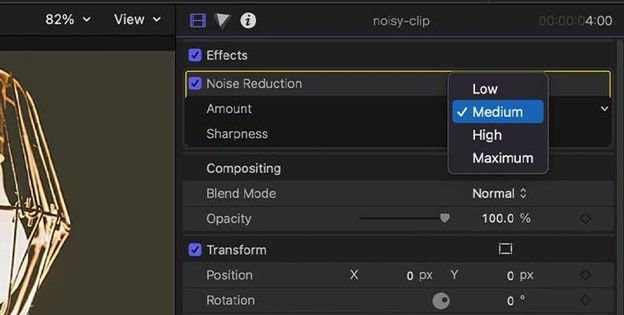
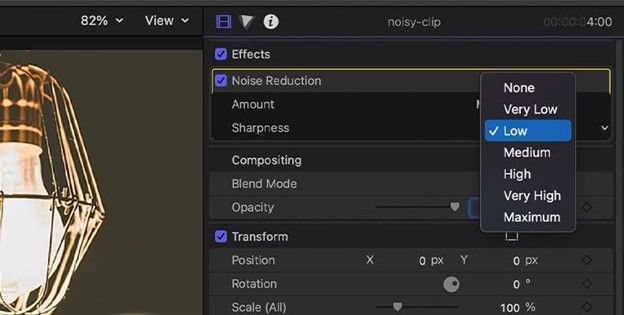
Step 7:Select the video clip in the timeline, then go to the Video Inspector on the right side. Under the Noise Reduction section, use the Amount drop-down menu to choose a level (Low, Medium, High, or Maximum). Higher settings will reduce more grain.

Step 8:Expand the Sharpness drop-down menu and adjust the sharpness to your preference, choosing from Very Low to Maximum. Once you're satisfied with the adjustments, hit the Export button to save your newly enhanced video.

Part 4. How to Reduce Grain in Premiere Pro
Premiere Pro is a professional video editing software from Adobe that offers a range of powerful features for both beginners and advanced editors. It includes tools for color correction, audio editing, and advanced visual effects, making it an excellent choice for improving the quality of your video.
Step-by-Step to Reduce Grain Video With Premiere Pro
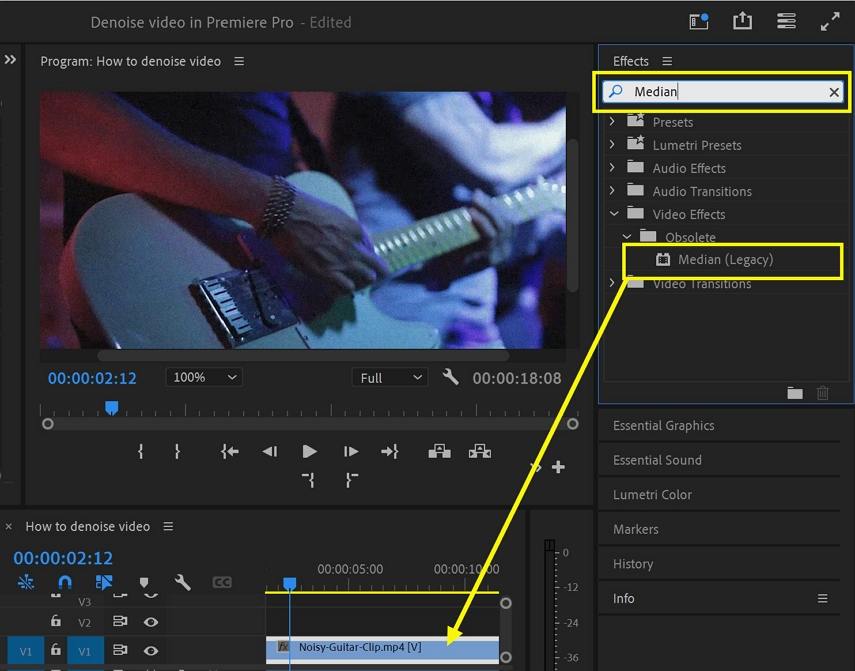
Step 1:To begin, add your footage to the Timeline and in the Effects panel, search for the Median effect. Once found, drag and drop it onto your clip.

Step 2:The next step is to mask the grainy parts of the video to apply the effect only where needed. In the Effect Controls panel, choose the best-suited mask shape, and use the Pen Tool to move the mask and adjust its size to cover the grainy areas.
Step 3:Finally, adjust the Median effect's Radius settings to fine-tune the amount of noise reduction. The Median effect blurs the grain, but you'll need to experiment with the Radius until you're satisfied with the look of the video. This way, the grain is reduced, and the clip remains natural and clean.
Part 5. How to Remove Grain from Video on an iPhone with Photo App
If you're using an iPhone, the Photos app provides a quick and simple way to reduce grain in video. While not as advanced as dedicated video editing tools, it's perfect for making basic adjustments without needing to install extra software.
Step-by-Step to Fix with Photos App
Step 1:Open the Photos app and navigate to Albums > Videos, then select the grainy video you want to fix.
Step 2:Tap Edit in the top-right corner, then choose the Adjust option from the available tools.

Step 3:Scroll through the adjustment options until you find Noise Reduction, and increase it to reduce the grain (setting it to 100 works best).

Step 4:Next, adjust the Sharpness to a value between 20 and 30 to enhance the clarity.
Step 5:Once you're satisfied with the changes, tap Done and decide whether to save the edited video as a new clip or overwrite the original.
Part 6. How to Fix a Grainy Video on Android with PowerDirector
If you're working on an Android device, PowerDirector is one of the best apps for removing grain from video. PowerDirector for Android is a feature-packed video editor that provides tools like noise reduction and stabilization to improve video quality. It's especially useful for users who want to remove grain from video with ease.
Step-by-Step to Fix with PowerDirector
Step 1:Start by downloading PowerDirector from the Google Play Store and open the app.
Step 2:Once the app is launched, tap the Menu icon (three horizontal lines) in the top-left corner to access the main settings.

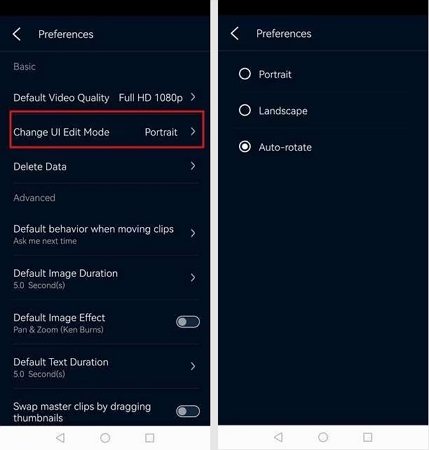
Step 3:From the menu, go to Preferences and then tap on Change UI Edit Mode to switch the interface to Auto-rotate. This will allow you to edit in landscape mode, which is more convenient for videos with a 16:9 ratio.

Step 4:After setting the correct UI mode, return to the main screen and select New Project to start editing.

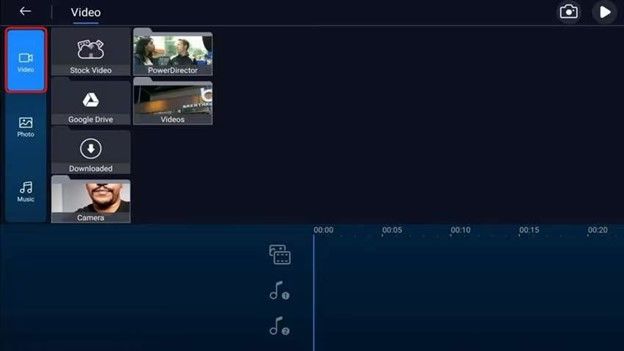
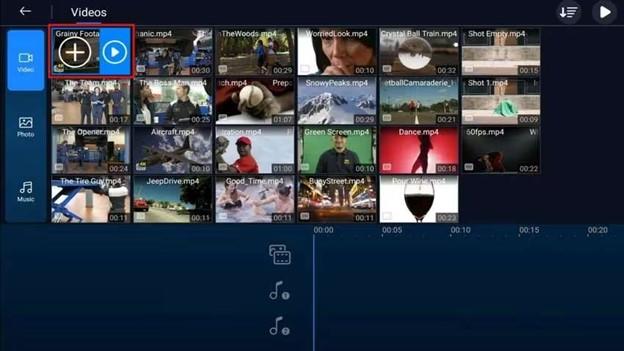
Step 5:Tap on the Media icon to import your grainy video. Choose the location where your video is stored, such as a folder on your phone or Google Drive.

Step 6:Once you've selected the video, tap the Plus button to add it to the timeline.

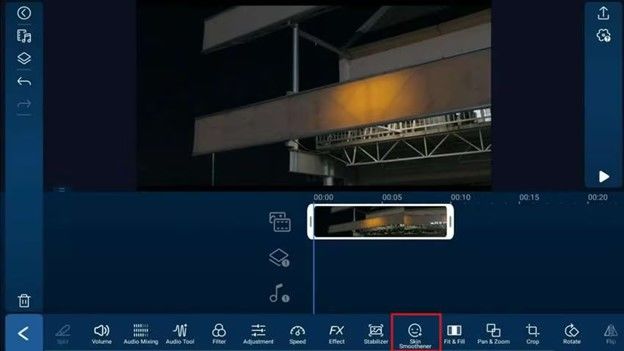
Step 7:With the video in the timeline, tap on the clip and look for the Skin Smoothner option. This tool helps reduce visual noise, even if your video doesn't contain faces.

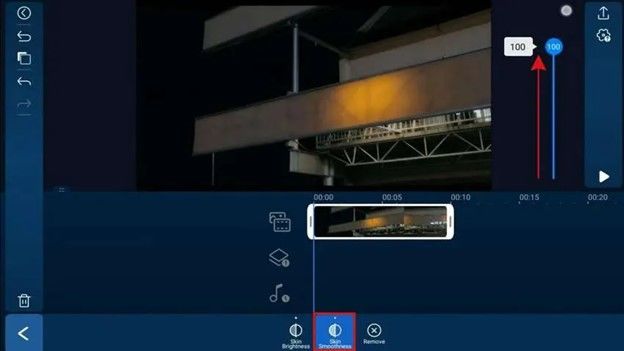
Step 8:Increase the Skin Smoothness by dragging the slider to 100 to remove as much grain as possible.

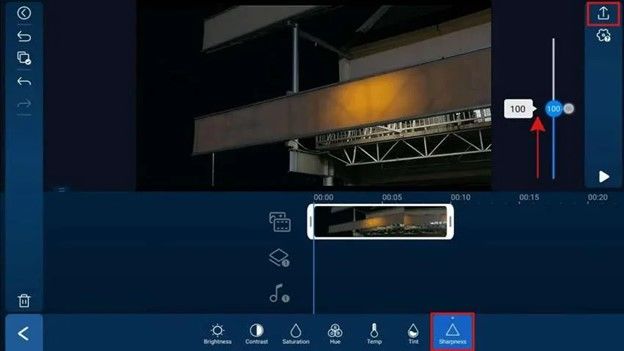
Step 9:Next, tap on the Adjustments tool, then increase the Sharpness to enhance the clarity of the video.

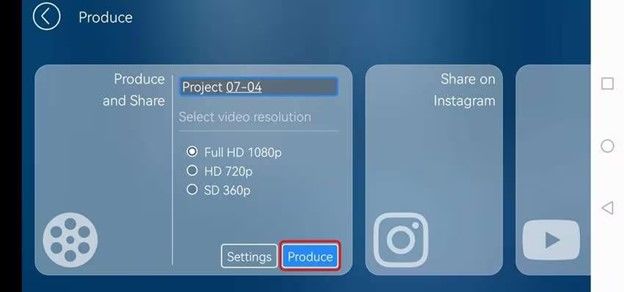
Step 10: When you're happy with the adjustments, tap Export to save the video. Choose a resolution (Full HD for free users, or 4K for premium users). Finally, give your project a name, tap Produce, and your grain-free video will be saved to your Gallery. You can also share it on platforms like Instagram, YouTube, or Facebook.

Conclusion
In conclusion, there are many effective ways to remove grain from video, whether you're using a computer, Mac, or smartphone. From advanced tools like HitPaw Univd and Premiere Pro to simple apps like Photos and PowerDirector, there's something for everyone. By using the steps outlined above, you can easily fix your grainy video and restore the sharpness and quality of your footage. So don't let grainy footage spoil your memories-use these methods to get clear, smooth videos today!









 HitPaw FotorPea
 HitPaw VikPea (Video Enhancer)
 HitPaw VoicePea


Share this article:
Select the product rating:
Joshua Hill
Editor-in-Chief
I have been working as a freelancer for more than five years. It always impresses me when I find new things and the latest knowledge. I think life is boundless but I know no bounds.
View all ArticlesLeave a Comment
Create your review for HitPaw articles