Adobe DNG Converter Download and Guide
It's no secret that photography has been becoming increasingly digital, and if you want to make the most of your photos today, it's essential to use top-notch editing software.
Adobe's DNG Converter is one of the best tools available for turning your RAW images into something special, and it can be yours for free! In this guide, we'll walk you through the process of downloading Adobe DNG Converter in 2022 and provide you with some helpful tips for getting the most out of it.
So, read on if you're ready to get your photos looking the best they can be!
Part 1. What is Adobe DNG Converter?
Adobe DNG Converter is a free download that allows you to convert your RAW images into Digital Negative (DNG) format. This is an open-source file format that was developed by Adobe to bring consistency and reliability to the process of editing digital photos.
The DNG format is a powerful way to store, process, and share digital photos, which makes it an invaluable tool for photographers of all skill levels. With Adobe DNG Converter, you can easily convert RAW images into the optimized DNG format and take your photography to the next level.
1. About the Digital Negative (DNG) format
The Digital Negative (DNG) format is a publicly-available raw image format that was designed by Adobe to provide photographers with a universal standard for storing and manipulating digital images.
The DNG format is based on the TIFF/EP standard, so it offers compatibility with a wide range of software programs and devices. The format also includes a variety of metadata, which gives users more control over how images are handled by software applications.
Most of all, the DNG format is completely open source, meaning that anyone can use it for free. Making it the perfect tool for digital photographers of all skill levels.
2. Why Convert to the DNG Format?
- The DNG format offers a number of advantages over other raw image formats. The most obvious benefit is that it provides users with consistency and reliability.
- By using the DNG format, users can be sure that their images will be readable and consistent across different software programs and devices, making it easier to share and store photos.
- The DNG format also makes it easy to manage your photos since the metadata is included in the image file. This means that you can easily organize and search for photos based on specific parameters, saving you time and hassle.
- Finally, DNG files can be made smaller than RAW files if minimal or no JPEG Preview is stored within the file. This makes them easier to share and store while also providing you with more space on your hard drive or cloud storage service.
And as mentioned earlier, the DNG format is completely free to use. This makes it an ideal choice for photographers of all skill levels who want to make the most of their images.
Part 2. How do I Install Adobe DNG Converter?
Installing Adobe DNG Converter is easy and can be done in just a few steps.
-
1.Go to the Adobe website and download the latest version of the Adobe DNG Converter. Or you can click the link here for downloading.
Download DNG Converter for macOS: https://www.adobe.com/go/dng_converter_mac
Download DNG Converter for Windows: https://www.adobe.com/go/dng_converter_win
-
2.Once downloaded, open the file and double-click the DNG Converter executable file.
-
3.Install the software on your computer by following the on-screen instructions.
And you are done! Once the installation is complete, you're ready to start converting your RAW images into the optimized DNG format.
Part 3. How to Convert RAW Files to DNG with Adobe DNG Converter
Using Adobe DNG Converter is simple and straightforward. Here's a step-by-step guide to help you get started:
- Double-click the DNG Converter icon to launch it. You may also drag and drop individual images or a folder of images directly onto the Adobe DNG Converter icon. This will launch the converter automatically.
- Choose the folder of images you want to convert to DNG.
- Choose a location for saving the converted DNG files.
- Specify a naming pattern for the new DNG files: Document Name: The existing file name is used with the DNG extension added. Add serial numbers or letters to the name: Advanced patterns; an example of the resulting name appears after Name Example.
- If you want to apply sharpening and noise reduction, you can select any options you want.
- Click "Convert" to start the conversion process.
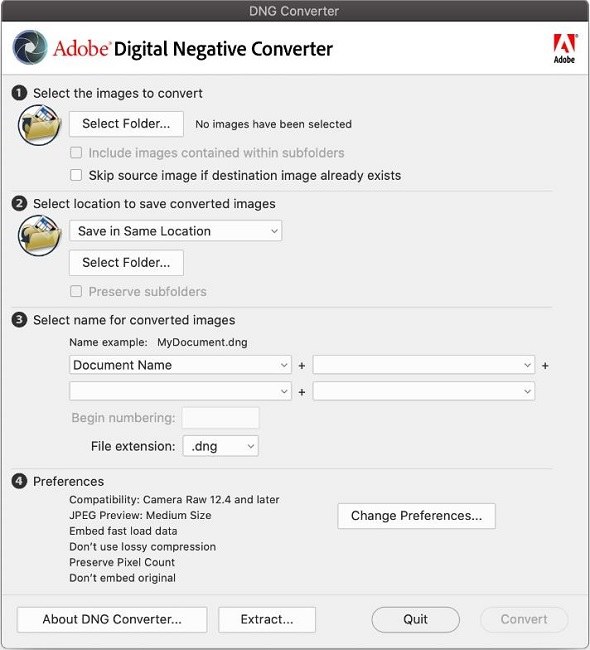
And that's it! Once the conversion completes, you'll have a set of optimized DNG files ready to use.
Part 4. Limited DNG Format Compatibility
While the DNG format has become increasingly popular over the past few years, it is worth noting that not all devices and software programs support it. This means that if you're planning to share your photos with someone who does not have DNG support, it might be necessary to convert the files into a more widely accepted format, such as JPG or PNG.
Fortunately, you don't have to do this manually – there are plenty of DNG to JPG/PNG converters available online like cloudconvert, Zamzar, and FreeConvert.
However, when it comes to the top-notch quality of your images, it's best to stick to HitPaw Univd (HitPaw Video Converter). This desktop software supports the conversion of RAW, DNG, and other photos to JPG/PNG/WEBP/TIFF with high quality.
It also offers a batch conversion mode, allowing you to convert hundreds of photos in one go. With its easy and use intuitive interface, it will make your conversion process a breeze. And all of these features come at a price you can afford!
Here's why HitPaw Univd stands tall amongst other DNG converters:
Main Features of HitPaw Univd
- Supports dozens of input formats, including Adobe DNG and RAW.
- Fast and reliable conversions.
- Lossless conversions with no loss of quality or detail.
- Batch conversion mode for converting multiple images at once.
- Ability to add text and image watermarks to protect your images.
- Essential editing options for making your photos stand out.
- Versatile output formats, including JPG, PNG, TIFF, and more.
- Simple to use with an intuitive user interface.
- Available for Windows and Mac.
How to Use HitPaw Univd
-
Step 1.Download and install the software on your computer.
-
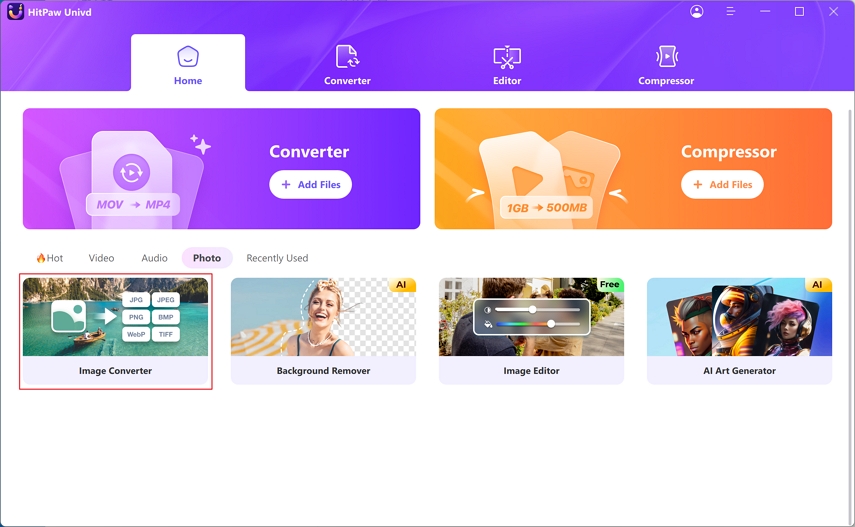
Step 2.Choose Image Converter feature in Toolbox.

-
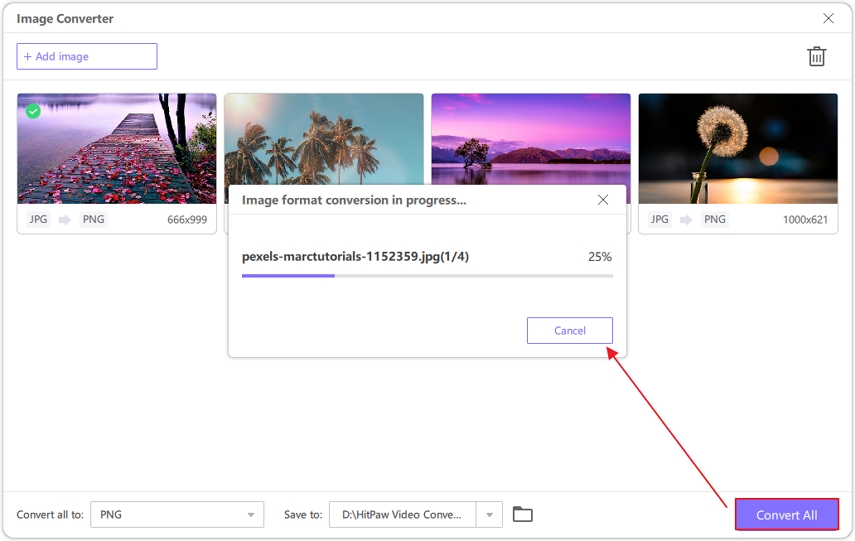
Step 3.Add the photos you want to convert. It supports importing photos of different formats.
-
Step 4.Select the output format from the output format list.

-
Step 5.Click "Convert All" to start the conversion process.

By following these simple steps, you can easily convert RAW and other image formats to JPG/PNG or any other format with HitPaw Univd.
The Bottom Line
Converting RAW images to DNG is an essential part of any photographer's workflow. With Adobe DNG Converter, you can quickly and easily convert your RAW files to the optimized DNG format. However, when it comes to converting them to more widely accepted formats, such as JPG or PNG, you're better off using HitPaw Univd.
This simple yet powerful tool offers a reliable and high-quality solution to convert a variety of image formats, including RAW and DNG. Plus, it provides essential options for editing your photos and adding watermarks to protect them.
If you're looking for a reliable solution to convert your RAW and DNG images, give HitPaw Univd a try - you won't be disappointed!




 HitPaw Edimakor
 HitPaw VikPea (Video Enhancer)


Share this article:
Select the product rating:
Joshua Hill
Editor-in-Chief
I have been working as a freelancer for more than five years. It always impresses me when I find new things and the latest knowledge. I think life is boundless but I know no bounds.
View all ArticlesLeave a Comment
Create your review for HitPaw articles