Full Guide on How to Import AVI Files into DaVinci Resolve
Are you struggling to import AVI files into DaVinci Resolve? AVI files are a popular video format, but they can sometimes present compatibility issues with DaVinci Resolve, leading to frustration and delays in your editing projects. This comprehensive guide will walk you through the step-by-step process of importing DaVinci Resolve AVI files and provide three effective solutions if you encounter any issues.
Additionally, we'll introduce you to the best tool for converting AVI files: HitPaw Univd (HitPaw Video Converter), a powerful and user-friendly software that simplifies the conversion process, ensuring smooth and hassle-free media handling for all your video editing needs.
Part 1: Can DaVinci Resolve Import AVI Files?
DaVinci Resolve is a powerful video editing software known for its robust features and professional-grade capabilities. However, when importing AVI files, users may face some challenges that can disrupt their workflow. AVI, or Audio Video Interleave, is a popular video format, but it is only sometimes seamlessly compatible with DaVinci Resolve due to codec issues or format restrictions.
Understanding whether DaVinci Resolve supports AVI files and identifying the common issues that arise, such as missing codecs, file corruption or unsupported codecs, can help you troubleshoot effectively and find suitable solutions. You can better navigate the process and ensure a smoother editing experience by gaining a deeper understanding of these potential hurdles.

Part 2. 3 Ways to DaVinci Resolve AVI Won't Import
Way 1. Import Media to DaVinci Resolve through Correct Way
DaVinci Resolve is a powerful video editing program renowned for its comprehensive tools catering to amateur and professional video editors. However, it can be tricky to navigate if you're new to it, given its vast array of features and complex interface.
One of the first things you'll need to learn is how to import media correctly. Importing media is crucial as it sets the foundation for your entire editing project. Without properly importing your files, you may encounter issues with playback, editing, and exporting your final video. Here's how to fix AVI Davinci Resolve Won't Import:
Step 1: Launch DaVinci Resolve and go to File > Import File > Import Media. Click Open after selecting the file you wish to import.
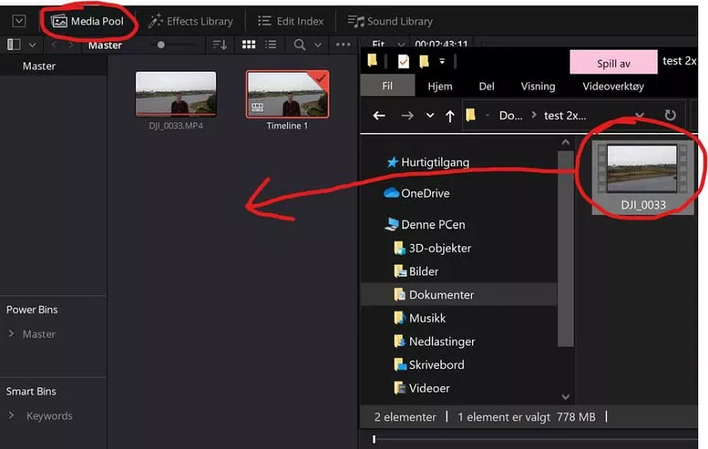
Step 2: The imported media will appear in your Media Pool window. Alternatively, drag and drop files directly into the Media Pool window. Just choose the files you want to import and drag them into the Media Pool. And there you go – you've successfully imported your media into DaVinci Resolve!
Way 2. Get rid of DaVinci Resolve Can't Import Media on your Mac
Mac users downloading DaVinci Resolve from the App Store may experience an error when trying to import media.
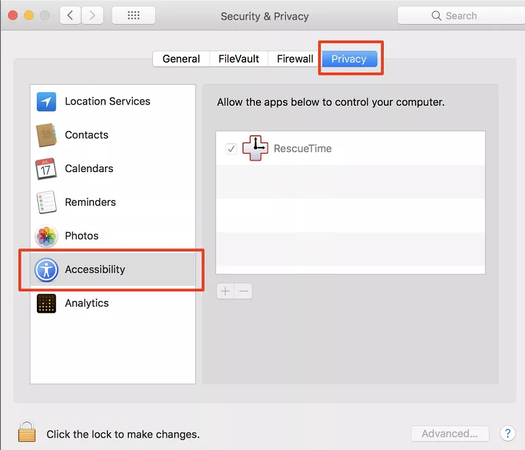
This issue is often due to the app's access privileges. Specifically, the application might not have the necessary permissions to access the media files or directories where these files are stored. To resolve this problem, users should ensure that DaVinci Resolve has the appropriate permissions enabled in the Security & Privacy settings under the System Preferences.
Step 1: Click on the Apple menu in the top-left corner of your screen. Select "System Preferences" from the dropdown menu. In the System Preferences window, click "Security & Privacy." Once in the Security & Privacy window, click the "Privacy" tab at the top. From the list on the left, select "Accessibility."
Step 2: Look for DaVinci Resolve in the list of apps on the right. Ensure that the checkbox next to DaVinci Resolve is checked. If it's not, you will need to add it manually. If DaVinci Resolve is not listed or not checked, click the "+" icon below the list of apps. In the file selection window that appears, find and select DaVinci Resolve, then click "Open."
Way 3. Add the Media through the Cut Page
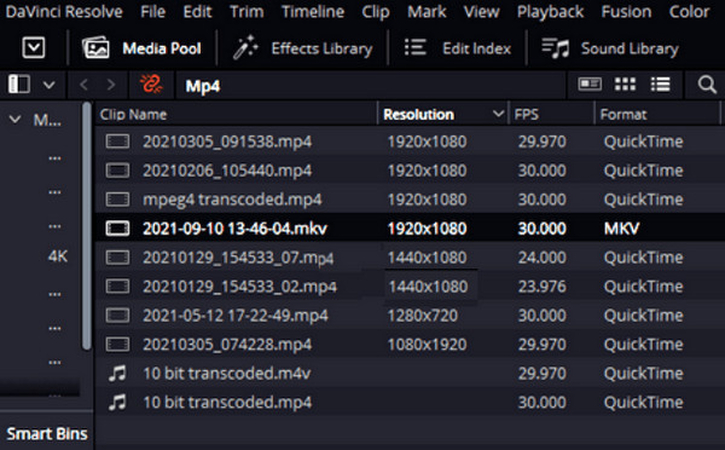
The Cut Page in DaVinci Resolve is designed for speed, allowing you to edit and modify your media files quickly. It's also an efficient way to import your MP4 files. Here's how to do it:
Step 1: Hit the Import Media button when you reach the Cut Page.
Step 2: Select all the media files you want to import using your cursor. If you want to import an entire folder, click the Import Folder button. And that's it! You've successfully imported your media files into the Cut Page of DaVinci Resolve.
Part 3. The Best Tool to Convert AVI File with HitPaw Univd
HitPaw Univd is the best way to convert AVI files, thanks to its user-friendly interface and powerful features. This versatile tool not only supports a wide range of formats, ensuring compatibility with various devices, but also offers high-speed conversion without compromising on quality.
Additionally, it provides advanced editing options, allowing users to trim, crop, and enhance their videos before conversion. The intuitive design makes it accessible for beginners, while the robust functionality meets the needs of more experienced users. Whether you're converting for personal use or professional projects, HitPaw Univd ensures a seamless and efficient process.
Features
- Converts AVI files to a wide range of formats without losing quality.
- Utilizes advanced technology to ensure fast conversion speeds.
- Supports converting multiple files at once, saving you time.
- Converts not only AVI files but also MP4, MOV, MKV, WMV, and many other formats.
- Offers basic editing tools to trim, crop, and enhance your videos before converting.
- Optimizes video formats for specific devices like smartphones, tablets, and gaming consoles.
How to convert AVI files through HitPaw Univd?
Step 1: Go to the HitPaw website and download the Video Converter. Then, follow the installation instructions that appear on your screen to install the software on your computer.
Once installed, open the HitPaw Univd application on your computer.
Step 2: Click the "Add Files" button or drag and drop your AVI files into the program window.

Step 3: From the list of available formats, select the one you want to convert your AVI file to. For instance, choose MP4 if that's your desired output format.
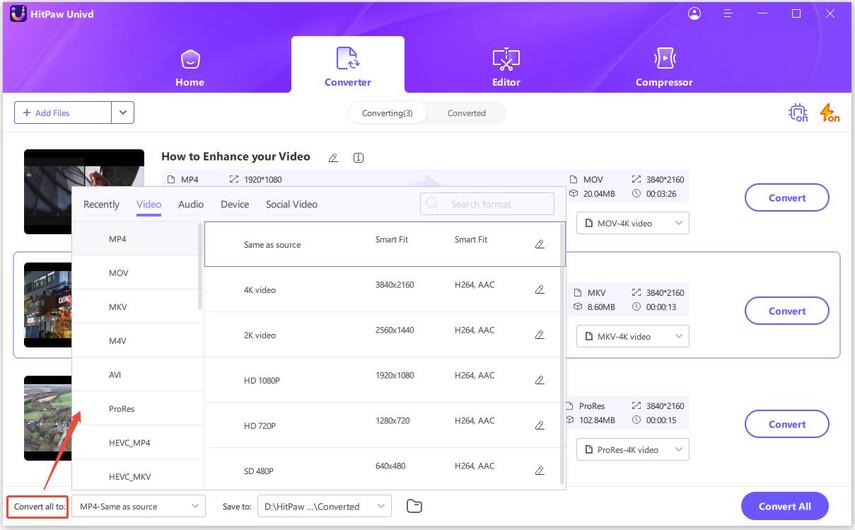
Step 4: If needed, click on the "Settings" icon to customize parameters such as resolution, bitrate, and frame rate to suit your requirements.
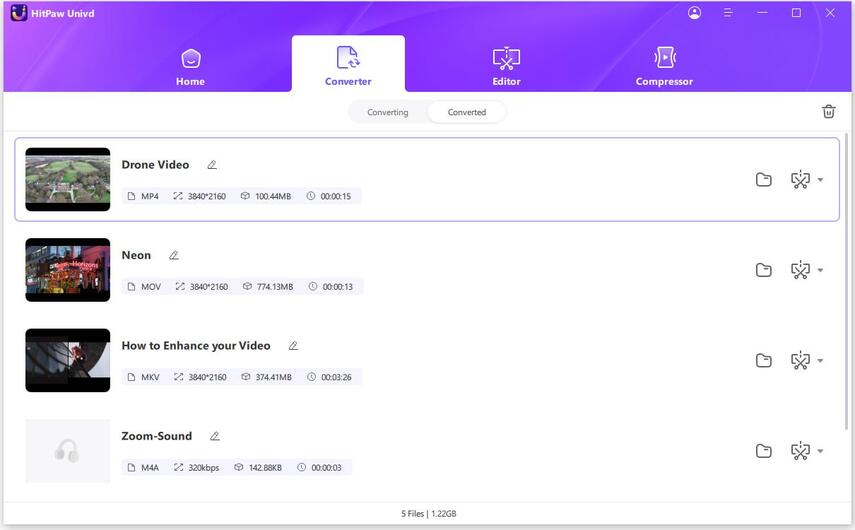
Step 5: Click on the "Convert" button to begin the conversion process. A progress bar will show the conversion status, and you'll be notified when it's complete. Once the conversion is finished, go to the "Converted" tab to locate your newly converted files. You can now play, edit, or transfer these files to your chosen device.
In Conclusion
In summary, this guide has shown you how to import Davinci Resolve AVI, troubleshoot potential access issues on Mac, and convert AVI files using the HitPaw Univd. Whether you're a new or experienced user, understanding these processes can significantly enhance your video editing workflow.
DaVinci Resolve offers powerful features for video editing, while HitPaw Univd stands out as an exceptional tool for converting AVI files and various other formats. With its high-quality conversion, fast speeds, batch processing, and user-friendly interface, HitPaw Univd ensures that your media files are compatible with any device and format you need.


 HitPaw Edimakor
 HitPaw VikPea (Video Enhancer)


Share this article:
Select the product rating:
Joshua Hill
Editor-in-Chief
I have been working as a freelancer for more than five years. It always impresses me when I find new things and the latest knowledge. I think life is boundless but I know no bounds.
View all ArticlesLeave a Comment
Create your review for HitPaw articles