The Guide on Different Ways to Convert PDF to JPG on Mac
PDF is a widely used file format for sharing documents, as it preserves formatting. However, a PDF viewer is needed to read it across different devices, and the person you're sharing it with may not have a viewer installed. So, converting PDF to an accessible format is necessary.
In this scenario, you can choose an image format, like JPG, because of its easy accessibility. But how to convert PDF to JPG on Mac? This guide will provide PDF to JPG converter tools for Mac to complete the task!
Part 1: How to Convert PDF to JPG on Mac with Preview?
Preview is a default app on Mac that offers an effortless way to convert PDF files into JPG images. It is free, user-friendly, and doesn't require installing additional software. You can also go for basic editing tasks, like annotating and easily rotating the images.
Pros
- Allow basic editing features
- Let you select the quality and resolution
Cons
- No support for batch conversion
- Let you convert a single page at a time
Here is how to convert PDF to JPG on Mac with Preview:
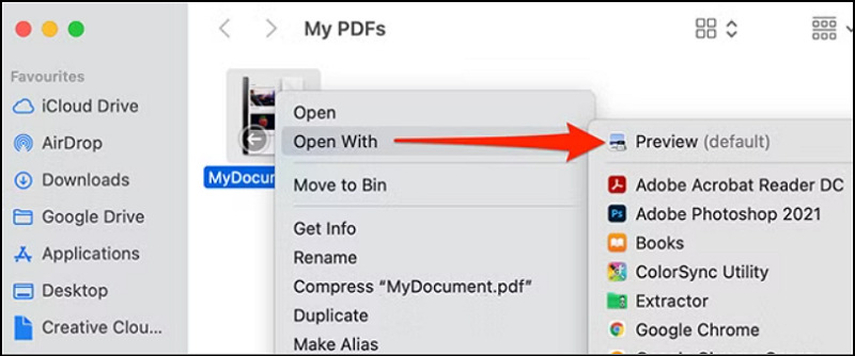
Step 1. Open PDF in Preview
Right-click the PDF file in Finder and select "Open with"> "Preview."
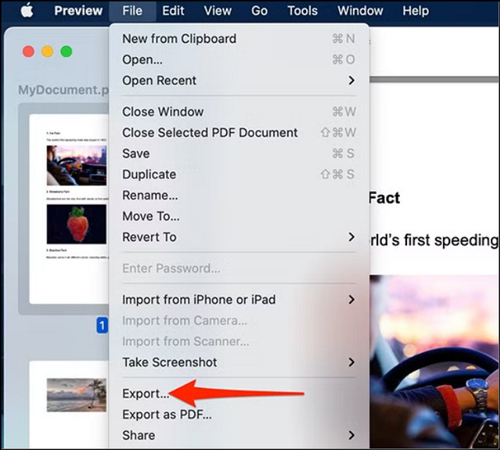
Step 2. Choose Export
Select the page you need to convert to JPG. Click "File"> "Export" to choose the target format and the file folder.
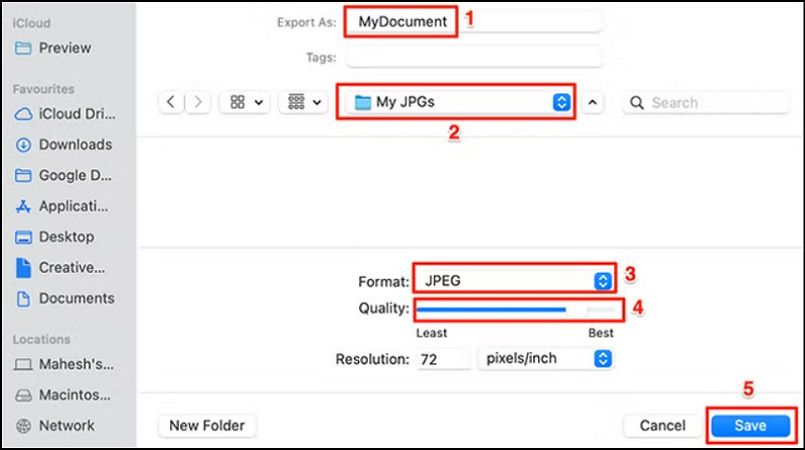
Step 3. Save Output
Finally, choose the output parameters and press the "Save" tab. You will be done!
Part 2: How to Convert PDF to JPG Mac with Automator Quick Actions
Automator is another powerful tool built into macOS. It can automate repetitive tasks like file conversions. With Automator Quick Actions, you can create workflows that convert PDFs to JPGs with just a few clicks.
Pros
- Help you convert large-size PDFs
- Save time with bulk conversions
Cons
- A bit complex to set up
- Limited image quality settings
Let's follow these steps of using Automator Quick Actions to convert PDF to JPG:
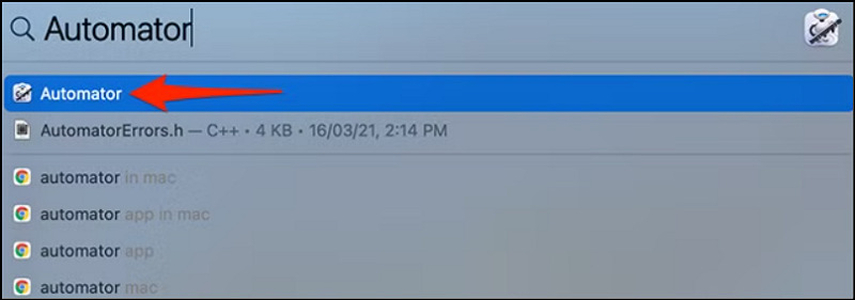
Step 1. Open Automator
Press "Command + Spacebar" and type "Automator" in the search bar. Click it from the results.
Step 2. Import PDF
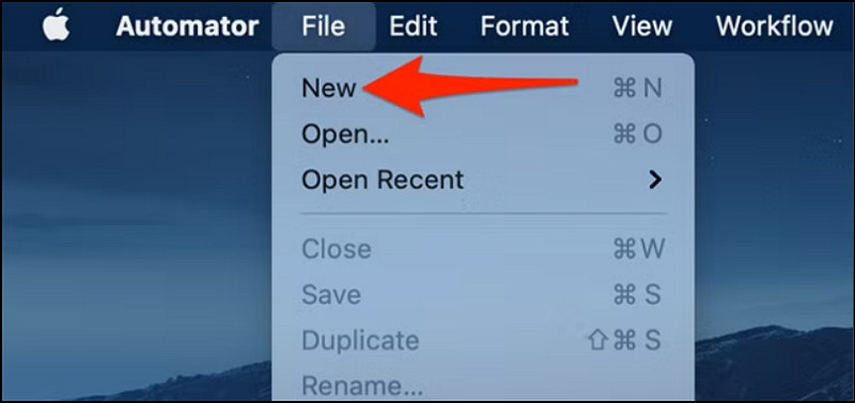
Choose "File" from the menu and click "New" to import the PDF files.
Step 3. Select Quick Action
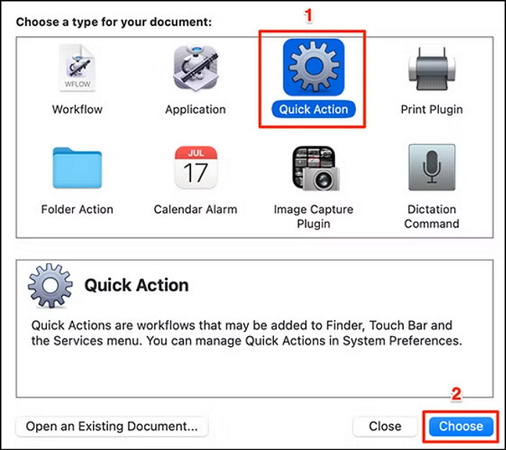
From the "Choose a type for your document" interface, select "Quick Action." And then press the "Choose" button.
Step 4. Choose PDF Files
Now, you will be on Quick Action's editing screen. Press the "Workflow Receives Current" menu and select "PDF Files."

Step 5. Render PDF Pages
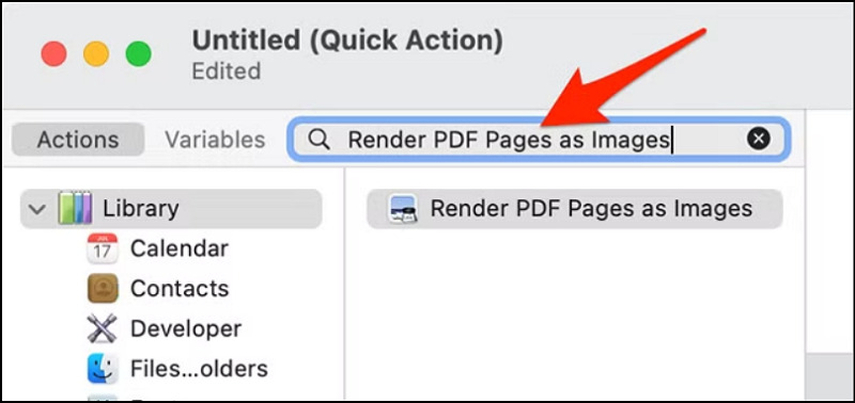
From the left side, click "Actions" and click the text fields next to "Variables." Type "Render PDF Pages as Images."
Step 6. Select Parameters
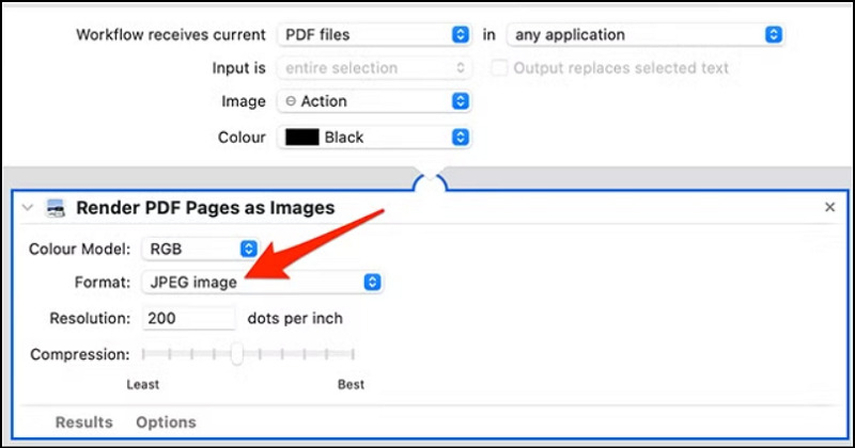
Drag and drop the "Render PDF Pages as Images" from the search results to the workflow. Click the "Format" menu and select "JPEG." Also, select the "Resolution" and other parameters.
Step 7. Find Move Finder Items
Again, type the "Move Finder Items" in the search bar next to the "Variables." Drag the "Move Finder Items" result to the workflow under the "Render PDF Pages as Images."
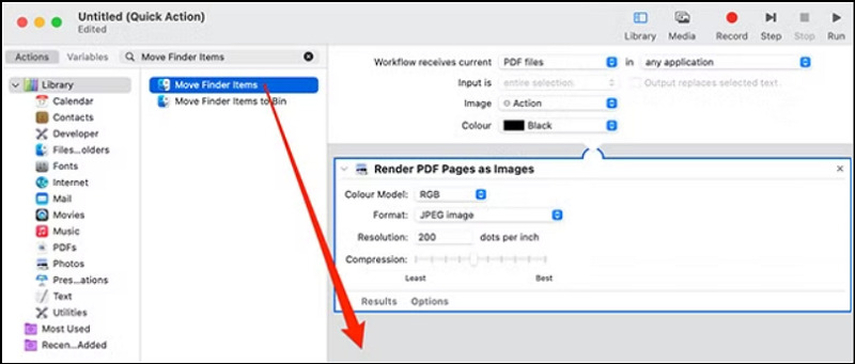
Step 8. Choose Destination Folder
From the "Move Finder Items" section, expand the "To" drop-down menu to choose the destination folder for converted JPG files.
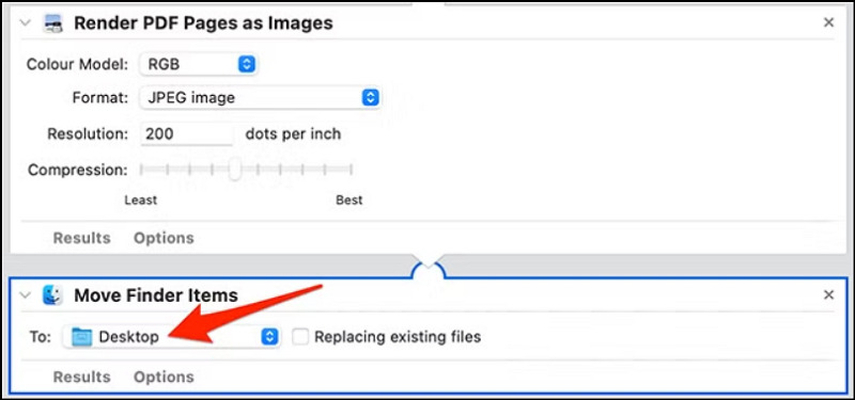
Step 9. Save PDF to JPG Action
Press the "Command + S" to save the Quick Action. You will see a prompt in the Automator. Name it as PDF to JPG and hit "Save."

Step 10. Convert PDF to JPG
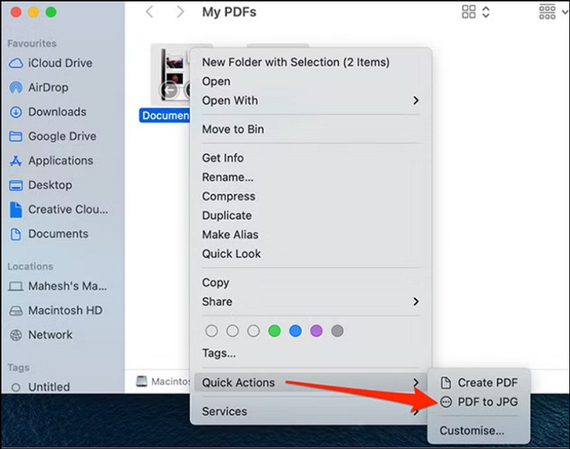
Close the Automator window. Open the Folder of your PDF files. Right-click it and select "Quick Actions"> "PDF to JPG." Your files will be automatically converted. All done!
Part 3: How to Convert a PDF to a JPG on Mac with Afirstsoft PDF for Mac
Afirstsoft PDF is a comprehensive PDF conversion tool that simplifies the conversion of PDFs to various Word, Excel, PPT, and Image formats, including JPG. It is a remarkable software designed for users who require more advanced editing options and batch conversion capabilities.
Pros
- Maintain file formatting during conversion
- Come up with high-quality output
Cons
- Require installation
- Some features are behind a paywall
Here is the tutorial for using Afirstsoft PDF to convert PDF To JPG on Mac:
Step 1. Import PDF File
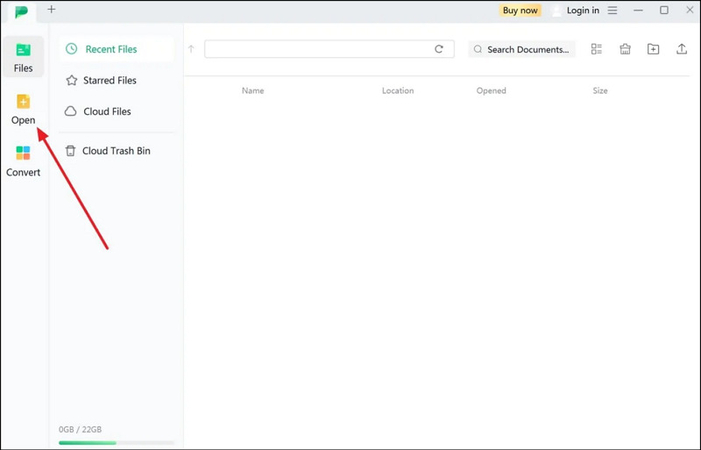
After installing this software, launch it and click "Open" to import the PDF file.
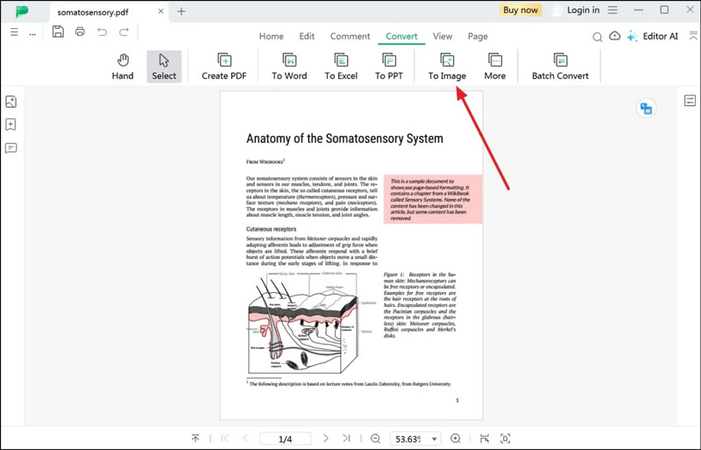
Step 2. Choose the Image Option
Now, open the "Convert" section and select the "To Image" option.
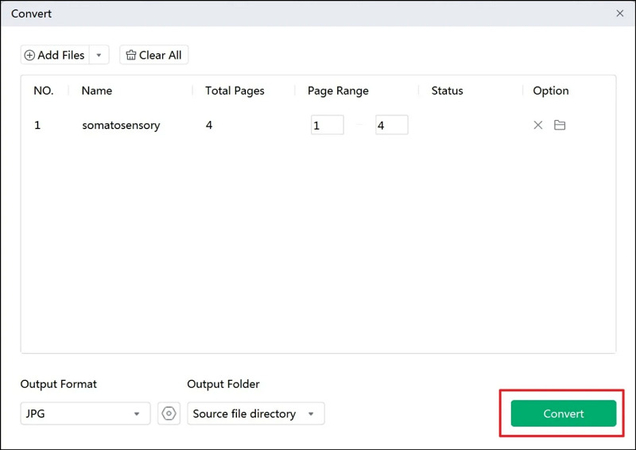
Step 3. Select Parameters and Convert
Next, optimize the conversion settings, such as the "Output Format" and "Output Folder." Then, hit "Convert" to save your JPG files in the destination folder.
Part 4: Bonus tip. How to Change JPG to Other Formats without Losing Quality
Sometimes, after converting your PDF to JPG, you might need to convert that JPG into another format like PNG, TIFF, BMP, WEBP, etc. In this case, the HitPaw Univd (HitPaw Video Converter) offers a simple solution for converting images without hassle. You can enjoy fast-speed conversion without losing quality. It also lets you convert multiple images simultaneously to save time and effort. You can even preview the images before conversion.
Main Features
- Offer an intuitive interface for converting images
- Support various input and output formats
- Maintain image quality during conversion
- Provide reliable customer support for a smooth conversion
Steps for Converting Images using HitPaw Univd:
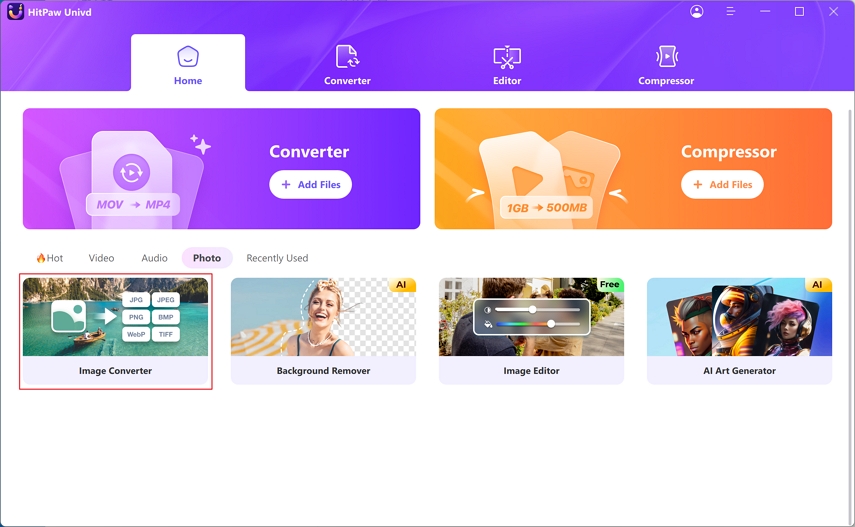
Step 1. Choose the Image Converter Tool
The first step is to install and launch the software and go to the "Toolbox" section. Now, select the "Image Converter" tool to proceed.
Step 2. Add and Preview Images
Next, press the "Add Image" button and import the image files you want to convert.
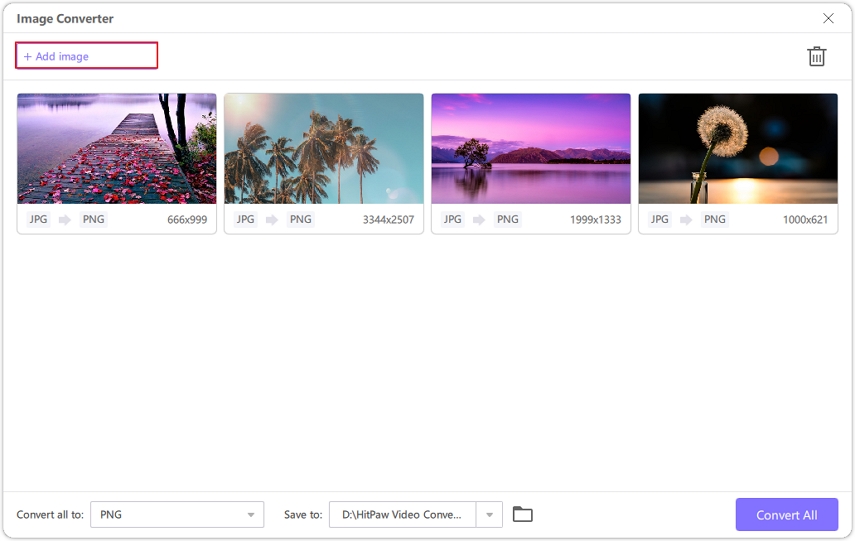
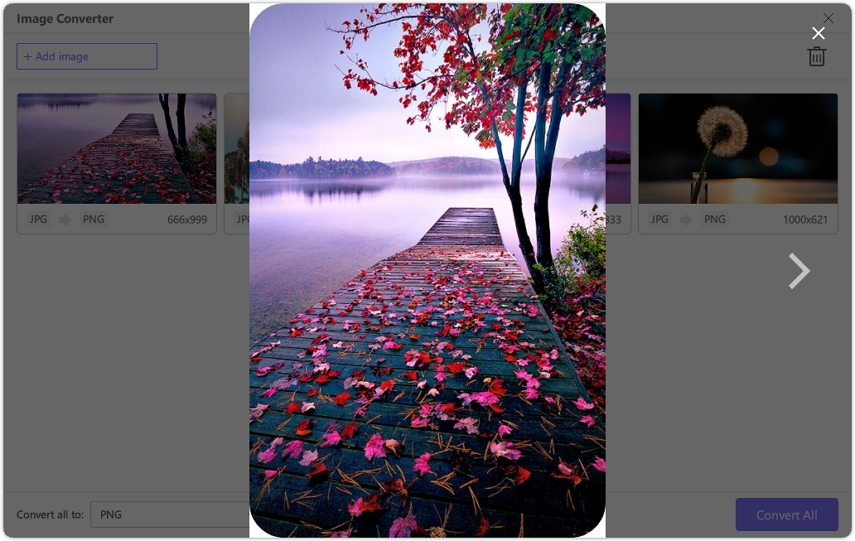
When you point to an image, a magnifying glass will appear. You can preview the image by clicking it. You can also delete a file if needed.
Step 3. Select Output Format
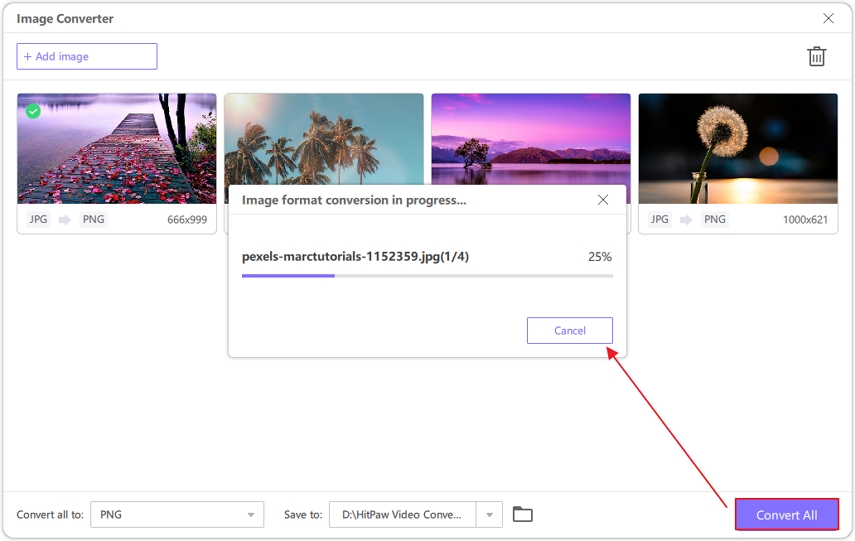
Later, expand the "Convert all to" drop-down menu to select the desired image format. Also, choose the destination folder from the "Save to" option.

Step 4. Start Conversion
Lastly, press the "Convert" or "Convert All" button to start the high-speed conversion. That's all!
Part 5: FAQs about Converting PDF to JPG Mac
Q1. Can I convert PDF to JPG on Mac?
A1. Of course, yes! There are several ways to convert PDFs to JPG on a Mac, including using built-in tools like Preview and Automator or third-party apps like Afirstsoft PDF.
Q2. How to convert PDF to JPG Mac?
A2.
To convert PDF to JPG on Mac:
Conclusion
Converting PDF to JPG on Mac is not difficult with the right tools. Whether it is Mac's built-in Preview, Automator Quick Actions, or third-party apps like Afirstsoft PDF, you have options that suit your demands. However, if you need to convert images to other formats, try out HitPaw Univd. Download this software now for a seamless experience across different formats. Surely, you will not regret it!


 HitPaw Univd


Share this article:
Select the product rating:
Joshua Hill
Editor-in-Chief
I have been working as a freelancer for more than five years. It always impresses me when I find new things and the latest knowledge. I think life is boundless but I know no bounds.
View all ArticlesLeave a Comment
Create your review for HitPaw articles