The Ultimate Guide of WAV to MP3 iTunes
Converting WAV to MP3 iTunes offers a versatile solution for optimizing audio files. Whether you need to save storage space, enhance compatibility, or streamline playback across devices, iTunes provides a straightforward method. In this guide, you'll explore expert tips and tricks for converting WAV to MP3 efficiently. Learn about the benefits of each format, understand the conversion process step-by-step, and discover tools to simplify your audio management tasks using iTunes.
Part 1. Understanding the Difference Between WAV and MP3
Differences in File Size and Quality Between WAV and MP3 Formats
File Size:
- WAV: WAV files are uncompressed, meaning they retain all the original audio data. As a result, WAV files are larger in size compared to MP3.
- MP3: MP3 files use lossy compression, significantly reducing file size by removing audio data that may not be easily perceptible to the human ear.
Audio Quality:
- WAV: Offers pristine, lossless audio quality with no data loss. Ideal for professional audio production and situations where preserving every detail is critical.
- MP3: Provides good quality audio that is suitable for everyday listening. While MP3 is compressed, it maintains a balance between file size and quality, making it popular for digital music distribution and storage.
Benefits of Converting WAV Files to MP3 for iTunes Compatibility
Here are the benefits of iTune convert WAV to MP3:
- Universal Support: MP3 is widely compatible with iTunes and other media players, ensuring seamless playback on various devices.
- Reduced File Size: MP3 compression significantly reduces file size compared to WAV, saving storage space on your devices.
- Ease of Sharing: Smaller file sizes make MP3s easier to upload, download, and share over the internet or via iTunes.
- Efficient Streaming: MP3 files stream more smoothly over networks due to their reduced size, offering uninterrupted listening experiences.
- Enhanced Accessibility: MP3 compatibility extends to a wider range of devices, including mobile phones, tablets, and music players.
- Practicality: Converting to MP3 allows you to manage and organize larger music collections more efficiently within iTunes.
Part 2. How to Convert WAV to MP3 in iTunes
HitPaw Univd (HitPaw Video Converter) is a versatile tool ideal for multimedia enthusiasts. With capabilities to convert WAV to MP3 in iTunes and beyond, it excels in video and audio format conversions, video downloading, editing, and more. It simplifies the process with intuitive features, ensuring high-quality output and compatibility across devices and platforms. For seamless iTune WAV to MP3 conversions, HitPaw Univd is your comprehensive solution.
Features
- Convert Photo/Video Formats: Easily convert between various video and photo formats with high quality.
- Download Videos from 10000+ Sites: Capture videos from popular platforms like YouTube, Vimeo, Facebook, and more.
- Download Music from Famous Platforms: Extract audio tracks from music streaming sites for offline listening.
- Edit Videos: Trim, crop, merge, add subtitles, apply effects, and more to customize your videos.
- Popular Tools: Includes an image compressor, screen recorder, 2D to 3D converter, and more for diverse multimedia needs.
Steps
To convert WAV to MP3 using HitPaw Univd and then import them into iTunes, follow these steps:
Step 1. Download and Install HitPaw Univd:
Visit the HitPaw Univd product page.
Download and install the software on your computer.
Step 2. Launch HitPaw Univd:
Open HitPaw Univd after installation.
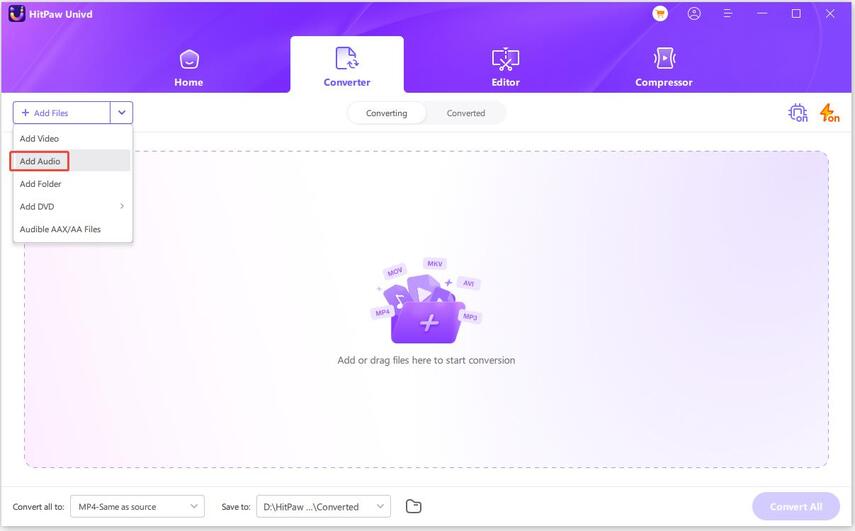
Step 3. Add WAV Files:
Click on Add Files to import the WAV files you want to convert.

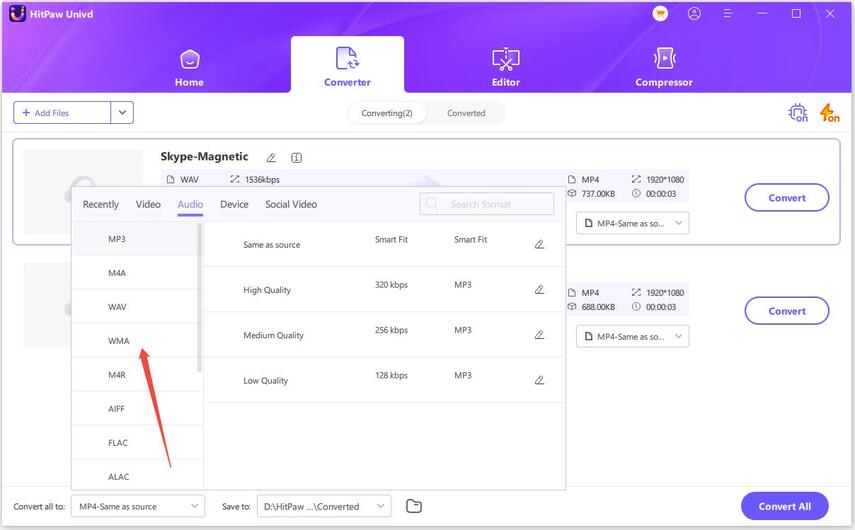
Step 4. Select MP3 as Output Format:
Choose MP3 as the output format. You can do this by selecting MP3 from the format dropdown list or setting it as the default output format.

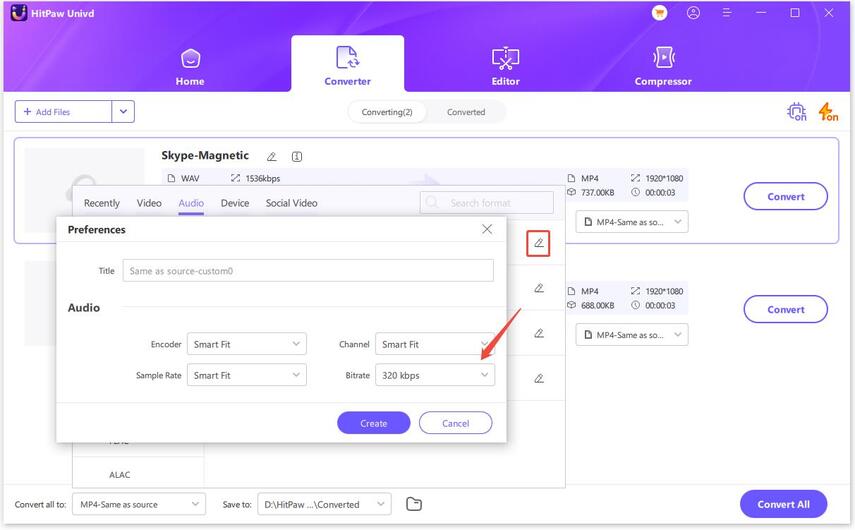
Step 5. Customize Audio Settings (Optional):
Optionally, adjust audio settings such as bitrate, sample rate, and channel according to your preferences.

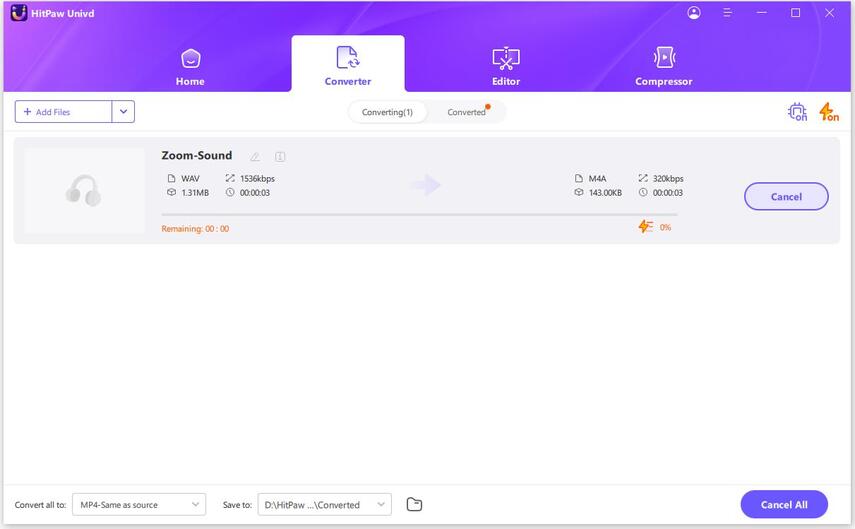
Step 6. Start Conversion:
Click on Convert to begin converting WAV files to MP3 format using HitPaw Univd.

Step 7. Import MP3 Files into iTunes:
- After conversion, open iTunes on your computer.
- Go to File > Add File to Library or Add Folder to Library.
- Navigate to the folder where your converted MP3 files are saved and select them.
- Click Open to import the MP3 files into your iTunes library.
By following these steps, you can efficiently convert WAV to MP3 iTunes using HitPaw Univd and then integrate them seamlessly into your iTunes library for playback and management.
Watch the following video to learn more details:
Part 3. Tips for Optimizing Audio Quality During Conversion
Importance of Selecting the Right Bitrate and Sample rate for MP3 Files
Selecting the right bitrate and sample rate for MP3 files is crucial as it directly impacts the audio quality and file size. Here’s why it's important:
- Bitrate: Bitrate determines the amount of data used to encode audio per second. Higher bitrates (e.g., 320 kbps) result in better audio quality because more data is preserved, especially for complex sounds like music with intricate details. Lower bitrates reduce file size but may sacrifice audio fidelity, leading to noticeable quality loss, especially in higher frequencies and dynamic ranges.
- Sample Rate: Sample rate refers to the number of samples of audio carried per second. For MP3 files, the standard sample rate is 44.1 kHz, which is sufficient for CD-quality audio. Increasing the sample rate beyond this may not significantly enhance quality for MP3 files but will increase file size.
Choosing the appropriate bitrate and sample rate depends on your priorities: higher bitrate for better quality or lower bitrate for smaller file size. Balancing these factors ensures optimal audio quality while maintaining efficient file management and playback compatibility across devices and platforms.
Recommendations for Preserving Audio Quality while Converting WAV to MP3.
Here are the recommendations for preserving audio quality while converting WAV to MP3:
- Choose a High Bitrate: Opt for higher bitrates (e.g., 320 kbps) to retain more audio detail and fidelity.
- Use Standard Sample Rate: Stick to the standard sample rate of 44.1 kHz for most music and audio recordings.
- Avoid Over-Compression: Optimize compression settings to balance file size and audio quality.
- Consider Variable Bitrate (VBR): Use VBR to dynamically adjust bitrate based on audio complexity.
- Test Settings: Before converting large batches, test different settings and listen to ensure optimal audio quality.
Following these guidelines ensures that your WAV to MP3 conversions maintain high-quality audio suitable for various playback scenarios.
Part 4: FAQs of WAV to MP3 iTunes
Q1. Can I convert WAV to MP3 in iTunes directly?
A1. No, iTunes doesn't support direct WAV to MP3 conversion. You'll need third-party software like HitPaw Univd for this task.
Q2. What bitrate should I use for MP3 files in iTunes?
A2. For iTunes, a bitrate of 256 kbps is generally recommended. It offers a good balance between audio quality and file size.
Q3. How do I import MP3 files into iTunes after conversion?
A3. Open iTunes, navigate to File > Add File to Library, select your converted MP3 files, and click Open to import them.
Bottom line
Converting WAV to MP3 for iTunes requires a reliable tool like HitPaw Univd, ensuring seamless audio quality and compatibility. With its user-friendly interface and versatile features, HitPaw simplifies multimedia tasks, offering precise control over bitrate and format settings. Whether for personal music libraries or professional projects, HitPaw Univd guarantees efficient conversions and preserves audio fidelity. Explore more at HitPaw Univd to streamline your media conversion needs effortlessly.


 HitPaw Edimakor
 HitPaw VikPea (Video Enhancer)


Share this article:
Select the product rating:
Joshua Hill
Editor-in-Chief
I have been working as a freelancer for more than five years. It always impresses me when I find new things and the latest knowledge. I think life is boundless but I know no bounds.
View all ArticlesLeave a Comment
Create your review for HitPaw articles