The Ultimate Guide to Fix Adobe Media Encoder Not Working Issues
Adobe Media Encoder is a powerful tool for rendering and encoding video files, but like any software, it can run into issues. From rendering problems to integration hiccups with other Adobe applications, users often find themselves searching for solutions. These challenges can disrupt workflow and lead to frustration, especially for beginners.
Whether you're a novice or have some experience, this guide aims to help you troubleshoot common problems effectively. You'll learn about fixes for Adobe Media Encoder not working issues, solutions for when Adobe Media Encoder stuck halfway, and how to resolve frustrating cases of encoding Premiere Pro stuck at 100. Let's dive in!
Part 1. Adobe Media Encoder Not Working with After Effects
Sometimes, users encounter issues when trying to render compositions from After Effects through Adobe Media Encoder. This can disrupt your workflow and cause unnecessary frustration, especially if you have tight deadlines.
Tip 1. Ensure Both After Effects and Adobe Media Encoder Are Up to Date
Updating both applications can resolve compatibility issues. Adobe frequently releases updates that fix bugs and enhance performance, ensuring smoother operation. Keeping your software up to date not only improves functionality but also protects you from security vulnerabilities.
Tip 2. Add Composition to Media Encoder via Render Queue
Instead of directly sending your composition, try adding it to the Media Encoder via the Render Queue. In After Effects, go to Composition > Add to Render Queue, and then select Adobe Media Encoder from the Output Module. This method often results in better compatibility and fewer issues.
Tip 3. Adjust Video Rendering Settings
Sometime, you can modify the video rendering way to resolve the issue of After Effects not exporting to Media Encoder. Go to Media Encoder CC > Preferences > General in Adobe Media Encoder. In the Video Rendering section, click the drop-down menu next to Renderer and choose "Mercury Playback Engine Software Only." Click OK to apply the changes.

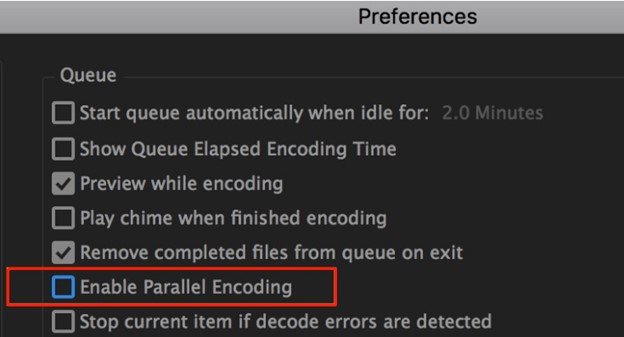
Tip 4. Turn Off Parallel Encoding
Parallel encoding can sometimes cause conflicts. Go to Preferences in Media Encoder and disable this option. It may help improve stability, especially when working with complex projects that require significant processing power.
Tip 5. Reset Adobe Media Encoder Preferences to Default
If all else fails, resetting preferences can clear up any lingering issues. The process to reset Adobe Media Encoder preferences varies depending on your operating system. Regardless of the OS, ensure that both After Effects and Adobe Media Encoder are closed before proceeding.
On Windows:
- Open the Run dialog by pressing Win + R and type %appdata%. Press OK to access the directory: C:\Users\YourUsername\AppData\Roaming.
- Navigate to the Adobe folder.
- Locate the Adobe Media Encoder subfolder and rename it to Old_Adobe Media Encoder.
- Then, go to Documents > Adobe in File Explorer.
- Find the Adobe Media Encoder folder here and rename it to Old_Adobe Media Encoder.
On macOS:
- Close both After Effects and Adobe Media Encoder.
- Open Finder, then hold the Option key and click Go on the menu bar.
- Select Library, then go to Preferences > Adobe.
- Rename the Adobe Media Encoder folder to Old_Adobe Media Encoder.
- Next, go to Documents > Adobe.
- Find the Adobe Media Encoder folder here and rename it to Old_Adobe Media Encoder.
Part 2. Adobe Media Encoder Rendering Problems
Rendering issues can be particularly irritating. They may cause significant delays in your projects, leading to missed deadlines and increased stress. Understanding these common problems and their solutions can save you a lot of time and keep your workflow uninterrupted.
1. Adobe Media Encoder Stuck Halfway During Rendering
If your rendering stops halfway, first check the render log for errors. This log provides insight into what might be causing the issue, enabling you to troubleshoot effectively. Additionally, consider breaking your project into smaller segments to test which part might be causing the blockage.
2. Mac Adobe Media Encoder Stuck: Quick Fixes
For users experiencing Adobe Media Encoder stuck Mac, try these solutions:
- Restart the Application: Close and reopen the Media Encoder. Sometimes, a fresh start is all you need to resolve minor glitches.
- Clear Media Cache: Go to Preferences > Media Cache and clear the cache to free up space and resolve glitches. Regular maintenance of your cache can prevent these issues from reoccurring.
3. Premiere Pro Encoding Stuck at 100%: How to Resolve
When encoding Premiere Pro stuck at 100, it's often due to a codec issue. Check the sequence settings and ensure they match the export settings. Additionally, try changing the output location to ensure there are no permission issues, as this can often lead to unexpected errors during rendering.
Part 3. Media Encoder Dynamic Link Not Working
Dynamic Link allows seamless integration between Adobe applications, but it can sometimes fail, resulting in frustration. If you find that Media Encoder isn't recognizing your After Effects projects, try restarting both applications to refresh their connection. Ensuring they are updated to the latest version can also resolve many integration bugs.
Part 4. Media Encoder Watch Folder Not Working
Watch folders automatically encode files placed into them, but they may not function as intended. This feature can greatly enhance efficiency when set up correctly. Ensure that the watch folder is correctly set up in the Media Encoder's preferences. If files aren't being processed, try removing and re-adding the folder to refresh the connection, which can often solve the problem.
Part 5. Adobe Media Encoder Out of Memory
If you're experiencing an out-of-memory issue on an M1-based Mac while using Adobe Media Encoder or Premiere Pro, adjusting the memory allocation for Adobe software may help. This can potentially reduce or eliminate the memory error.
To optimize memory usage, aim for a 50% balance between Adobe applications and your operating system (OS).
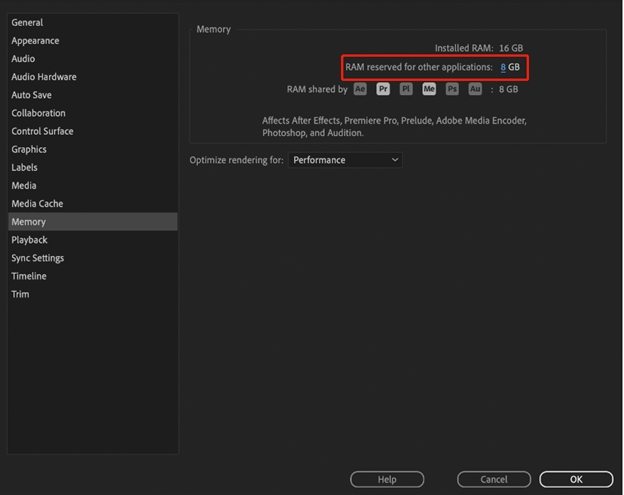
- Open Adobe Media Encoder and navigate to Preferences > Memory.
- Set the RAM reserved for other applications to half of your computer's installed RAM.
- Click OK to save your changes, then restart your machine to apply the new memory allocation.
Check if the high memory issue persists while using Adobe Media Encoder.
Part 6. Other Adobe Media Encoder Known Issues and Their Fixes
1. Adobe Media Encoder Freezes When Closing After Pausing the Queue
This issue can often be resolved by updating your graphics drivers to ensure compatibility. Additionally, try reducing the number of queued items to minimize load and see if that resolves the freezing problem.
2. App Hangs When Stopping the Queue After a Pause
If the app hangs, it might be due to a corrupted file in the queue. Removing files one by one can help identify the culprit. Keeping your project files organized and error-free will also help maintain smoother operation.
3. Unable to Publish Videos Directly to Facebook
Check your export settings. Ensure they comply with Facebook's video upload guidelines, or consider exporting to a local file and uploading manually. This method often bypasses any potential hiccups during the direct upload process.
4. Failed Attempts to Upload Videos to Adobe Stock
If uploads fail, verify your internet connection. Sometimes, a poor connection can disrupt uploads, causing frustration. Check for any restrictions from your firewall or antivirus that might be blocking the upload, as these can often lead to unexpected failures.
Part 7. Adobe Media Encoder Alternative: HitPaw Univd (HitPaw Video Converter)
If these issues become overwhelming, you can use an alternative to Adobe Media Encoder for file format conversion tasks. HitPaw Univd supports a wide range of video and audio formats, making it a great choice for simple and efficient file conversions.
HitPaw Univd - All-in-one Video Solutions for Win & Mac
Secure Verified. 254,145 people have downloaded it.
- Convert videos between over 1000 formats, including MP4, AVI, TS, MOV, WMV, etc.
- Batch convert videos up to 5000 files
- Simple and intuitive interface suitable for all users.
- Fast conversion speeds without sacrificing quality.
- Professional editing tools to trim, merge, and adjust videos.
- Add external subtitles in various formats for better accessibility.
Secure Verified. 254,145 people have downloaded it.
Step-by-Step Guide to Convert Video in HitPaw Univd
Follow this tutorial to seamlessly convert videos on both Windows and Mac between 1000 formats using HitPaw Univd.
Step 1: Open HitPaw Univd and Add Files
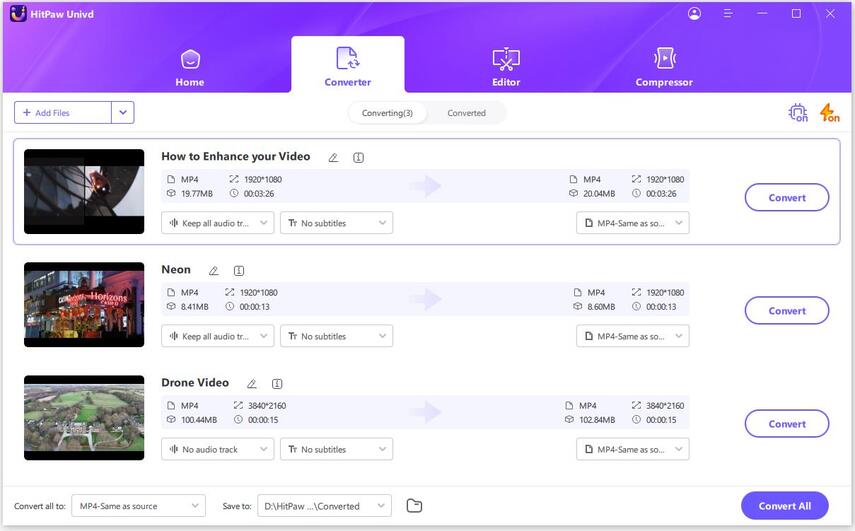
Launch HitPaw Univd and select "Add Video" to import your files. Alternatively, you can drag and drop video(s) directly into the program for quick importing. The videos will appear in the queue, ready for editing and conversion.
Step 2: Edit Video Info (Optional)
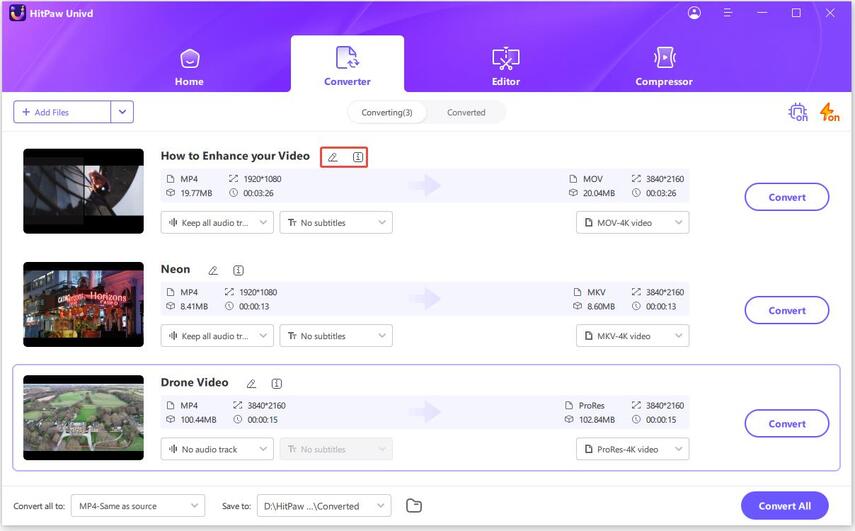
Click on the file name to edit the title, or click the pen or info icon to modify the media metadata. You can enrich your video by adding details like title, artist, album, composer, genre, date, and description, enhancing organization and accessibility.
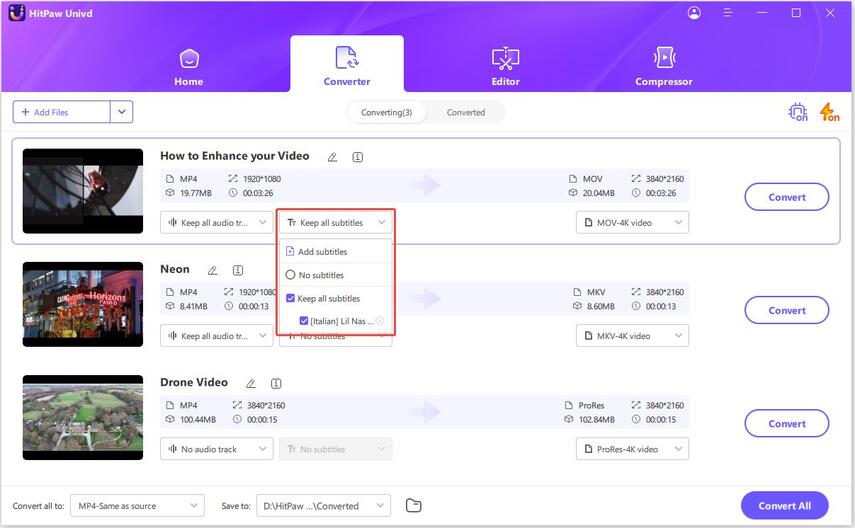
Step 3: Add Subtitles to Video
When you add a video, check the subtitles status. You can easily add external subtitles by clicking “Add subtitles” to add SRT, ASS, VTT, and SSA subtitles. The external subtitles will be listed in the order they were imported, and you can remove them using the delete icon next to each one.
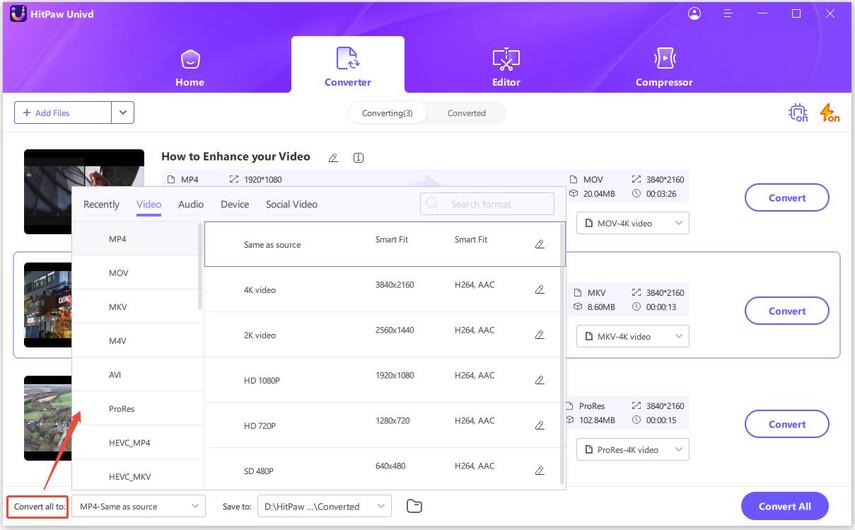
Step 4: Select an Output Format
Choose the output format for each file by clicking the inverted triangle icon at the lower right of each item. For a unified output format across all files, click "Convert all to" in the lower left corner. You can even click the edit icon to adjust quality, video codec, and audio codec as needed.
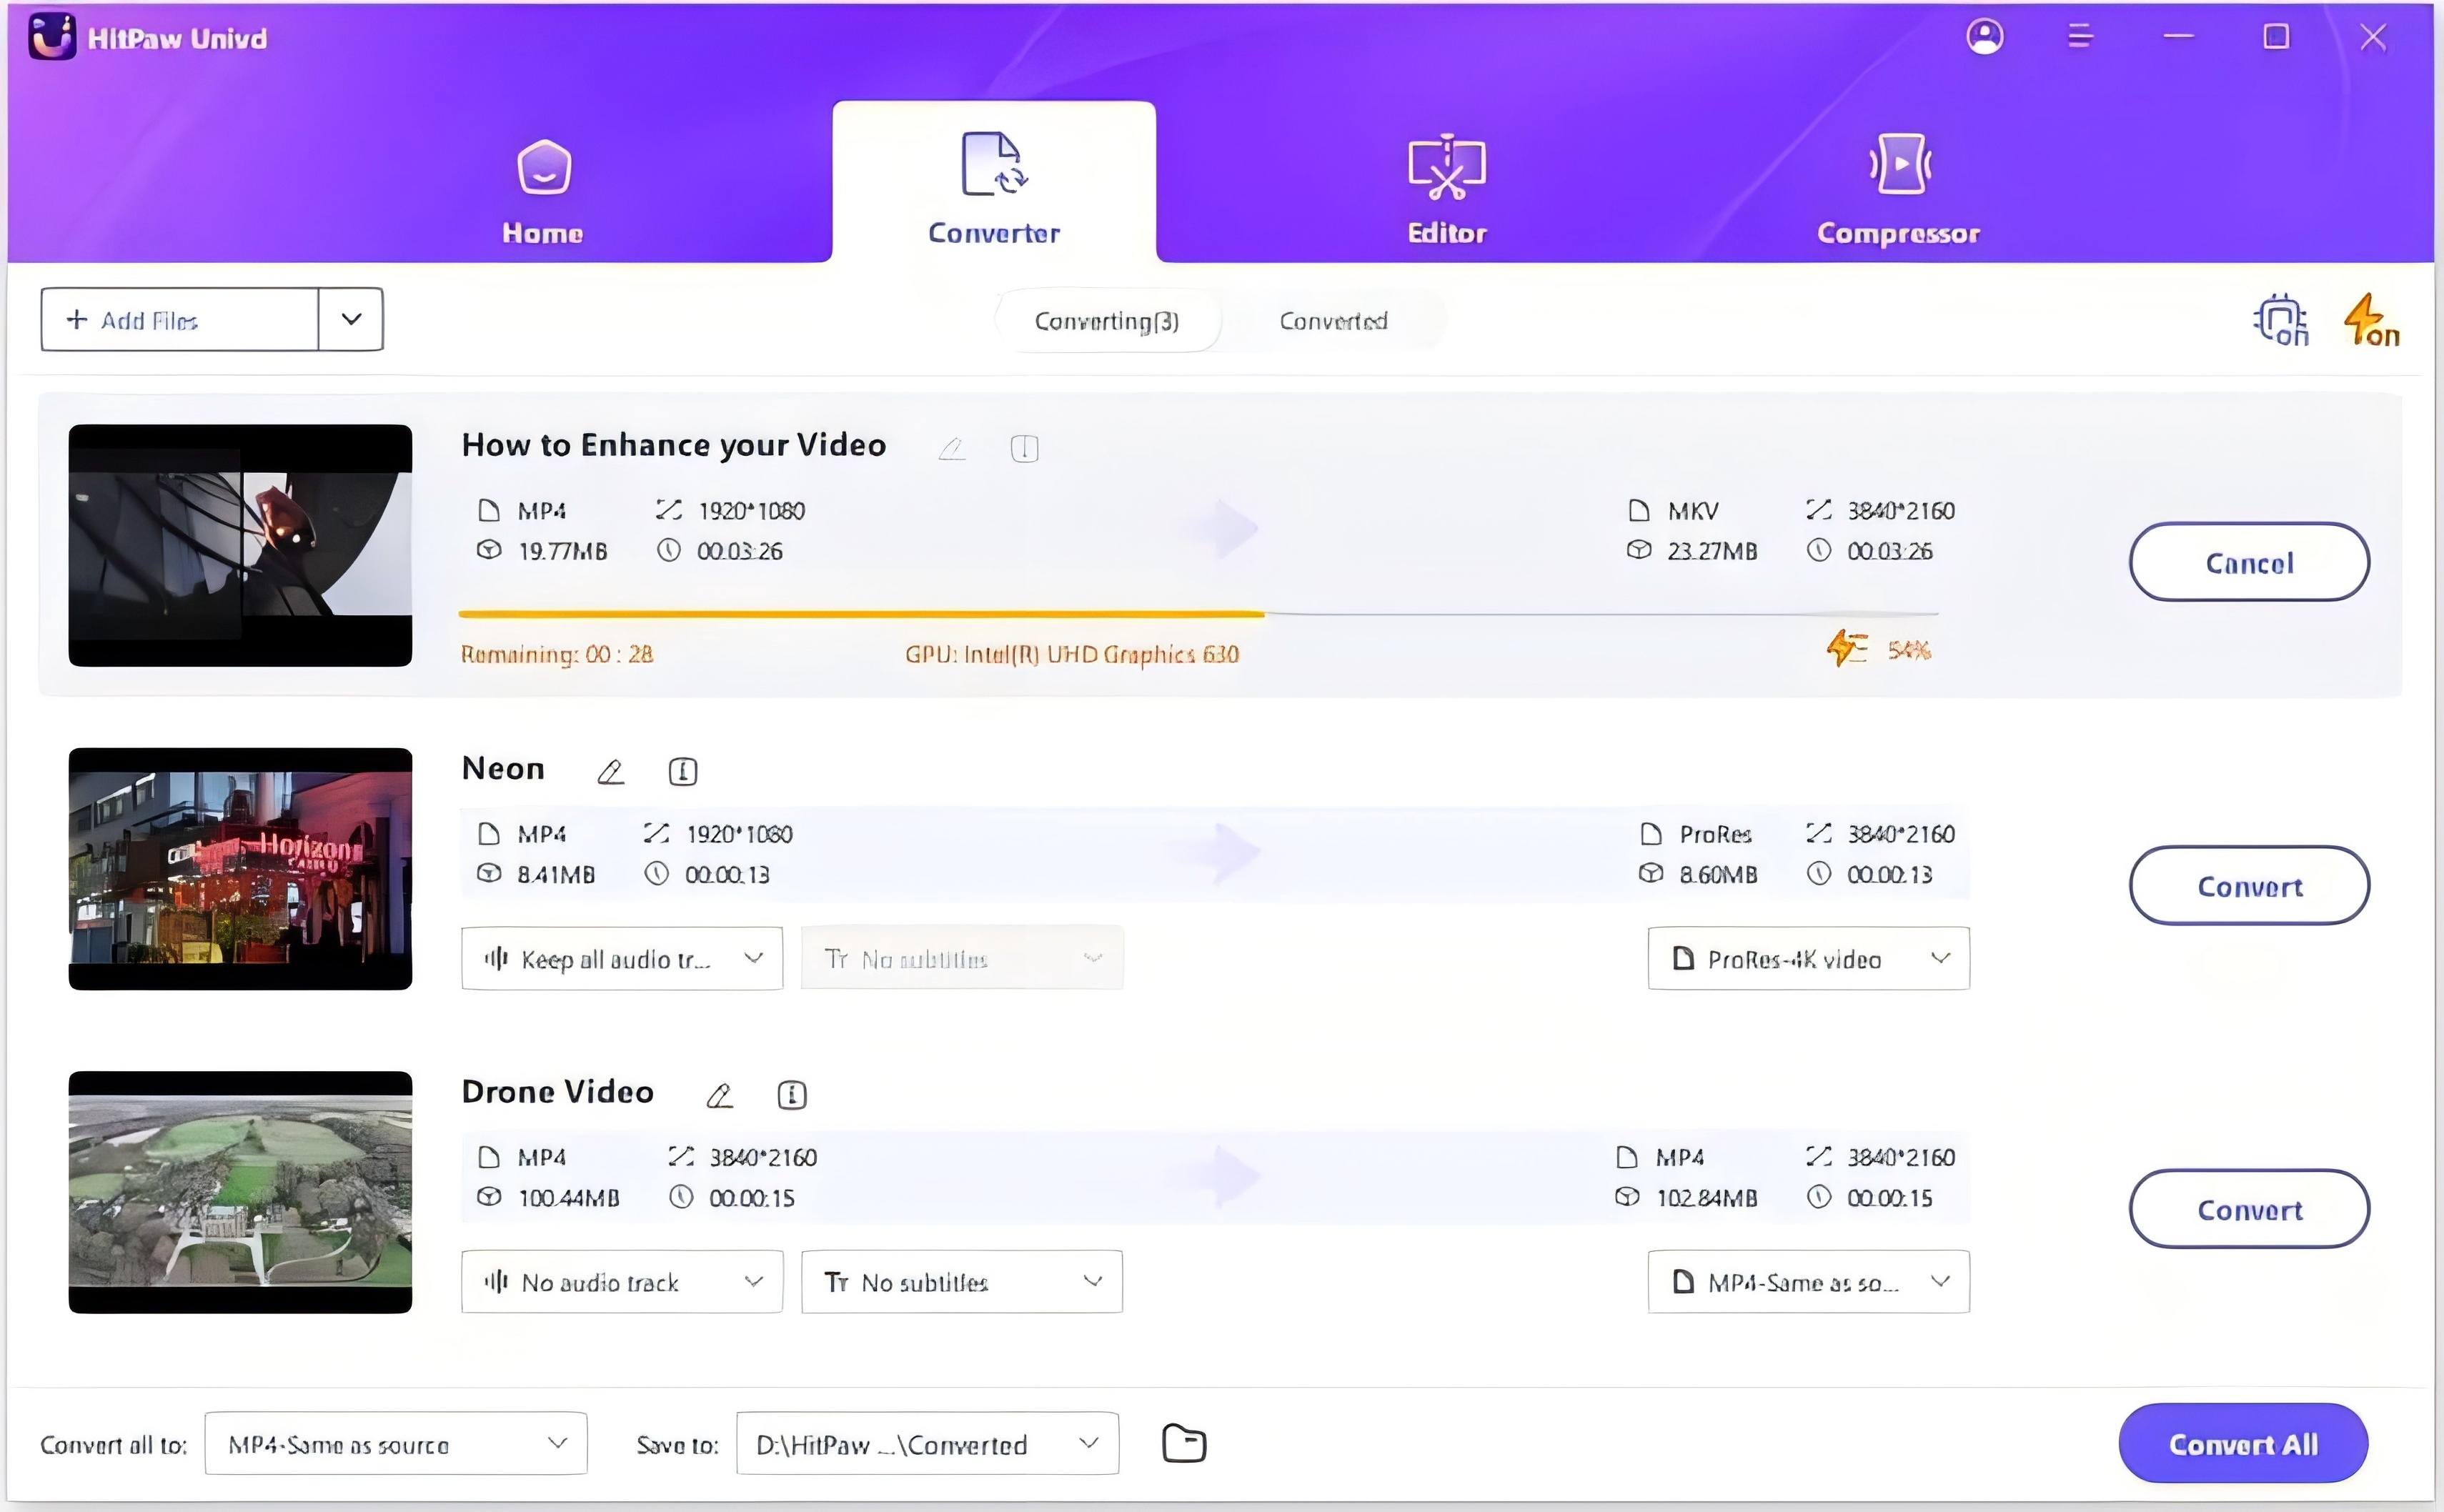
Step 5: Convert the Video
Click “Convert” (or “Convert All” for multiple files) to start converting videos in bulk. This program converts videos with full GPU acceleration.
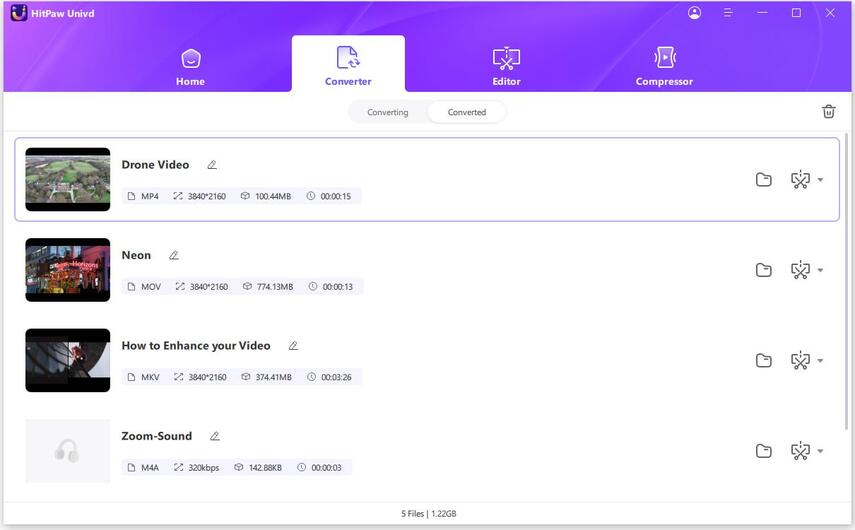
Step 6: Access the Converted Files
Once the conversion is complete, navigate to the "Converted" tab at the top to find your finished files. You can click “Open Folder” to quickly access them or select “Add” if you need to edit the list or make further adjustments to your videos. Enjoy your newly converted content with ease!
Conclusion
Adobe Media Encoder is the best tool for video rendering, but it isn't without its issues. Whether you're facing problems with rendering, dynamic linking, or simply uploading to platforms like Facebook, understanding these common hurdles can help you navigate them more effectively.
By following the solutions outlined in this guide, you can minimize disruptions and maintain your workflow, ensuring that you stay productive. Should these problems persist, consider using alternatives like HitPaw Univd, which offers simplicity and speed. With the right tools and knowledge, you can tackle any video project with confidence!




 HitPaw Univd


Share this article:
Select the product rating:
Joshua Hill
Editor-in-Chief
I have been working as a freelancer for more than five years. It always impresses me when I find new things and the latest knowledge. I think life is boundless but I know no bounds.
View all ArticlesLeave a Comment
Create your review for HitPaw articles