[Updated Guide]: Premiere Pro How to Change Aspect Ratio
Changing the aspect ratio of a video is a common task for video editors, whether you're preparing content for various social media platforms, cinematic releases, or other specialized formats. This process is crucial for ensuring that your video looks its best across different viewing environments.
Whether you're working on a personal project or a professional assignment, understanding how to Premiere pro change aspect ratio can significantly enhance the quality and versatility of your video output. This updated guide will walk you through the detailed steps to Premiere pro on how to change the aspect ratio, ensuring that you can confidently and efficiently meet the demands of any video production scenario.
Part 1. Premiere Pro How to Change Aspect Ratio
When working on video projects, the aspect ratio plays a crucial role in determining how your video appears across various platforms and devices. Whether you need to create a square video for Instagram or a widescreen format for YouTube, Adobe Premiere Pro offers powerful tools to change the aspect ratio of your footage. In this guide, we'll walk you through the steps to change the aspect ratio Premiere, ensuring your videos look perfect on any screen.
Step 1: To begin a new project in Adobe Premiere Pro, select File > New > Project. You can use File > Import or drag and drop the files into the "Project" window to add your video clips to the project. The imported video clips can be dropped from the "Project" panel into the "Timeline" panel. Arrange them in the sequence you wish them to appear.
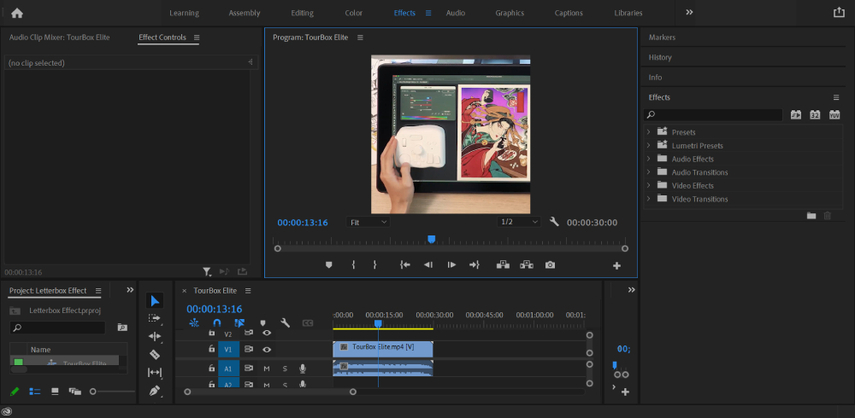
Step 2: On the 'Project' panel, click the 'New Item' button that is situated in the lower right corner. It looks like a folded up piece of paper. 'Adjustment Layer' is the one you ought to choose. After making sure the video settings in the resulting dialog box correspond to the project's specifications, click "OK."
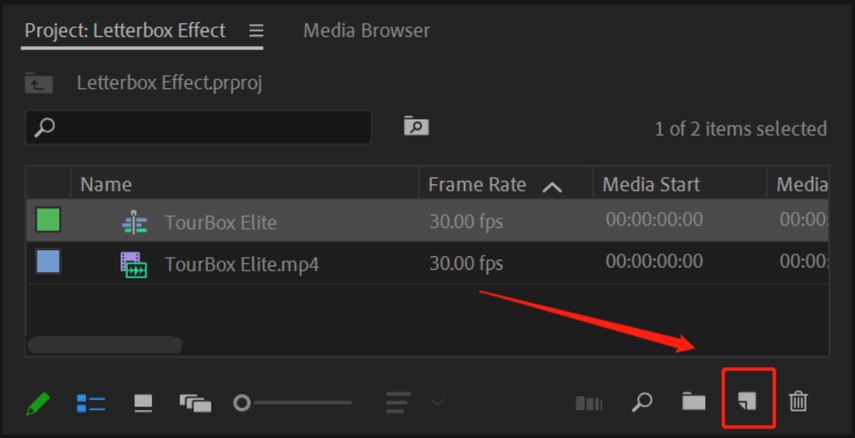
Step 3: In the 'Timeline,' create a new track above your video clips and drag the newly created adjustment layer from the 'Project' panel. To apply the letterbox effect to every clip, extend the adjustment layer over them all. After selecting the adjustment layer, drag its end until it encompasses all pertinent clips in the timeline.

Step 4: To access the 'Effects' panel, click Window > Effects (if not displayed, enable it). Use the search field in the 'Effects' tab to look for "Crop". Drag the 'Crop' effect onto your adjustment layer's timeline.
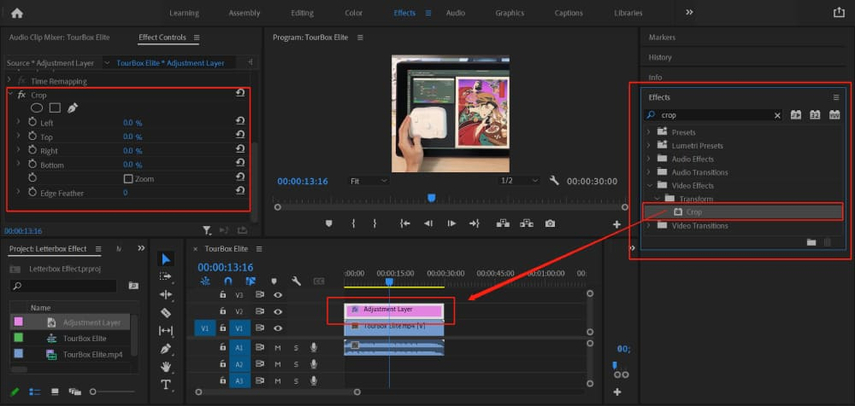
Step 5: Access the 'Effect Controls' panel (Window > Effect Controls if not visible) after selecting the adjustment layer in the timeline. Play with the 'Top' and 'Bottom' percentages under 'Crop' to get the ideal letterbox effect.
In general, you should have "Top" and "Bottom" settings between 10% and 15% in order to get a cinematic aspect ratio.
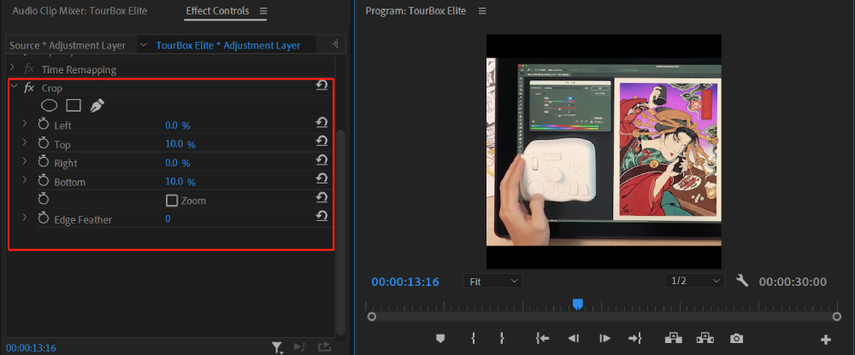
Step 6: Check out the letterbox effect by playing your sequence. You can export your video now if you're satisfied with the outcome. Select Media from File > Export. Click 'Export' after naming your file, selecting its destination, and selecting your preferred format and preset in the export settings box.
Part 2. The Best Alternative to Change Video Aspect Ratio with HitPaw Univd (HitPaw Video Converter)
While Premiere aspect ratio change is a powerful and versatile way to adjust the aspect ratio, it can sometimes be complex and time-consuming, especially for users who need a quick and straightforward solution. Navigating through its various settings and options might feel overwhelming, particularly for beginners or those working on tight deadlines. In such cases, the HitPaw Univd offers an excellent alternative.
This user-friendly software provides an intuitive interface and efficient tools for adjusting video sizes, making the process much simpler and faster. With HitPaw Univd, users can achieve the desired aspect ratio for their videos without the steep learning curve associated with more advanced editing software
Features
- Simple and intuitive design, perfect for beginners and professionals alike.
- Supports a vast range of video formats, ensuring compatibility with all your devices.
- High-speed conversion without compromising quality.
- Convert and edit multiple videos simultaneously, saving you time and effort.
- Offers tools for cropping, trimming, adding effects, and more.
- Ensures that your videos retain their original quality even after conversion and resizing.
How to resize videos with HitPaw Univd?
Step 1: Install the HitPaw Univd on your PC after getting it from the official website. Use the Add Video option or drag and drop your video file into the HitPaw Univd application window after the program is open.
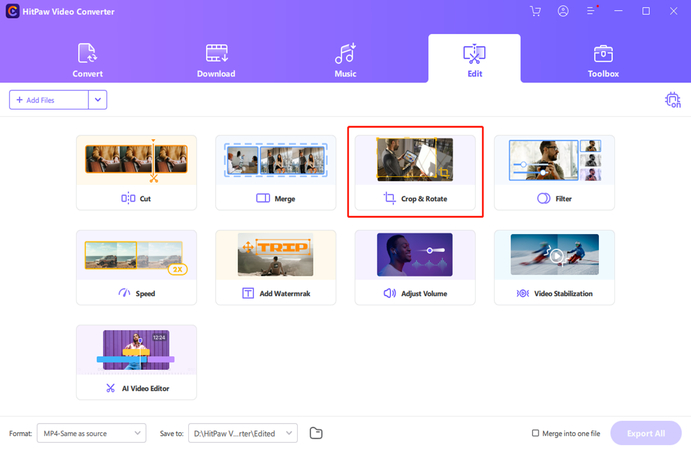
Once your video has been imported, click the Edit symbol (usually a pencil or scissors) that shows up beside the video thumbnail. This will open the editing interface and provide you with several tools.
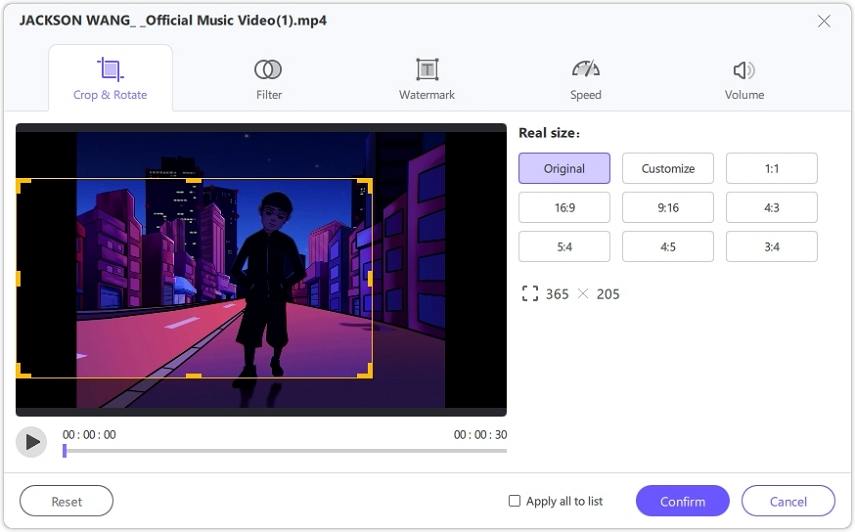
Step 2: Select the Crop and Resize option from the editing interface. The width and height of your movie can be manually adjusted using the choices that appear. You can drag and adjust the size of your video frame by using the handles. Alternatively, for accurate resizing, you can input particular dimensions. Once the required adjustments have been made, save your changes and go back to the main interface by clicking the OK or Apply button.
Step 3: Finally, press the Confirm button. To save your resized movie to your computer, select the desired export format and quality parameters, then click Export once more.
Part 3. FAQs of Changing Aspect Ratio Premiere
Q1. How to Resize Panels in Premiere Pro?
A1.
With Adobe Premiere Pro, you may adjust panel sizes to better fit your editing requirements and personalize your workplace. This is how panels can be resized:
Q2. How Do I Change the Aspect Ratio of a Video?
A2.
Changing the aspect ratio of a video in Premiere Pro involves adjusting the sequence settings and sometimes reframing your clips. Here’s a step-by-step guide:
At Last...
Changing the aspect ratio of a video is essential for ensuring that your content looks great on different platforms and devices. Premiere pro how to change aspect ratio provides a comprehensive set of tools to help you make these adjustments, from resizing panels to changing the frame size of your sequences.
However, for those looking for a simpler and faster alternative, HitPaw Univd offers an excellent solution. With its user-friendly interface and efficient tools, HitPaw Univd allows you to change the aspect ratio of your videos quickly and easily, making it an ideal choice for both beginners and professionals.


 HitPaw Edimakor
 HitPaw VikPea (Video Enhancer)


Share this article:
Select the product rating:
Joshua Hill
Editor-in-Chief
I have been working as a freelancer for more than five years. It always impresses me when I find new things and the latest knowledge. I think life is boundless but I know no bounds.
View all ArticlesLeave a Comment
Create your review for HitPaw articles