The Ultimate Guide of Davinci Resolve Compress Video
Video compression is essential for managing file sizes, especially high-definition content. In this regard, Davinci Resolve is a widely used, powerful tool for video editing and compression. Whether you're a professional editor or a beginner, learning how Davinci Resolve compress video and audio can greatly enhance your workflow and media management. This guide delves deep into the capabilities of Davinci Resolve, audio and video compression, how to compress video with Davinci Resolve, and an alternative. Let’s explore!
Part 1. What is Davinci Resolve Video Compression
Davinci Resolve compress video by reducing the bit rate and resolution of the original files. This diminishes file size while striving to retain as much quality as possible. The software utilises sophisticated algorithms to ensure efficient compression and minimise quality loss.
Here is a step-by-step guide on how to compress video using Davinci Resolve:
Step 1. Import the Video to Davinci Resolve
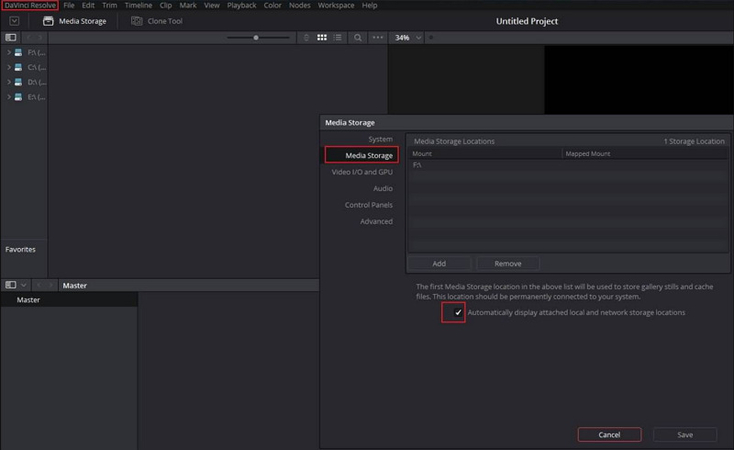
Download and install the latest version of the Davinci Resolve. Launch it on your computer and choose “New Project” from the “Project Manager.” Import your video and open the “Project Settings.”
Step 2. Cut Video to Reduce File Size
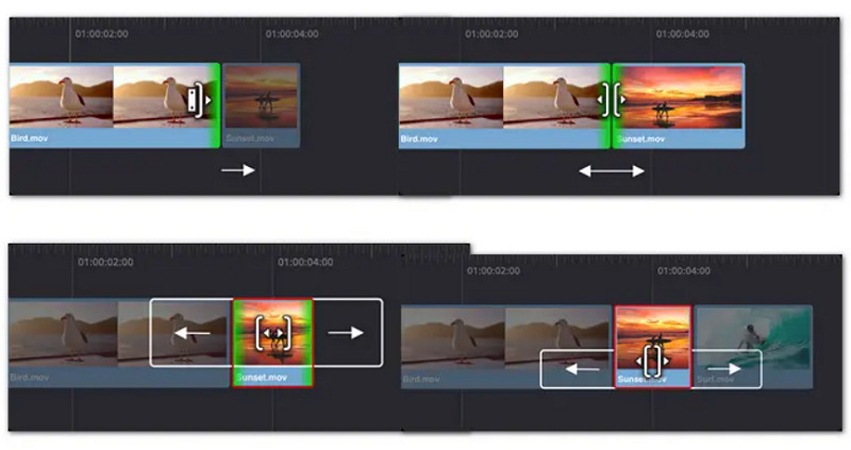
Click the “Cut” tab from the bottom control pane. Your video will appear in the preview window. You can drag the sliders to cut the video, thus reducing the file size and compressing without losing quality.
Davinci Resolve comes with Trim Edit Mode to cut the video and Blade Edit Mode to split the clip, thus reducing the file size.
Step 3. Export Video
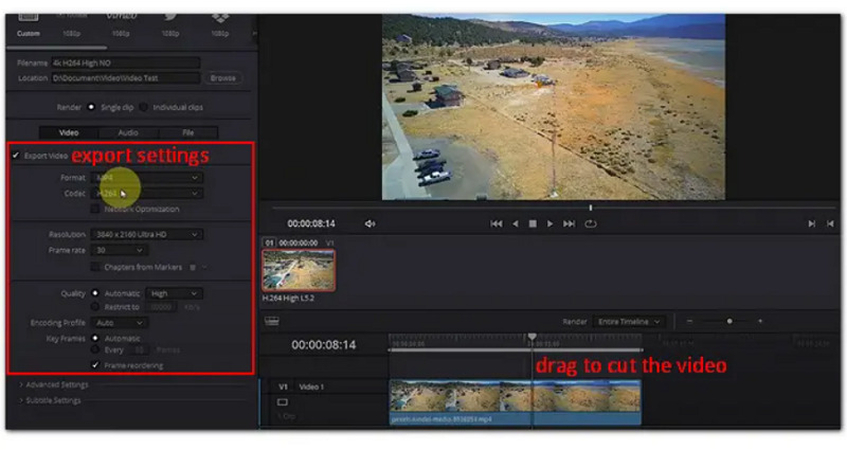
Access export and compression settings in the “Export Video” box. Choose the “Single clip” and select the desired “Format,” “Codec,” “Encoder,” and “Resolution.” Lower resolutions and bit rates will result in smaller file sizes. Plus, the H.264 codec is the best for all situations.
Let’s look at the tips on optimising video quality when you reduce file size with Davinci Resolve:
- Use the high quality and best settings for crucial projects where quality cannot be compromised.
- Experiment with different codecs; some may offer better compression with less quality loss.
- Always preview the final output to ensure the compression has not overly degraded the video.
Part 2. Audio Compression in Davinci Resolve
Audio compression reduces the dynamic range of your audio tracks, making quieter sounds more audible and loud sounds less overwhelming. This is crucial for maintaining audio clarity and ensuring a balanced sound.
Let’s follow these steps to use Davinci Resolve compressor audio:
Step 1. Access the Dynamics Panel
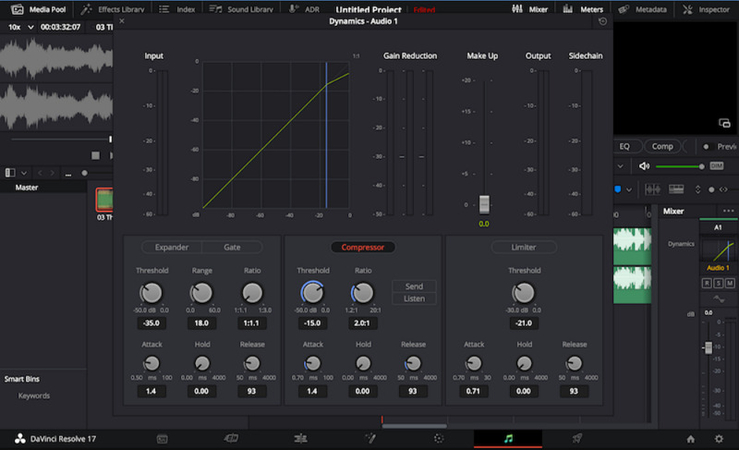
Open the “Dynamics” panel by double-clicking the “Dynamics graph” from the mixer’s strip in Davinci Resolve. Along with a limited and expander, all the sub-sections allow you to manage the audio levels.
Step 2. Adjust the Audio Compression
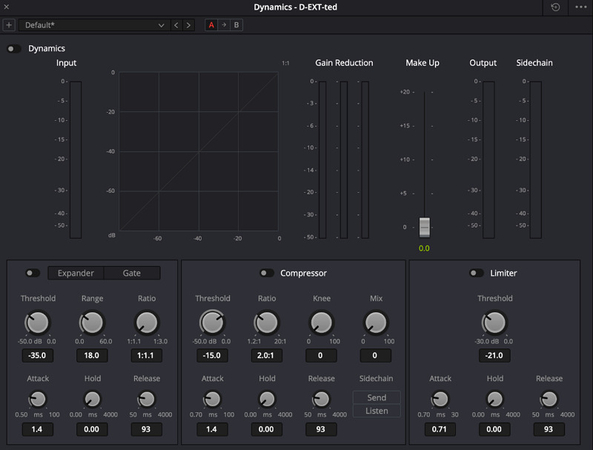
Select the audio track and adjust the compression settings. Set the level at which the compressor starts to reduce the audio volume.
- Threshold: Lowering the threshold means more audio signal will be compressed.
- Ratio: Determine how much compression will be applied once the signal exceeds the threshold. Higher ratios result in more significant compression.
- Attack: Control how quickly the compressor reacts once the audio passes the threshold level. A faster attack time is useful for very dynamic audio to tame peaks.
- Release: Set how quickly the compressor stops affecting the audio after it falls below the threshold. Shorter release times can make the compression less noticeable.
- Make-up Gain: Use make-up gain to compensate and bring the volume back up to a suitable level.
Step 3. Fine Tune Your Settings
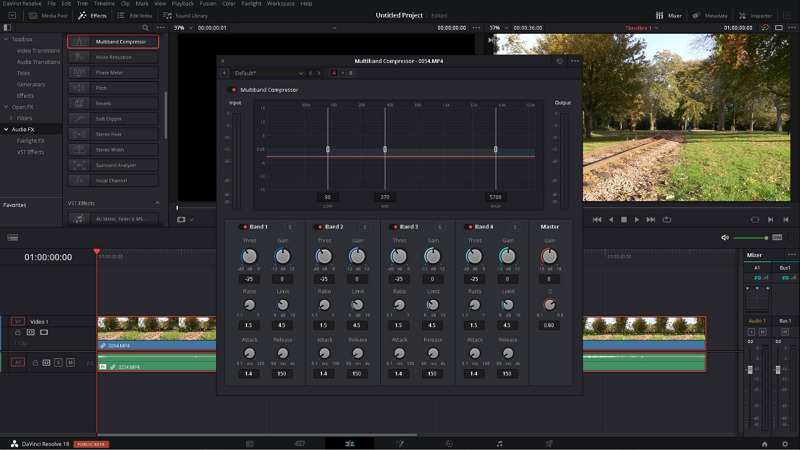
Adjust these settings while playing back the audio to hear the effect of your adjustments. Aim for a balance where the audio dynamics are controlled without squashing the life out of your sound.
Here are some techniques for balancing audio quality and file size:
- Be cautious not to overcompress, which can lead to a loss of audio dynamics.
- Use a limiter to prevent clipping in louder sections.
- Regularly compare the compressed audio against the original to maintain clarity and integrity.
Part 3. Reducing Video Size in Davinci Resolve
Understanding the available codecs and their settings is crucial to reduce video size in Davinci Resolve. For example, H.264 is known for delivering good quality at lower bit rates than ProRes or DNxHD. You can adjust these settings on the “Deliver” page by choosing the codec from the “Format” dropdown and then customising the resolution and bit rate. Testing combinations can help you find the perfect balance between size and quality.
Adjusting the compression settings in Davinci Resolve can reduce your video's resolution and frame rate to decrease its file size. Lowering the resolution to 1080p or 720p can significantly reduce the file size while providing a sufficiently high-quality image for many projects. Setting the frame rate to 60fps, 30fps, or 24fps can also reduce the size without affecting the viewing experience.
Maintaining video quality while reducing file size requires a strategic approach to compression. Move the “Quality” slider towards lower quality to adjust the compression level. However, reducing the file size can affect the video’s clarity and detail. After adjusting these settings, it’s important to frequently preview your video to ensure the compression artefacts do not degrade the visual quality too much.
Part 4. Best Alternative to Davinci Resolve Compress Video
For those seeking an alternative to Davinci Resolve with a broader range of capabilities, HitPaw Video Compressor offers a video compressor that helps you compress videos. You can also access an extensive range of tools for converting formats, downloading content, and editing. It supports a plethora of formats and integrates features for both audio and video optimisation. Due to its advanced AI algorithms, it ensures quick processing and high-quality output.
Features:
- Support processing almost 1000 formats
- Help you convert photo and video formats
- Lossless video conversion at 120X faster speed
- Download videos and music from 10000+ sites
- Keep track of all the compressed videos
Let’s follow these steps to compress videos using the HitPaw Univd (HitPaw Video Converter):
Step 1. Open Video/Image Compressor
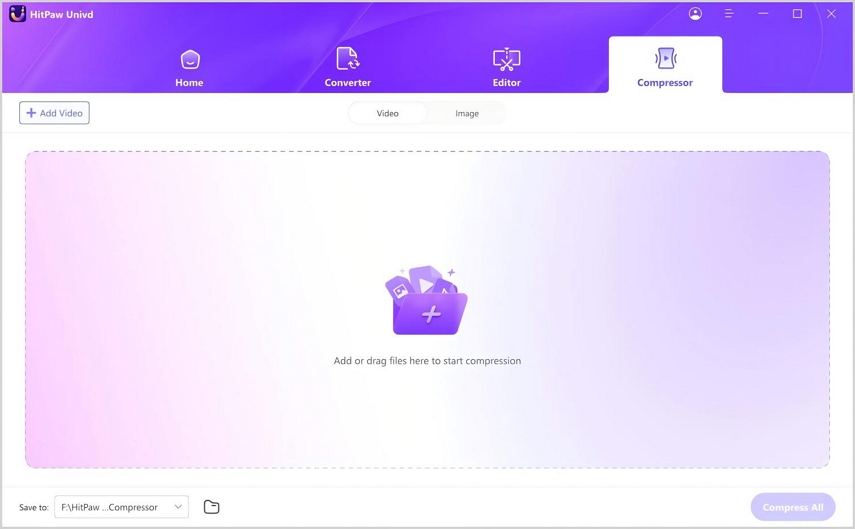
The first step is to launch the HitPaw Univd and open the “Toolbox” section. You have to select the “Image/Video Compressor” tool.
Step 2. Import the Video
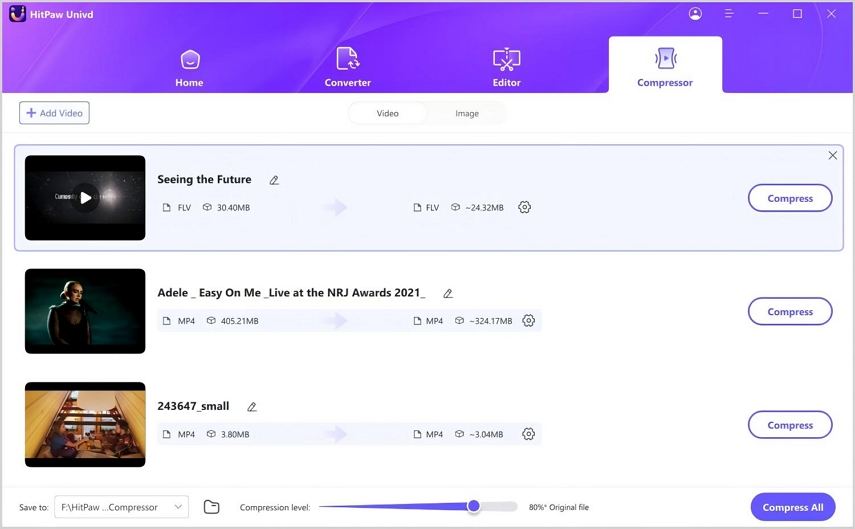
It’s time to click the “Add Video” button to import the required video or videos for compression in almost any format.
Step 3. Adjust Compress Settings
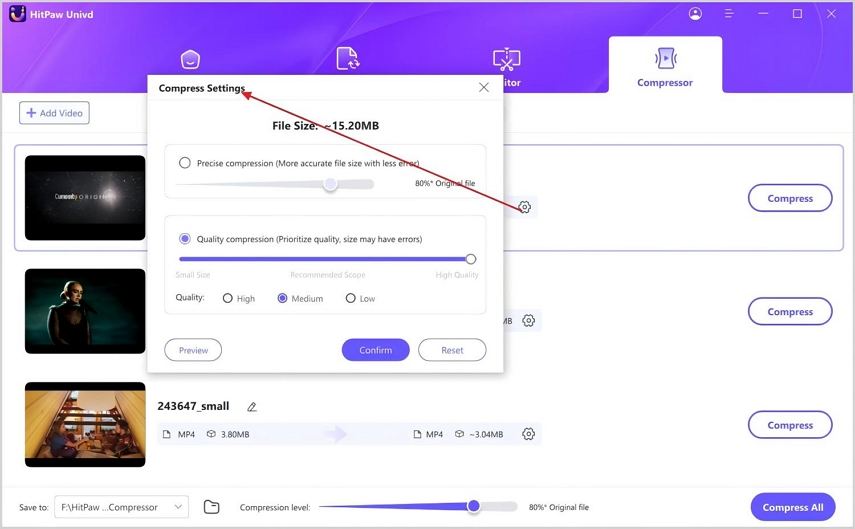
Click the “Settings” icon to adjust the compression level, quality, and format. You can also preview the output file size. Then, tap “Confirm.”
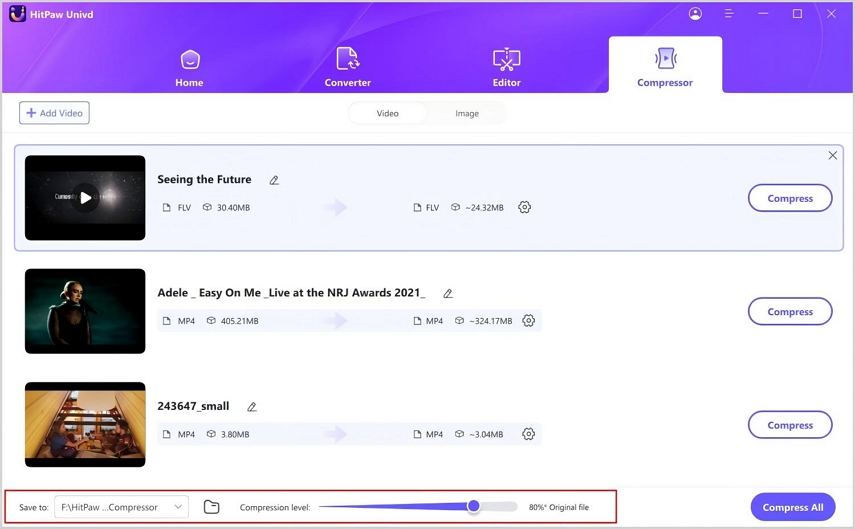
Next, you can change the compression level and quality using the sliders at the bottom.
Step 4. Click Compress
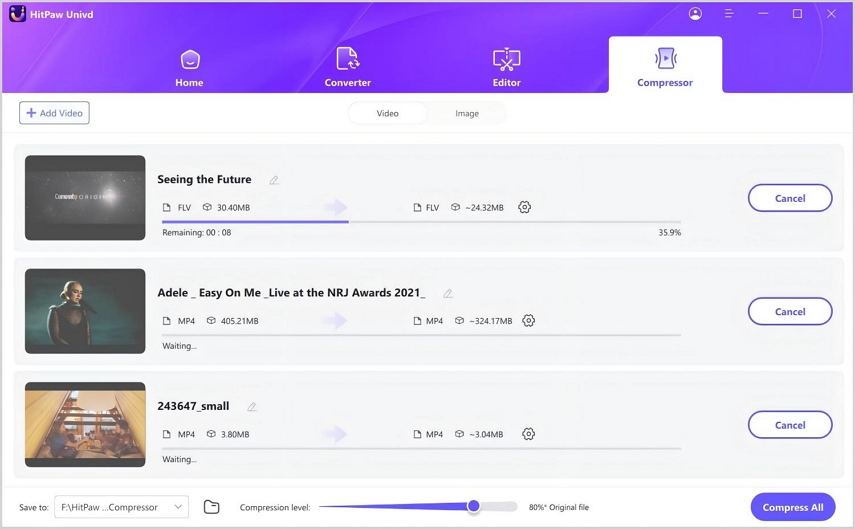
Lastly, press the “Compress” or “Compress all” button to start compression. Once done, you can access the output from the “Compressed” section. That’s all!
Watch the following video to learn more details:
Part 5. FAQs of Davinci Resolve Compress Video
Q1. Can Davinci Resolve reduce video size without losing quality?
A1. Yes, by carefully selecting codec and compression settings, you can significantly reduce video size with minimal impact on quality.
Q2. What is the best format to compress video in Davinci Resolve?
A2. H.264 is widely recommended to balance compression efficiency and quality preservation.
Q3. How do I compress a 4K video in Davinci Resolve?
A3. Lower the bitrate and resolution in the export settings, and consider converting to a more compressed format like H.264.
Bottom Line
Mastering audio and video compression in Davinci Resolve is essential for efficient media management, allowing you to maintain quality while reducing file sizes. For those looking to expand their toolkit, HitPaw Univd offers a versatile range of features, from format conversion to video editing and downloading content. Its user-friendly interface and powerful capabilities make it an excellent alternative or complement to Davinci Resolve. Try HitPaw Univd to enhance your video projects today!


 HitPaw Edimakor
 HitPaw VikPea (Video Enhancer)


Share this article:
Select the product rating:
Joshua Hill
Editor-in-Chief
I have been working as a freelancer for more than five years. It always impresses me when I find new things and the latest knowledge. I think life is boundless but I know no bounds.
View all ArticlesLeave a Comment
Create your review for HitPaw articles