[Solved!] How to Add Vimeo Subtitles?
Adding Vimeo subtitles to your videos enhances accessibility and improves viewer engagement by making your content comprehensible to a broader audience, including those who are deaf or hard of hearing and non-native speakers.
In this guide, we'll walk you through the simple steps to add Vimeo subtitles to your videos, ensuring that your message is clear and accessible to everyone. Follow along to learn how to effortlessly incorporate Vimeo subtitles into your uploads.
Part 1. How to Add Subtitles on Vimeo?
To start, let's explore how to add subtitles to your Vimeo project. Vimeo subtitles can enhance your video's accessibility and are easy to add through this straightforward process.
Step 1: Upload Your Video File to Vimeo
1. Visit Vimeo and Sign In
Head to the Vimeo website and click on the "New video" button located in the top right corner. If you don't have a Vimeo account, you can easily sign up using Google.
2. Choose Your Upload Method
After signing in, you'll be given options to upload an existing video or create one directly on the platform. Select the option that suits your needs.

Step 2: Navigate to the Distribution Tab and Select Subtitles
1. Access the Edit Settings
Once your video is uploaded, go to the video settings by clicking the "Edit Settings" button.
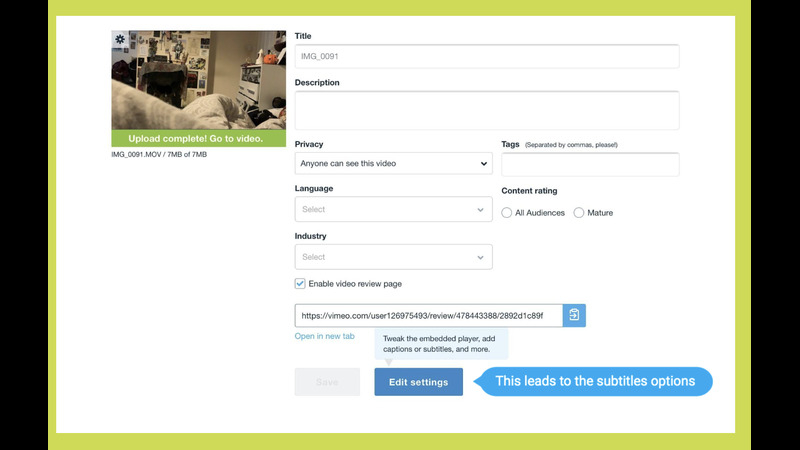
2. Open the Distribution Tab
Within the Edit Settings menu, locate and click on the "Distribution" tab.
3. Select the Subtitles Option
In the Distribution tab, find and select the "Subtitles" option to proceed.
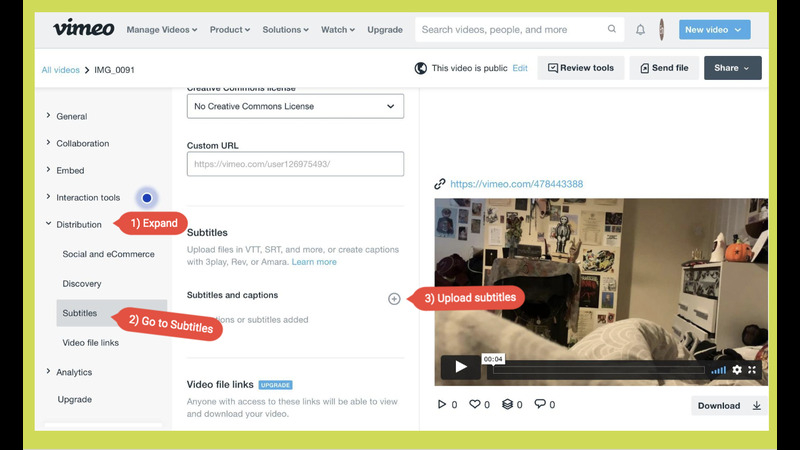
Step 3: Add Your Subtitle File
1. Click the + Button
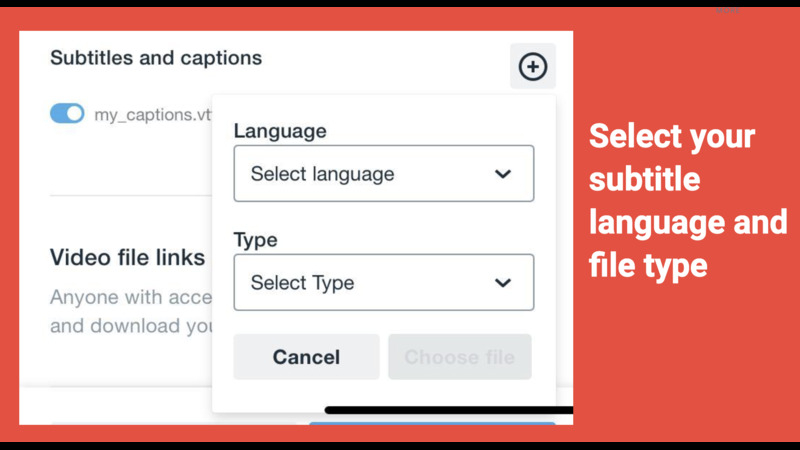
In the Subtitles section, click the "+" button to start adding your subtitle file.
2. Specify Language and File Type
A prompt will appear asking you to specify the language of your subtitles and the file type. Vimeo supports multiple subtitle file formats including SRT, VTT (recommended), DFXP/TTML, SCC, and SAMI. It's advisable to encode your subtitle files in UTF-8 format to ensure special characters display correctly.
3. Upload Your Subtitle File
Choose your subtitle file from your computer's documents or library, and upload it to Vimeo.
By following these steps, you can effortlessly add subtitles to your Vimeo videos, making them more accessible and engaging for a diverse audience.
Part 2. The Best Alternative to Vimeo to Add Subtitles
HitPaw Univd (HitPaw Video Converter) is a comprehensive software solution that excels beyond simple subtitle addition. It supports bulk video conversions, enabling you to convert multiple files simultaneously while maintaining or enhancing video quality. This makes it an ideal alternative for those frequently handling various video formats, ensuring efficient, high-quality processing.
Why Choose HitPaw Univd
- HitPaw Univd handles multiple videos simultaneously, saving time and effort for format conversions and subtitle additions.
- Convert video quality and format at the same time, ensuring optimal state for distribution and viewing.
- Effortlessly add subtitles with an intuitive interface that guides you through the process.
- Supports a wide range of formats, ensuring compatibility with any platform, from MP4 to MKV and more.
- Designed for ease of use, making it accessible to both beginners and advanced users.
Steps to Add Subtitles
Step 1: Import Video Files
Launch HitPaw Univd. Click the "Add Video" button or drag and drop your video files into the program.

Step 2: Add Subtitles
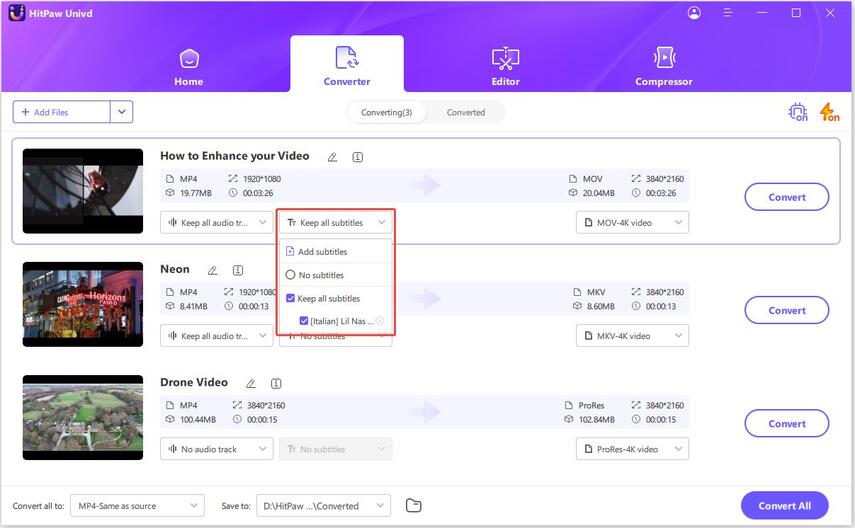
Click the "Subtitles" option, then select "Add Subtitles".
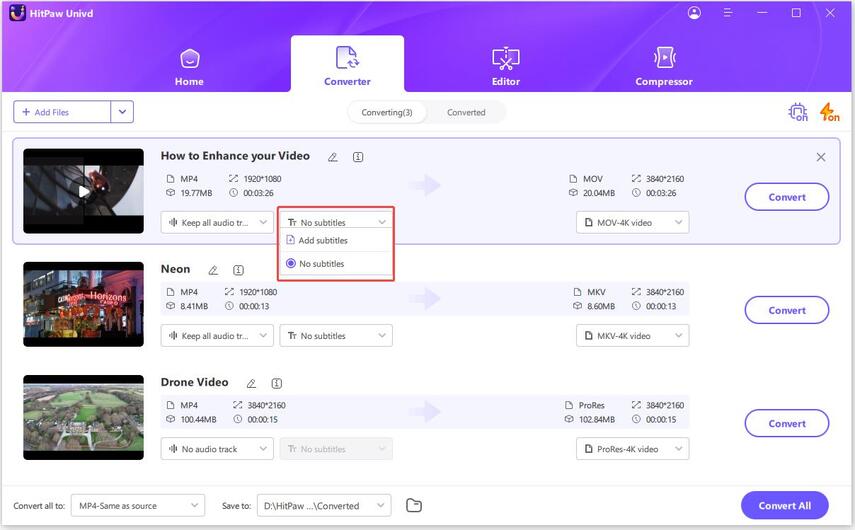
Step 3: Select Subtitle Format
Choose your subtitle file (supports SRT, ASS, VTT, and SSA formats). The files are sorted by import order, and you can remove them if needed.
Step 4: Choose Output Format
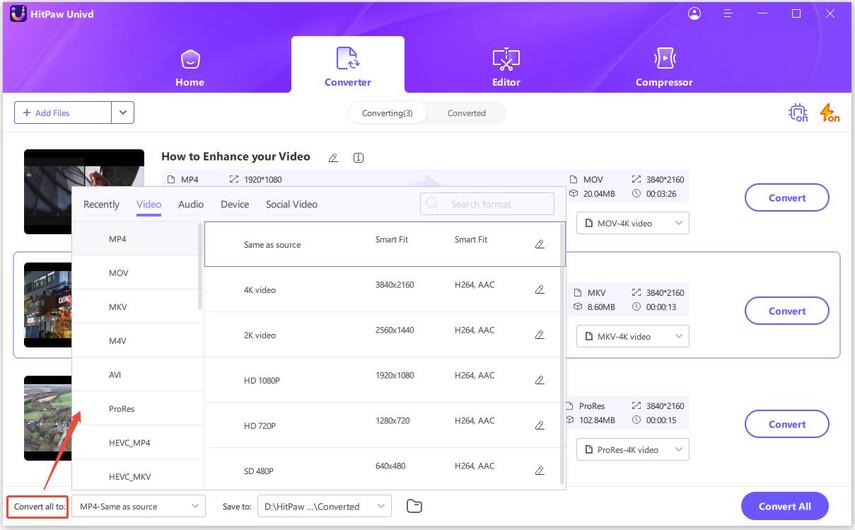
After adding subtitles, click "Convert All" to export the videos without re-encoding, or select a different output format by clicking the inverted triangle icon on each file's lower right side.
Step 5: Start Conversion
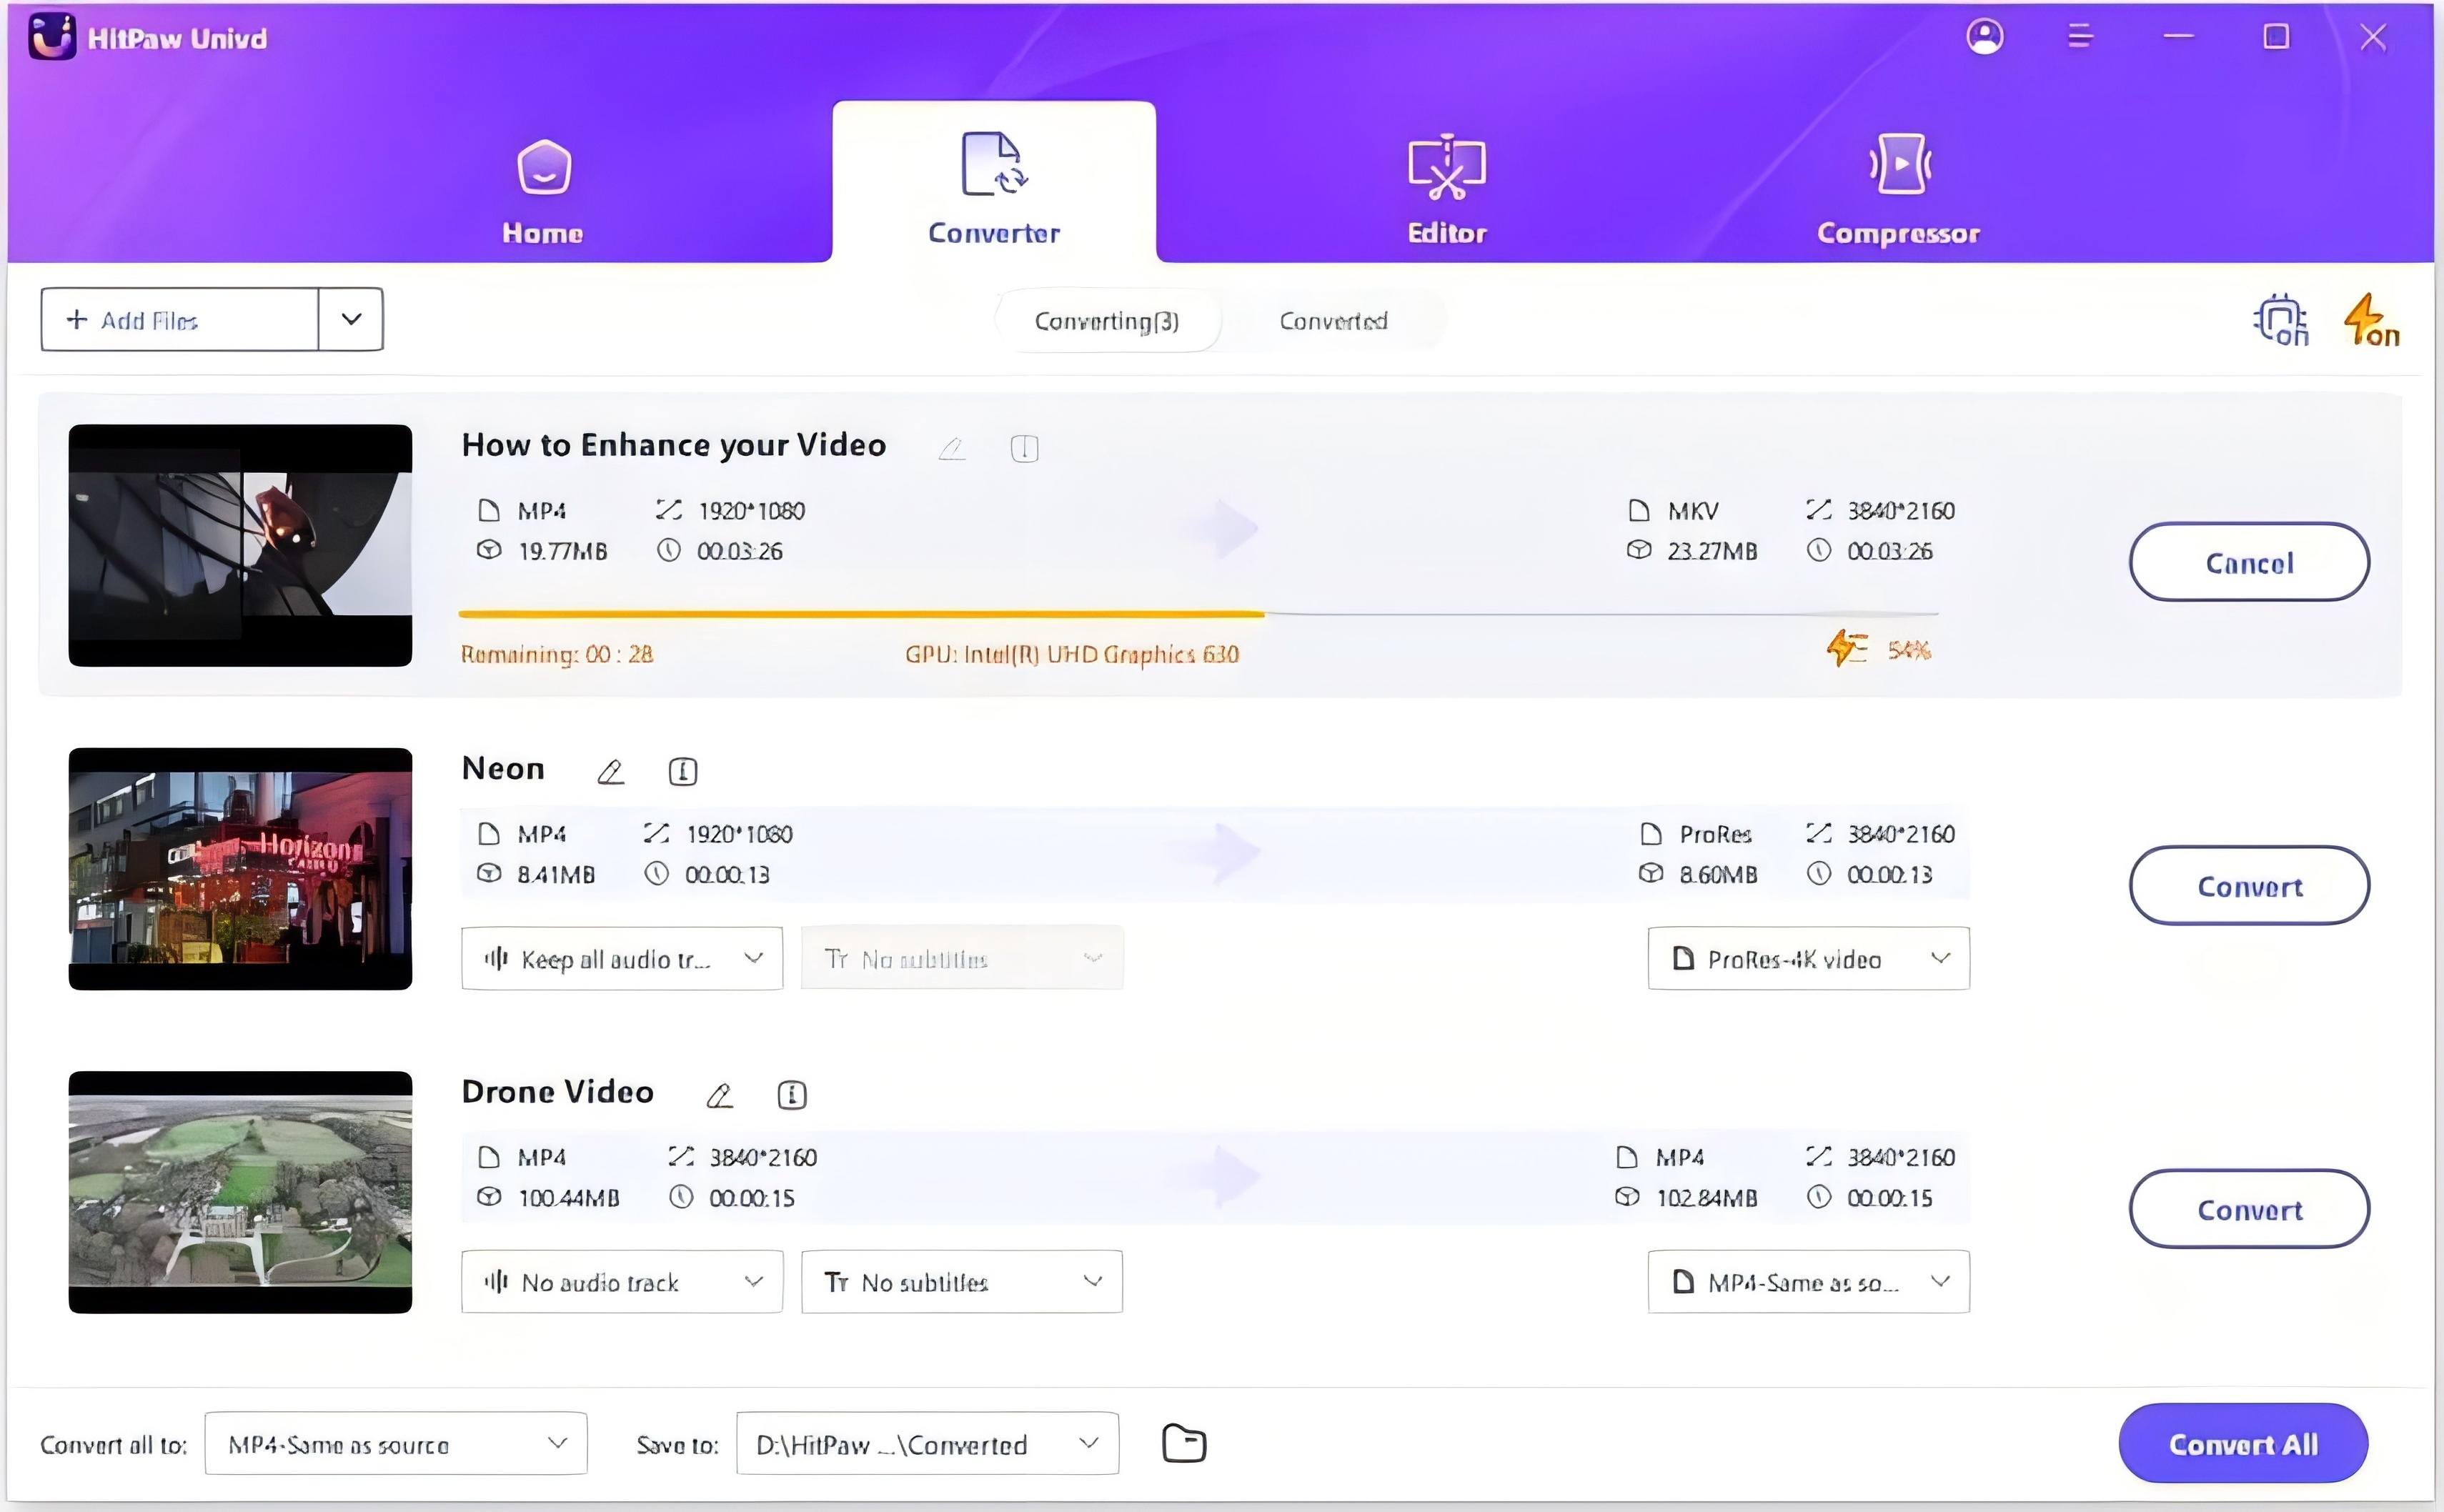
Select your target folder and click "Convert" (or "Convert All" for multiple files) to start the conversion process, ensuring no loss in video quality.
Step 6: Access Converted Files
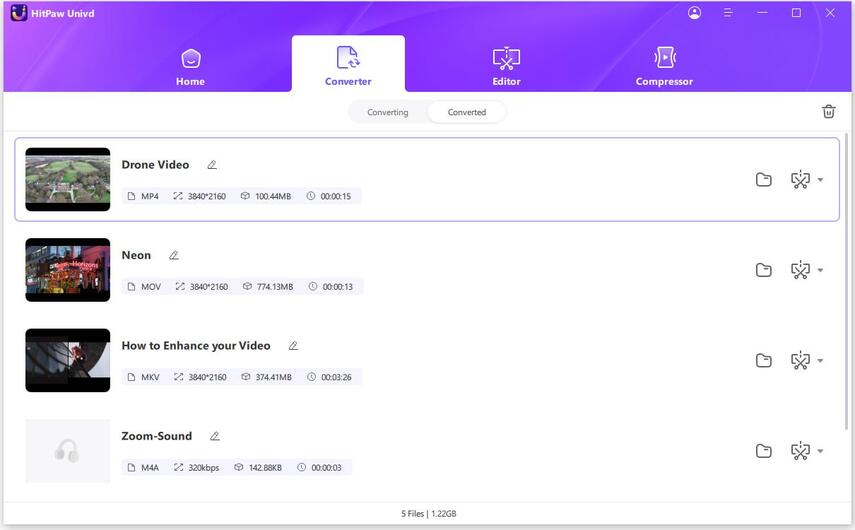
After conversion, go to the "Converted" tab. Click "Open Folder" to view your converted AVI files with subtitles.
Watch the following video to learn more details:
Part 3. Pro-Tips. What's the Difference between Subtitles and Closed Captioning
When enhancing your videos for accessibility and engagement, it's crucial to understand the differences between subtitles and closed captioning. Though often used interchangeably, these two features serve different purposes and offer distinct functionalities. Here are the three key differences between subtitles and closed captioning:
1. Purpose and Content
- Subtitles: Subtitles are aimed at viewers who can hear but may not understand the spoken language, translating or transcribing dialogue into text for comprehension without non-dialogue audio cues.
- Closed Captioning: Closed captions, tailored for deaf or hard of hearing viewers, encompass spoken dialogue and vital non-dialogue elements, like sound effects and speaker identification, ensuring complete audio comprehension.
2. Display and Customization
- Subtitles: Subtitles, typically optional, allow viewers to customize language, font size, and style. They translate or transcribe spoken dialogue without additional audio details.
- Closed Captioning: Closed captions, though optional, provide robust customization, visibility, and readability. They can be toggled by viewers and often feature formatted text boxes, aiding comprehension for those with hearing impairments.
3. Technical Implementation and Standards
- Subtitles: Implementing subtitles is relatively straightforward, often involving simple text files (like SRT or VTT) that are synced with the video. The standards for subtitles focus on translating dialogue accurately and displaying it in a readable format.
- Closed Captioning: Closed captioning, using standards like SCC or DFXP/TTML, entails intricate formatting to convey dialogue, sound effects, and speaker changes. Compliance with regulatory standards is crucial for broadcast and streaming accessibility.
Part 4. FAQs of Adding Vimeo Subtitles
Q1. What are the rules for subtitles?
A1. Subtitles should be accurate, synchronized with dialogue, and easy to read. They must convey the spoken content faithfully, maintain proper timing, and avoid obscuring important visuals. Additionally, subtitles should comply with accessibility standards, ensuring they are legible for all viewers.
Q2. Why aren't my subtitles working on Vimeo?
A2.
Subtitles may not work on Vimeo due to various reasons:
Conclusion
Enhance Vimeo videos with subtitles effortlessly using HitPaw Univd. While Vimeo offers effective tools, HitPaw's features like bulk conversion and simultaneous quality adjustments provide a comprehensive solution.
Its user-friendly interface and wide format support streamline the process. Add subtitles efficiently and improve viewer accessibility with HitPaw Univd. Simplify your workflow and ensure your message reaches a wider audience with this versatile tool.


 HitPaw Edimakor
 HitPaw VikPea (Video Enhancer)


Share this article:
Select the product rating:
Joshua Hill
Editor-in-Chief
I have been working as a freelancer for more than five years. It always impresses me when I find new things and the latest knowledge. I think life is boundless but I know no bounds.
View all ArticlesLeave a Comment
Create your review for HitPaw articles