A Comprehensive Guide on How to Change Video Speed in CapCut
CapCut is a well-known video editing tool that is preferred by both novices and experts due to its robust capabilities and easy-to-use UI. One of its versatile functions is the ability to change the speed of your videos, allowing you to create captivating slow-motion effects or dynamic time-lapses with ease.
This guide will provide you with straightforward and quick tips on how to change video speed in CapCut, ensuring that you can enhance your video projects effortlessly. Whether you're aiming for dramatic effects or just need to tweak the pacing, this tutorial has you covered.
Part 1. Change Video Speed in CapCut on iPhone/Android
CapCut's mobile app empowers users to go for the Capcut change video speed, whether speeding up a movie for a dynamic effect or slowing it down for emphasis. Its intuitive interface and robust editing capabilities include precise speed settings, allowing users to customize playback speeds effortlessly directly from their iPhone or Android device. CapCut ensures that mobile video editing remains accessible and professional, catering to both casual creators and serious videographers alike.
How to change speed of video in Capcut on iPhone/Android
Step 1: On your smartphone or tablet, launch the CapCut app. Make a fresh undertaking.
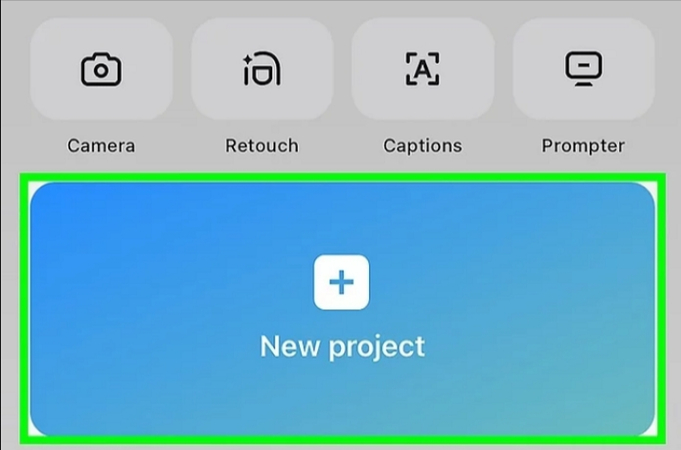
Step 2: To access the "Edit" function, click the video.

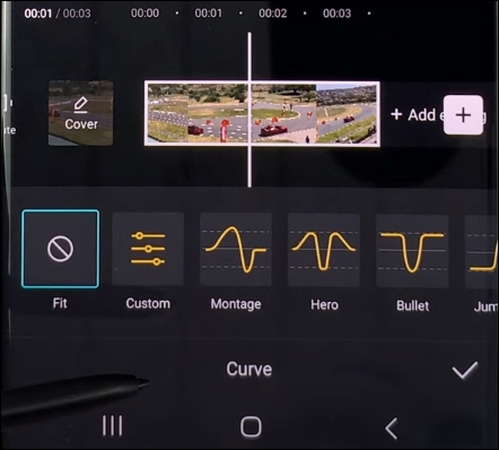
Step 3: After selecting "Speed," the available options appear. Select "Normal" or "Curve" to adjust the speed. There is a 0.1–100x configurable playback speed.
Part 2. Change Video Speed in CapCut on Desktop
CapCut excels in facilitating creative video editing tasks like creating time-lapse effects or dramatic slow-motion sequences. Its desktop application features a user-friendly interface that simplifies access to essential speed adjustment tools, ensuring users can achieve desired outcomes without navigating complex settings.
Whether you're looking to speed up a song to match a video clip or adjust the speed of a video for enhanced storytelling, CapCut offers intuitive controls and seamless integration, empowering users to unleash their creativity effectively. This makes CapCut a versatile choice for both amateur and professional video editors seeking flexible and powerful editing solutions. In this part, you'll learn how to change the speed of a video in Capcut.
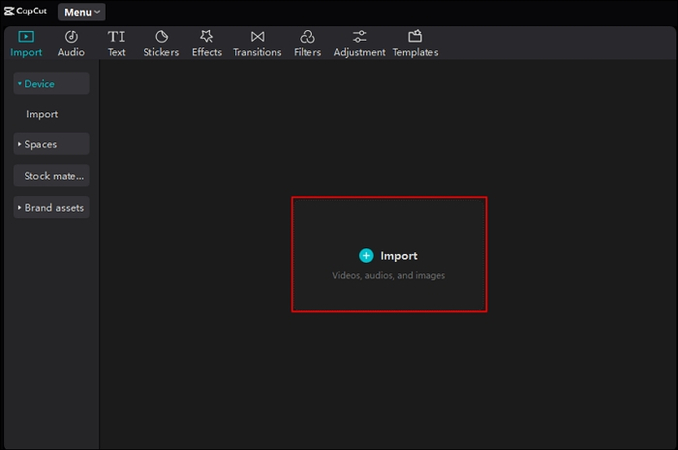
Step 1: Open CapCut on your computer and click "Create new project." This will bring you to the editing interface. Either drag and drop your video clip into the allotted space or select "Import". Add the clip to the playlist after that.
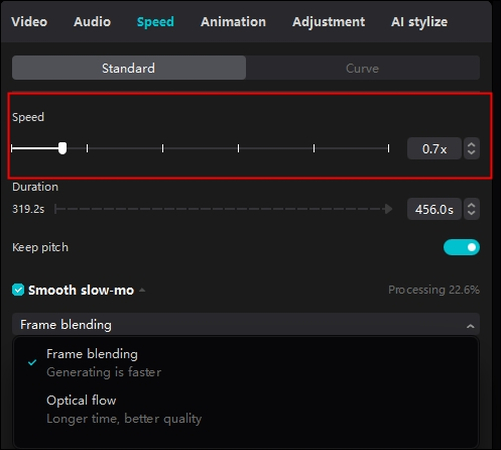
Step 2: In the timeline, click the video clip. The screen will show a modification box in the right corner. Locate the "Speed" tab and adjust the speed from 0.1x to 100x. The clip's duration will change accordingly. If you want to speed up an MP3 without altering the pitch, check the "Keep pitch" option. For creating smooth slow-motion videos, you have two modes to choose from: Frame Blending, which generates faster, and Optical Flow, which takes longer but produces better quality.
CapCut also offers a speed curve feature to customize the speed effect. After selecting "Curve," you'll see several ready-made speed templates and a custom option. To speed up or slow down a video from 0.1x to 10x, move the semi-circle control up or down. This works with templates as well. Click "Reset" to undo any changes.
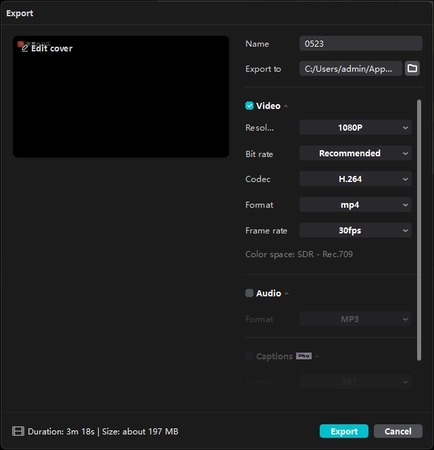
Step 3: Play the video to review the effect, make any necessary adjustments, and then choose to export or share the video. Decide on the format, resolution, storage location, and name for the video. For saving the work, select the export option at the conclusion of it.
Part 3. A Powerful Video Speed Changer: HitPaw Univd (HitPaw Video Converter)
HitPaw Univd excels in providing users with a seamless experience when adjusting video speeds, making it a standout choice for video editing enthusiasts. Its intuitive interface and comprehensive features empower users to effortlessly speed up or slow down videos while maintaining optimal quality.
Whether you're enhancing a time-lapse sequence, creating dramatic slow-motion effects, or simply adjusting playback speed for better viewing, HitPaw Univd offers precision and flexibility. The software's ability to handle various video formats ensures compatibility with diverse projects, from personal vlogs to professional presentations. With HitPaw Univd, achieving desired video speeds is both efficient and effective, making it an indispensable tool for video editing tasks of any scale.
Features
- Speed Adjustment: Easily speed up or slow down videos with precise control, offering a range of speed options to suit your needs.
- Real-time Preview: View changes in real-time while adjusting the video speed to ensure the desired effect.
- Batch Processing: Edit the speed of multiple videos simultaneously, saving time and effort.
- Frame Blending and Optical Flow: Choose between frame blending for faster processing or optical flow for higher-quality slow-motion effects.
- Speed Curve: Customize speed changes throughout the video using a speed curve, allowing for gradual acceleration or deceleration.
- Keep Pitch Option: When changing the speed of a video, the original audio pitch is maintained, ensuring high-quality sound.
- Wide Format Support: Compatible with various video formats, ensuring versatility and convenience.
How to change video clip speed with HitPaw Univd
Step 1: To import the video you wish to modify, open HitPaw Univd on the system and pick "Add Files".

Step 2: Once your video is loaded, click on the "Edit" button next to the video thumbnail. In the editing window, find the "Speed" tab. You can adjust the speed by moving the slider or entering a specific speed value. The preview window allows you to see the changes in real time.
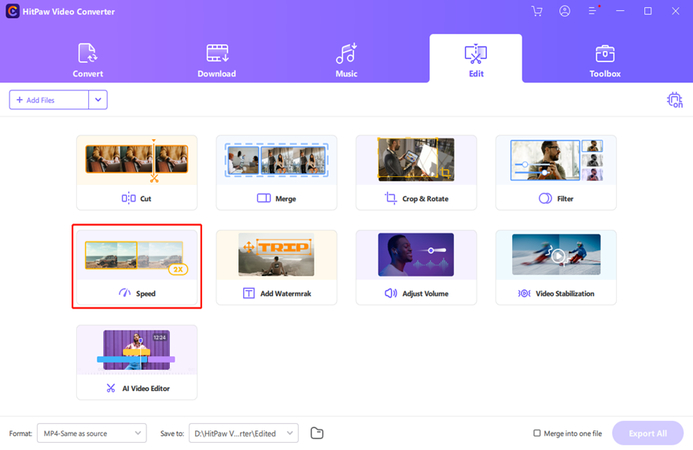
Step 3: Once you've adjusted the speed, click "OK" to save the adjustments. Choose the output format and target folder next. At the conclusion, click the "Convert" option to export your edited video.
Part 4 FAQ of Changing Video Speed in CapCut
Q1. Can CapCut change video speed?
A1. CapCut's speed adjustment tools empower users to achieve precise video edits, enhancing storytelling with dynamic effects like time-lapse and slow-motion. Whether accessed via desktop or mobile platforms, CapCut ensures seamless control over video speeds, catering to diverse editing needs with intuitive simplicity and professional results.
Q2. Where is the speed slider in CapCut?
A2. The editing window is where the speed slider is situated in CapCut. Click on the video clip after importing and putting your video to the timeline. On the right side of the screen, an editing window will open. Locate and click on the "Speed" tab on this window. There, you'll find the speed slider, which lets you change the speed between 0.1 and 100 times.
Conclusion
Learning how to change video speed in Capcut is essential for creating engaging and dynamic content, and tools like CapCut and HitPaw Univd make this task straightforward. While CapCut offers a range of features for basic speed adjustments, HitPaw Univd stands out for its powerful capabilities and user-friendly interface.
With HitPaw Univd , you can easily adjust video speed, maintain high-quality output, and take advantage of additional editing tools. We highly recommend HitPaw Univd for anyone looking to enhance their video editing experience with efficient and versatile speed adjustment options.


 HitPaw Edimakor
 HitPaw VikPea (Video Enhancer)


Share this article:
Select the product rating:
Joshua Hill
Editor-in-Chief
I have been working as a freelancer for more than five years. It always impresses me when I find new things and the latest knowledge. I think life is boundless but I know no bounds.
View all ArticlesLeave a Comment
Create your review for HitPaw articles