The Ultimate Guide of How to Make GIF Move in Google Slides
Adding animated GIFs to your Google Slides can make your presentations more engaging and visually appealing. This guide provides a step-by-step about how to make GIF move in google slides. Whether you’re a beginner or looking to enhance your presentation skills, you'll find the necessary tips and tricks to seamlessly incorporate moving GIFs into your Google Slides, making your content more dynamic and interactive.
Part 1. Why Use GIFs in Google Slides
Benefits of Using GIFs to Enhance Presentations
Here are the benefits of using GIFs to enhance presentations:
- Visual Appeal: GIFs add a dynamic element to your slides, making them visually stimulating and breaking the monotony of static content.
- Captures Attention: Animated visuals grab and hold the audience's attention more effectively than static images or text.
- Simplifies Complex Concepts: GIFs can visually demonstrate processes or changes over time, making complex ideas easier to understand.
- Enhances Aesthetics: They add an extra layer of creativity and professionalism, making your slides look polished and engaging.
- Engages Multiple Senses: By adding movement, GIFs engage both visual and cognitive senses, enhancing the overall impact of the presentation.
Impact of Animated Visuals on Audience Engagement
- Increased Retention: Animated visuals can significantly improve information retention, helping the audience remember key points better.
- Better Understanding: They aid in clarifying complex ideas and concepts, making them easier to grasp and understand.
- Higher Engagement: Animated visuals keep the audience engaged, maintaining their interest throughout the presentation.
- Emotional Connection: GIFs can convey emotions and actions more effectively than words alone, creating a stronger connection with the audience.
- Interactive Experience: They encourage interaction and participation, making the presentation more dynamic and lively.
Incorporating GIFs into your Google Slides can transform your presentations, making them more interactive, engaging, and memorable for your audience. By leveraging the benefits and impact of animated visuals, you can enhance the overall effectiveness and appeal of your content.
Part 2. How to Convert Videos to GIFs
HitPaw Univd (HitPaw Video Converter) is a versatile and powerful format conversion program designed to meet all your multimedia processing needs. It stands out for its user-friendly interface and robust features, making it the go-to solution for both beginners and professionals.
Features
- Convert Photo/Video Formats: Easily convert between various photo and video formats to ensure compatibility across different devices and platforms.
- Download Videos from 10,000+ Sites: Download videos from popular websites, including YouTube, Facebook, Instagram, and more, for offline viewing.
- Download Music from Famous Platforms: Save music from platforms like Spotify, SoundCloud, and others to enjoy offline.
- Edit Videos: Trim, crop, rotate, and apply various effects to your videos with the built-in video editor.
- Various Popular Tools: Includes an image compressor, screen recording, 2D to 3D conversion, and more, making it a comprehensive multimedia processing tool.
Steps
Here is How to Convert Videos to GIFs Using HitPaw Univd
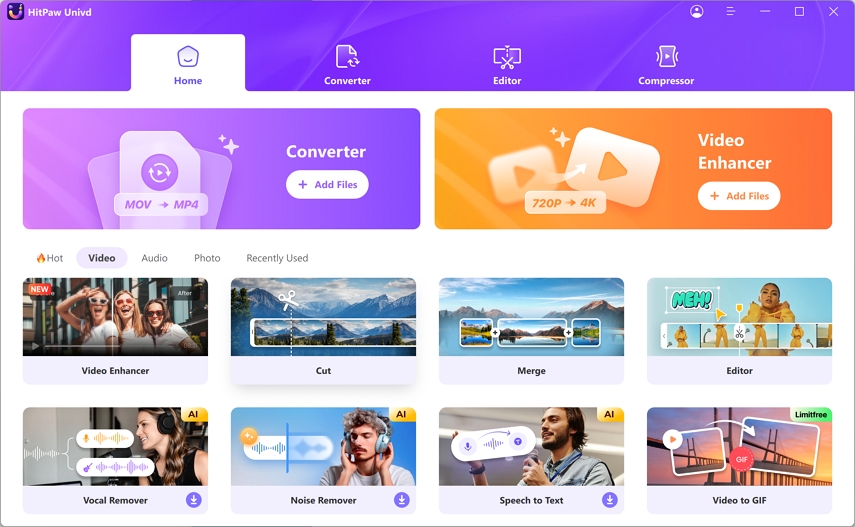
Step 1. Launch HitPaw Univd and Switch to Toolbox
Open HitPaw Univd and switch to the Toolbox tab. Select the "Video to GIF" feature.
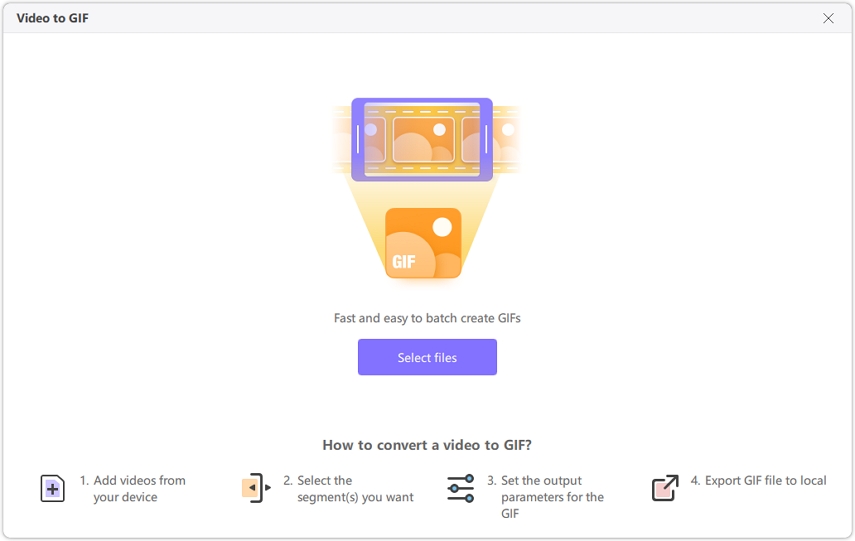
Step 2. Add a Video
Import your desired video into the program. The video will appear in the timeline, where you can preview it by clicking the play button.
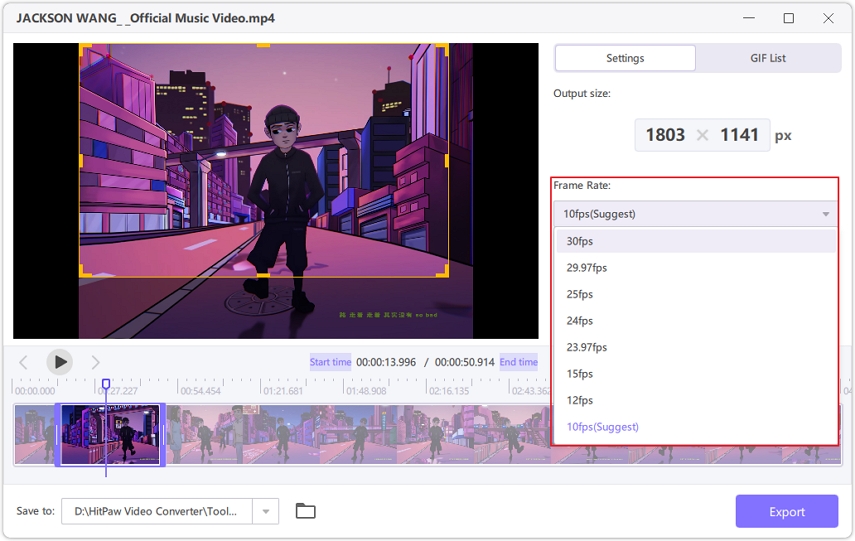
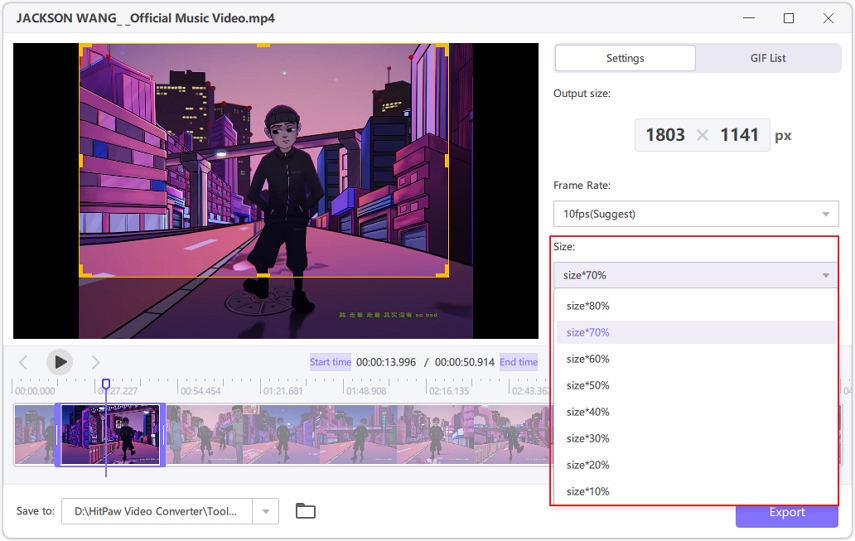
Step 3. Set GIF Output Parameters
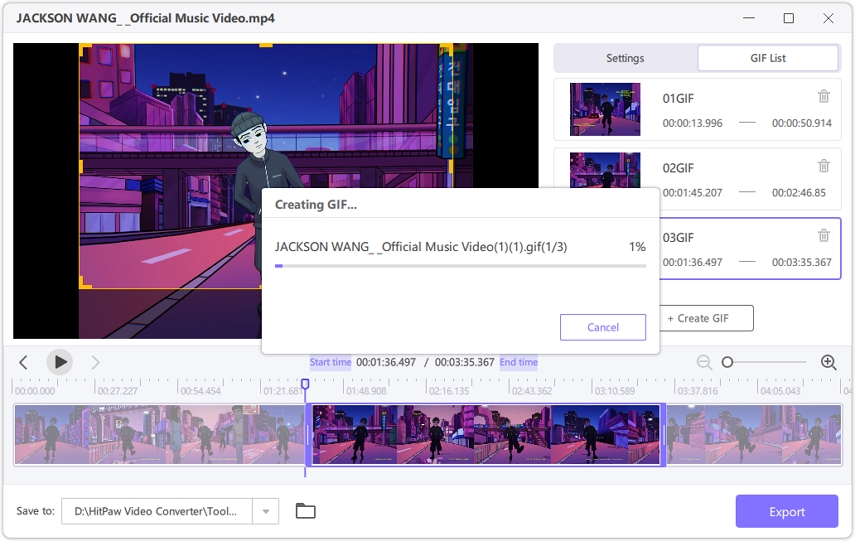
In the Settings tab, configure the output resolution, frame rate, and size. Adjust the aspect ratio by dragging the matrix diagram in the preview window. Set the frame rate (default is 10fps) and size from the drop-down menus.
Step 4. Create GIF from Video
Adjust the start and end times of the GIF by dragging the timeline bars. Preview the segment, then click "Create GIF" to generate the GIF file. For multiple GIFs, select new segments and repeat the process.
Step 5. Export GIFs
Click the Export button in the lower right corner to save your created GIFs.
Watch the following video to learn more details:
Part 3. Adding GIFs to Google Slides
Step-by-Step Instructions on Inserting GIFs into Google Slides
Here is how to make a gif move in google slides:
1. Open Google Slides
- Go to Google Slides and open your presentation or create a new one.
2. Select the Slide
- Choose the slide where you want to add the GIF.
3. Insert the GIF
- Click on the “Insert” menu at the top.
- Select “Image” and then “Upload from computer” or “By URL” depending on where your GIF is stored.
If you are using a URL, paste the link to the GIF. If uploading from your computer, navigate to and select your GIF file.
- Click “Insert” to add the GIF to your slide.
4. Adjust the Size and Position
- Click on the GIF to select it.
- Drag the corners to resize the GIF while maintaining its aspect ratio.
- Click and drag the GIF to reposition it on the slide as desired.
5. Preview the Animation
- Enter “Present” mode to ensure the GIF animates as expected during your presentation.
Tips on Adjusting the Size and Position of GIFs for Optimal Presentation
- Maintain Aspect Ratio: Always drag from the corners to resize the GIF proportionally, preventing distortion.
- Centering the GIF: Use alignment tools in Google Slides to center the GIF horizontally and vertically on your slide for a balanced look.
- Background Considerations: Ensure the background color or image of the slide contrasts well with the GIF to enhance visibility.
- Consistent Placement: For multiple slides with GIFs, maintain a consistent size and position to ensure a cohesive look throughout your presentation.
- Check Performance: Test the presentation on different devices to ensure the GIFs play smoothly without any lag or performance issues.
By following these steps and tips, you can effectively insert and optimize GIFs in your Google Slides, making your presentations more engaging and visually appealing.
Part 4. FAQs of How to Make GIF Move in Google Slides
Q1. Why is my GIF not moving in Google Slides?
A1. Ensure that the GIF is properly inserted into the slide and not just a still image. Enter “Present” mode to see the animation. If it still doesn’t move, try re-uploading the GIF or checking the file compatibility.
Q2. How do I add a GIF to Google Slides from a URL?
A2. Click on "Insert" > "Image" > "By URL" in Google Slides. Paste the URL of the GIF and click “Insert.” Ensure the URL is direct and ends with .gif to function correctly.
Q3. Can I resize a GIF in Google Slides without losing animation?
A3. Yes, you can resize a GIF in Google Slides by clicking and dragging the corners. This does not affect the animation. Ensure to drag from the corners to maintain the aspect ratio and avoid distortion.
Bottom Line
Incorporating animated GIFs into Google Slides can significantly enhance your presentations, making them more engaging and visually appealing. By following the steps and tips outlined in this guide, you can seamlessly add and adjust GIFs to create a dynamic presentation. For all your video conversion needs, try out HitPaw Univd. It offers a comprehensive suite of tools to effortlessly convert and edit your multimedia files. Transform your presentations today with HitPaw Univd!


 HitPaw Edimakor
 HitPaw VikPea (Video Enhancer)


Share this article:
Select the product rating:
Joshua Hill
Editor-in-Chief
I have been working as a freelancer for more than five years. It always impresses me when I find new things and the latest knowledge. I think life is boundless but I know no bounds.
View all ArticlesLeave a Comment
Create your review for HitPaw articles