The Ultimate Guide of Compressing Video with FFmpeg
Compressing video files can be crucial for saving storage space and ensuring smooth playback across devices. In this ultimate guide, you'll learn how to compress video with FFmpeg, a powerful and versatile open-source tool. Discover expert tips and tricks to optimize your videos, maintain high quality, and significantly reduce file sizes using FFmpeg's advanced features and settings.
Part 1. What is FFMPEG for Video Compression
Understanding FFmpeg and Its Capabilities for Video Compression
FFmpeg is an open-source multimedia framework renowned for its powerful video compression capabilities. It enables users to reduce video file sizes while maintaining quality by adjusting parameters like bitrate, frame rate, and resolution. Supporting numerous codecs and formats, FFmpeg is versatile for any video compression task, making media storage and sharing more efficient.
Options Available in FFmpeg for Compressing Videos
When FFmpeg compress video, several options and parameters can be adjusted to fine-tune the output:
1. Bitrate Control:
- Constant Bitrate (CBR): Maintains a fixed bitrate throughout the video, useful for streaming.
- Variable Bitrate (VBR): Adjusts the bitrate dynamically to optimize quality and file size.
2. Resolution Scaling:
- Change the video resolution to reduce file size. Lower resolutions generally result in smaller file sizes.
3. Codec Selection:
- Choose from various codecs like H.264, H.265, VP8, and VP9. H.264 is popular for its good balance of quality and compression efficiency.
Examples of Commands to Compress Videos Using FFmpeg
Here are some common FFmpeg commands to compress videos:
1. Basic Compression with H.264 Codec:
ffmpeg -i input.mp4 -vcodec libx264 -crf 23 output.mp4
This command uses the H.264 codec with a constant rate factor (CRF) of 23. Lower CRF values result in higher quality and larger file sizes.
2. Change Resolution and Compress:
ffmpeg -i input.mp4 -vf scale=1280:720 -vcodec libx264 -crf 23 output_720p.mp4
This command scales the video down to 1280x720 resolution and compresses it using the H.264 codec.
By using these commands, you will be able to utilize FFmpeg's full potential to compress video FFmpeg, optimizing your videos for storage and sharing without compromising on quality.
Part 2. How to Compress Video with FFmpeg
Here is a step-by-Step guide on how ffmpeg compress video to specific size:
1. Install FFmpeg:
Ensure FFmpeg is installed on your system. You can download it from the official FFmpeg website and follow the installation instructions for your operating system.
2. Open Command Line Interface (CLI):
Access the CLI on your computer. For Windows, use Command Prompt or PowerShell; for macOS or Linux, use Terminal.
3. Navigate to the Video File Directory:
Use the cd command to navigate to the directory where your video file is located.
cd path/to/your/video
4. Basic Compression Command:
Start with a basic compression command to reduce the file size using the H.264 codec.
ffmpeg -i input.mp4 -vcodec libx264 -crf 23 output.mp4
5. Adjust Bitrate:
To control the bitrate, use the -b:v option.
ffmpeg -i input.mp4 -vcodec libx264 -b:v 1M output_vbr.mp4
6. Scale Resolution:
Reduce the resolution to lower the file size.
ffmpeg -i input.mp4 -vf scale=1280:720 -vcodec libx264 -crf 23 output_720p.mp4
7. Change Frame Rate:
Adjust the frame rate for further compression.
ffmpeg -i input.mp4 -r 24 -vcodec libx264 -crf 23 output_24fps.mp4
8. Compress Audio:
Compress the audio stream while keeping the video stream unchanged.
ffmpeg -i input.mp4 -vcodec copy -acodec aac -b:a 128k output_audio_compressed.mp4
9. Combine Multiple Options:
Combine various options to optimize the compression process.
ffmpeg -i input.mp4 -vf scale=1280:720 -r 24 -vcodec libx264 -b:v 1M -acodec aac -b:a 128k output_optimized.mp4
Tips and Tricks for Optimizing Video Compression with FFmpeg
1. Use CRF for Quality Control:
The Constant Rate Factor (CRF) is a good way to balance quality and file size. A CRF value of 18-23 is generally recommended for high-quality compression.
2. Experiment with Different Codecs:
While H.264 is common, newer codecs like H.265 (HEVC) offer better compression rates. For H.265, replace libx264 with libx265.
ffmpeg -i input.mp4 -vcodec libx265 -crf 28 output_h265.mp4
3. Two-Pass Encoding:
For better quality at a given file size, use two-pass encoding.
ffmpeg -i input.mp4 -vcodec libx264 -b:v 1M -pass 1 -an -f mp4 /dev/null && \
ffmpeg -i input.mp4 -vcodec libx264 -b:v 1M -pass 2 -acodec aac -b:a 128k output_twopass.mp4
Importance of Choosing the Right Settings for Video Compression
Choosing the right settings for video compression is crucial to achieve the best balance between file size and quality. Incorrect settings can lead to poor video quality, excessive file sizes, or long processing times. Here's why it's important:
- Quality Preservation:
The right settings ensure that the video quality remains high, even after compression. - Efficient Storage and Bandwidth Usage:
Optimal compression settings help save storage space and reduce bandwidth usage, making video files easier to store and share. - Playback Compatibility:
Using standard codecs and settings ensures that the compressed video is compatible with various playback devices and platforms.
By following this guide and utilizing the tips and tricks provided, FFmpeg compresses video without losing quality.
Part 3. Best Alternative to Compress Videos
HitPaw Video Compressor is a highly recommended video compression program known for its user-friendly interface and powerful features. It supports a wide range of formats and allows users to compress videos without losing quality quickly and efficiently. With advanced settings and batch processing capabilities, HitPaw Univd (HitPaw Video Converter) is ideal for both beginners and professionals seeking a reliable solution for video compression.
Features
- User-Friendly Interface: Easy-to-navigate interface suitable for beginners and professionals.
- Wide Format Support: Supports a broad range of video and audio formats for comprehensive compatibility.
- High-Quality Compression: Compress videos without losing quality, maintaining the integrity of your media files.
- Batch Processing: Compress multiple videos simultaneously, saving time and effort.
- Fast Conversion Speed: Utilizes advanced technology for quick and efficient video compression and conversion.
Steps
1. Install and Launch:
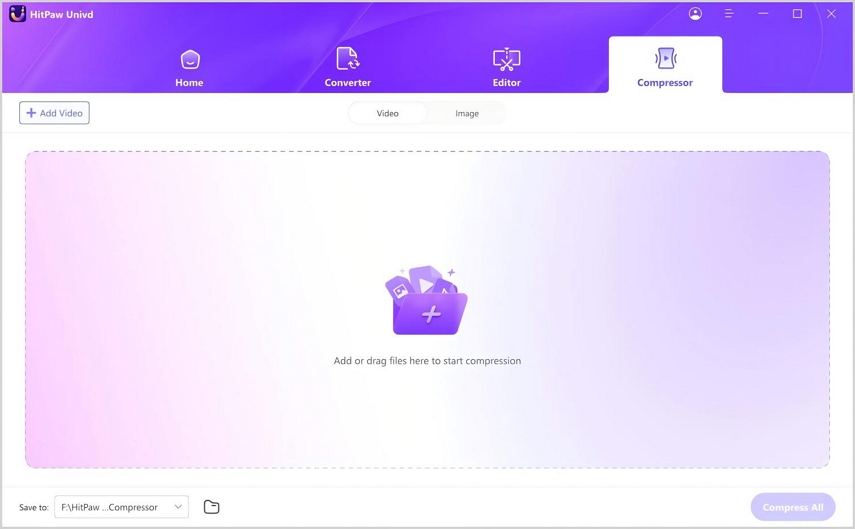
Install and open HitPaw Univd. Select the Video/Image Compressor feature from the Toolbox.

2. Add Video to Compress:
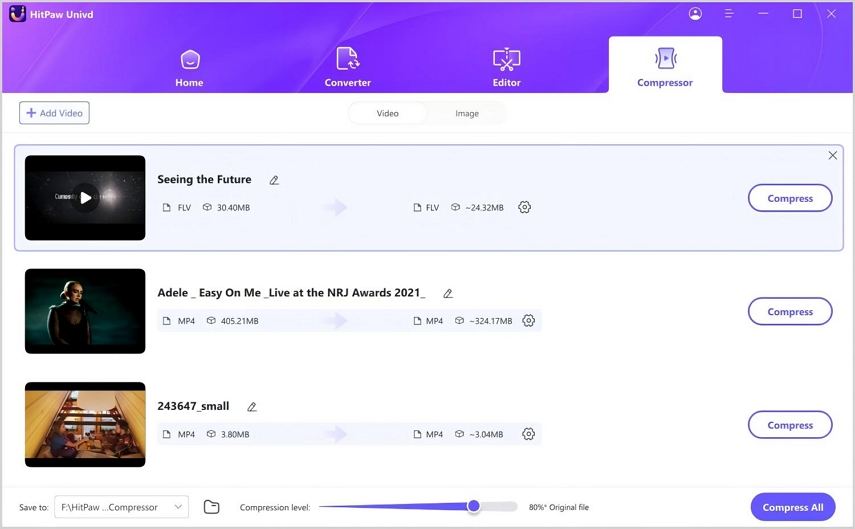
Click "Add Video" on the Video tab to import your video(s). Rename by clicking the pen icon if needed.

3. Adjust Compression Settings:
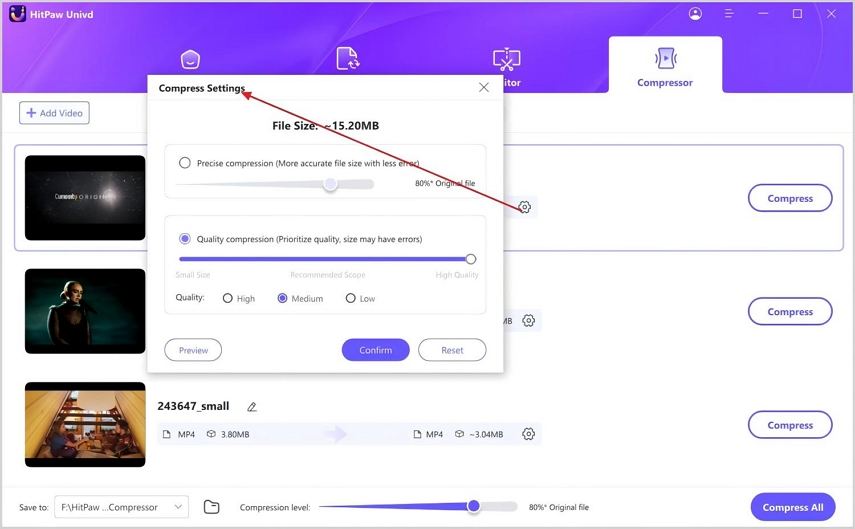
Click the gear icon to set the compression level and quality. Choose "Original" or "MP4" format, preview effects, and click "Confirm." Select a compression level (medium recommended) for all files.

4. Start Compression:
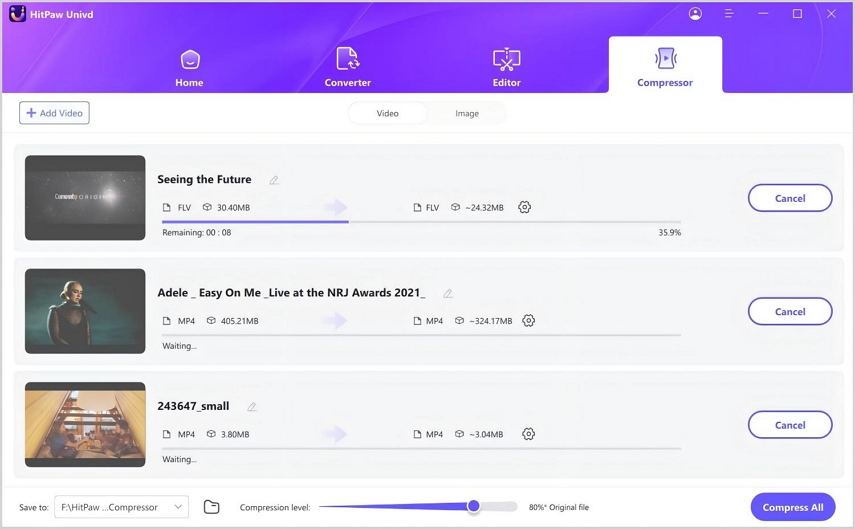
Click "Compress" for a single file or "Compress All" for multiple files.

5. Access Compressed Videos:
Find the compressed video(s) in the output folder after the process completes.
Watch the following video to learn more details:
Part 4. Advanced Techniques for Video Compression with FFMPEG
Advanced Features of FFmpeg for Reducing Video Size Without Losing Quality
1. Two-Pass Encoding:
This technique analyzes the video in the first pass and compresses it in the second, optimizing quality and file size.
ffmpeg -i input.mp4 -c:v libx264 -b:v 1M -pass 1 -an -f mp4 /dev/null && \
ffmpeg -i input.mp4 -c:v libx264 -b:v 1M -pass 2 -c:a aac -b:a 128k output.mp4
2. CRF with Preset:
Adjust the CRF (Constant Rate Factor) with a preset for better quality control. Lower CRF values yield better quality.
Compress Videos to a Specific Size Using FFmpeg
Here is how ffmpeg compress video to specific size:
Calculate Target Bitrate:
- 1.Determine desired file size (MB), video duration (seconds).
- 2.Calculate bitrate: bitrate = (desired size in bits) / duration.
- 3.Example: For a 50 MB file, 5 minutes (300 seconds):
bitrate = (50 * 8,000,000) / 300 ≈ 1333 kbps
FFmpeg Command:
ffmpeg -i input.mp4 -b:v 1333k -c:a aac -b:a 128k output.mp4
Examples of Complex Commands for Advanced Video Compression
Two-Pass Encoding with H.265:
ffmpeg -y -i input.mp4 -c:v libx265 -b:v 1M -x265-params pass=1 -an -f mp4 /dev/null && \
ffmpeg -i input.mp4 -c:v libx265 -b:v 1M -x265-params pass=2 -c:a aac -b:a 128k output_h265_twopass.mp4
Advanced CRF with Custom Preset:
ffmpeg -i input.mp4 -c:v libx264 -preset veryslow -crf 18 -c:a aac -b:a 128k output_crf18.mp4
Part 5. FAQs of Compress Video with FFmpeg
Q1. How do I compress a video without losing quality in FFmpeg?
A1. Use -crf with values between 18-23 and a suitable codec like H.264 or H.265. Example: ffmpeg -i input.mp4 -vcodec libx264 -crf 20 output.mp4.
Q2. How can I reduce the video size with FFmpeg?
A2. FFmpeg compress video by Adjusting bitrate, resolution, or frame rate. Example: ffmpeg -i input.mp4 -b:v 1M -vf scale=1280:720 -r 24 output.mp4.
Q3. What is the best preset to use for video compression with FFmpeg?
A3. Use -preset slow or veryslow for high-quality compression, or -preset fast for quicker results. Example: ffmpeg -i input.mp4 -vcodec libx264 -preset slow -crf 20 output.mp4.
Bottom Line
In conclusion, mastering video compression with FFmpeg and HitPaw Univd can significantly enhance your video handling capabilities. While FFmpeg offers powerful command-line options for advanced users to compress video FFmpeg, HitPaw Univd provides a user-friendly alternative. Try HitPaw Univd today to simplify your video compression tasks without sacrificing quality.


 HitPaw Edimakor
 HitPaw VikPea (Video Enhancer)


Share this article:
Select the product rating:
Joshua Hill
Editor-in-Chief
I have been working as a freelancer for more than five years. It always impresses me when I find new things and the latest knowledge. I think life is boundless but I know no bounds.
View all ArticlesLeave a Comment
Create your review for HitPaw articles