[100% Useful] How to Repair AVI Files
Encountering issues with AVI files can be frustrating, especially when they contain valuable content. Corrupted or damaged AVI files often result from interrupted downloads, abrupt system shutdowns, or even virus attacks, leaving you unable to access your videos.
Understanding how to repair these files is essential to restore your media and avoid data loss. This guide will explore effective methods and tools to repair AVI files, ensuring your videos are back to their original state. Whether you're dealing with minor glitches or significant corruption, these solutions will help you recover your important AVI files seamlessly.
Part 1. Why Do AVI Files Become Damaged?
AVI files can become damaged for various reasons, leading to playback issues or complete inaccessibility. Understanding the common causes of AVI file corruption is crucial in preventing future occurrences and effectively repairing damaged files. Here are some primary reasons why AVI files may become damaged:
1. Interrupted Downloads:
If the download of an AVI file is interrupted due to a lost internet connection or a power outage, the file can become incomplete and unplayable.
2. Abrupt System Shutdowns:Unexpected system crashes or power failures while playing or transferring AVI files can result in file corruption.
3. Virus or Malware Attacks:Viruses and malware can infect and corrupt AVI files, rendering them unusable.
4. Bad Sectors on Hard Drive:AVI files stored on a hard drive with bad sectors may become corrupted over time, making them difficult to play.
5. Unsupported Media Players:Using incompatible or outdated media players can sometimes lead to AVI file corruption, especially if the player cannot properly handle the file's codec.
6. File Transfer Errors:Errors during the transfer of AVI files from one device to another, such as from a computer to an external drive, can lead to corruption.
Part 2. 2 Ways to Repair AVI Files
Method 1. AVI Repair with VLC
VLC Media Player is a free and open-source media player for Windows, Mac, Linux, BSD, Solaris, and more. It is compatible with most streaming protocols, DVDs, Audio CDs, and video formats. This versatile media player can convert video, audio, and images.
With built-in codecs, VLC Media Player can play almost any video or audio file without needing additional codecs. Besides being an excellent video player, VLC Media Player also serves as a powerful video editor. Its video editing tools can repair corrupted video files.
Converting your AVI video files can test VLC Media Player's repair features. However, this conversion process might not always restore your video files' playability.
Here's a step-by-step guide to opt avi repair using VLC:
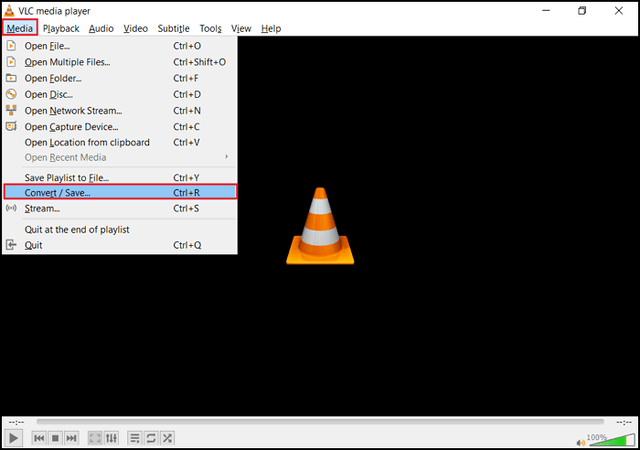
Step 1: Open VLC on your device, go to "Media," and then select "Convert/Save."
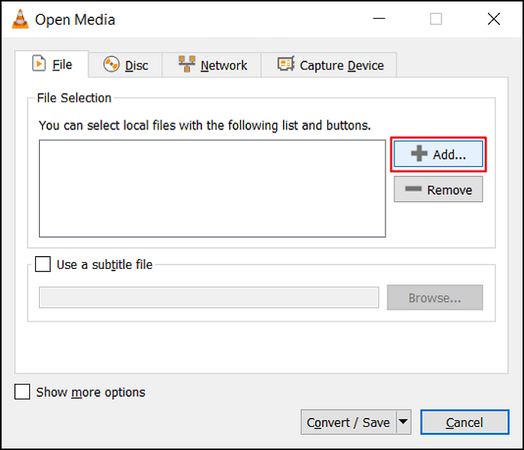
Step 2: Click on the "Add" button to import the videos that need to be transcoded.
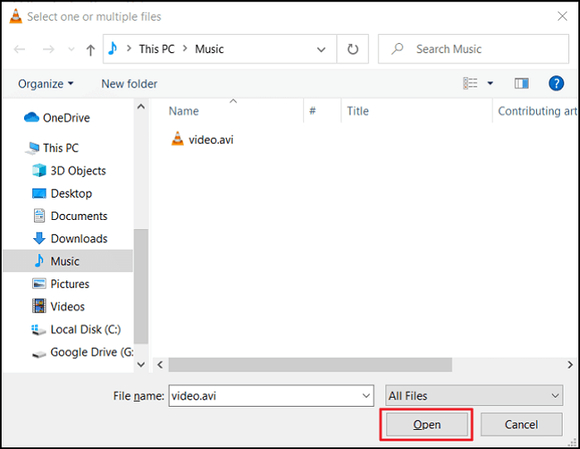
Step 3: In the "Convert" dialog box, provide the file name and choose the destination for the output file.
Step 4: Press "Convert/Save" again. A new window will appear. From the Profile dropdown menu, select the appropriate input codec.
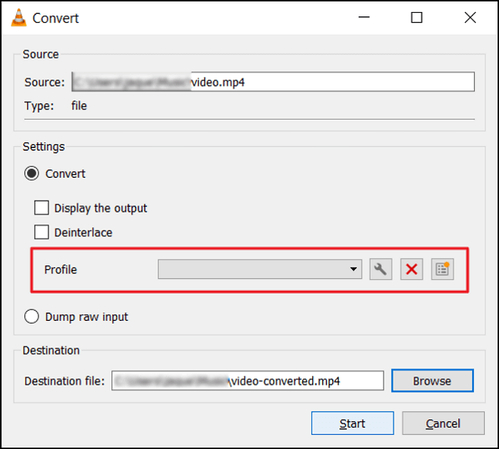
Step 5: To customize profile settings, click on "Edit Selected Profile." You can also create a new profile or remove existing ones as needed.
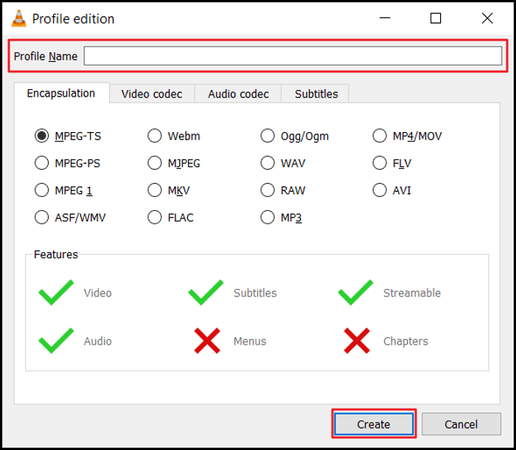
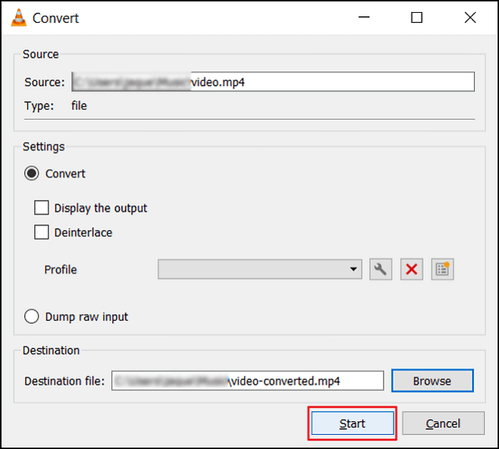
Step 6: Once you've chosen the profile, click "Start." VLC Media Player will take care of the conversion automatically.
Method 2. Fix AVI File with DivFix++
DivFix++ is a free software program designed specifically to fix avi file. Known for its reliability, DivFix++ can salvage damaged videos by removing the old index and creating a new one. This user-friendly tool is available for Windows, macOS, and Linux, making it accessible for most users. It's an excellent solution for recovering important video data that might otherwise be lost to file corruption. In this guide, we'll walk you through how to use DivFix++ to aim at damaged avi file repair.
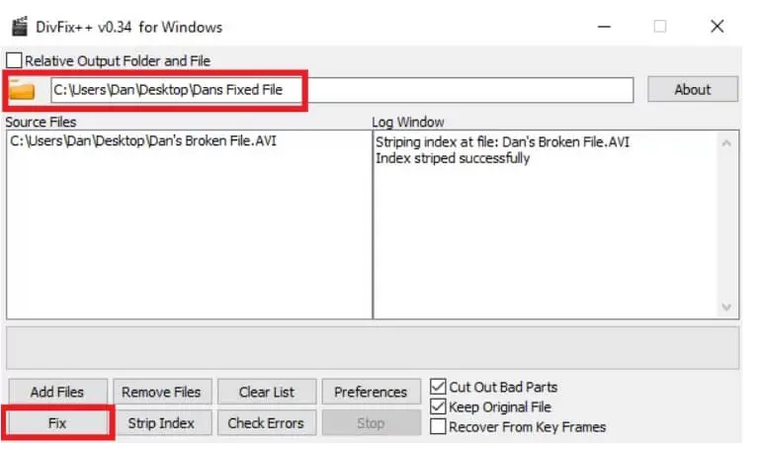
Step 1: First, download DivFix++ from the developer's website and unzip the ZIP file. There's no need to install it. Open the app and take note of the checkboxes in the lower right-hand corner. Tick "Cut Out Bad Parts" if your AVI file won't open.
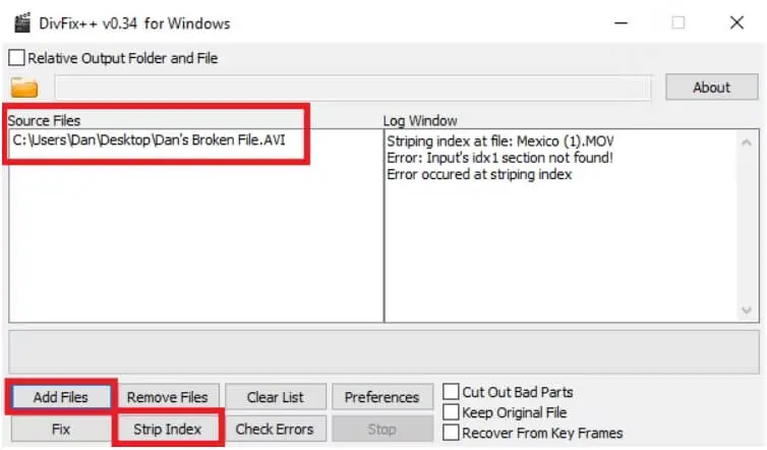
Step 2: Click "Add Files" to select your corrupted file, then click "Strip Index" to remove the old index. If successful, you'll see a confirmation in the Log Window. Next, choose a destination for the new file and click "Fix" to rebuild the index and repair any corrupted parts of the video. This process may take several minutes.
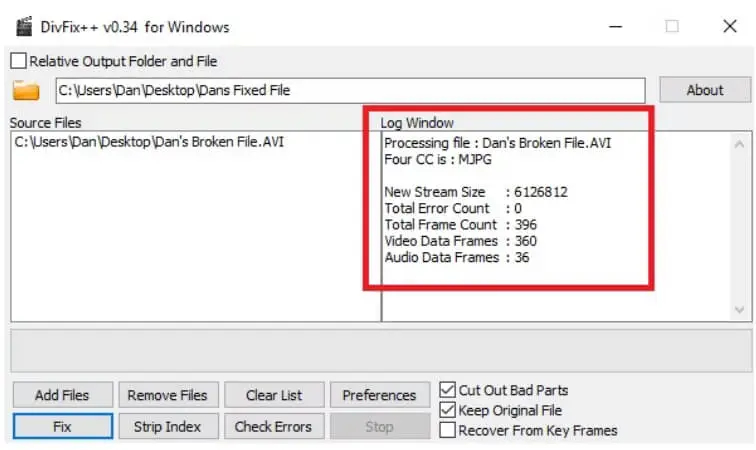
Step 3: Once the file is ready, you'll see another confirmation in the Log Window. Play the newly created file to ensure it works perfectly.
Part 2. Convert AVI File with HitPaw Univd (HitPaw Video Converter)
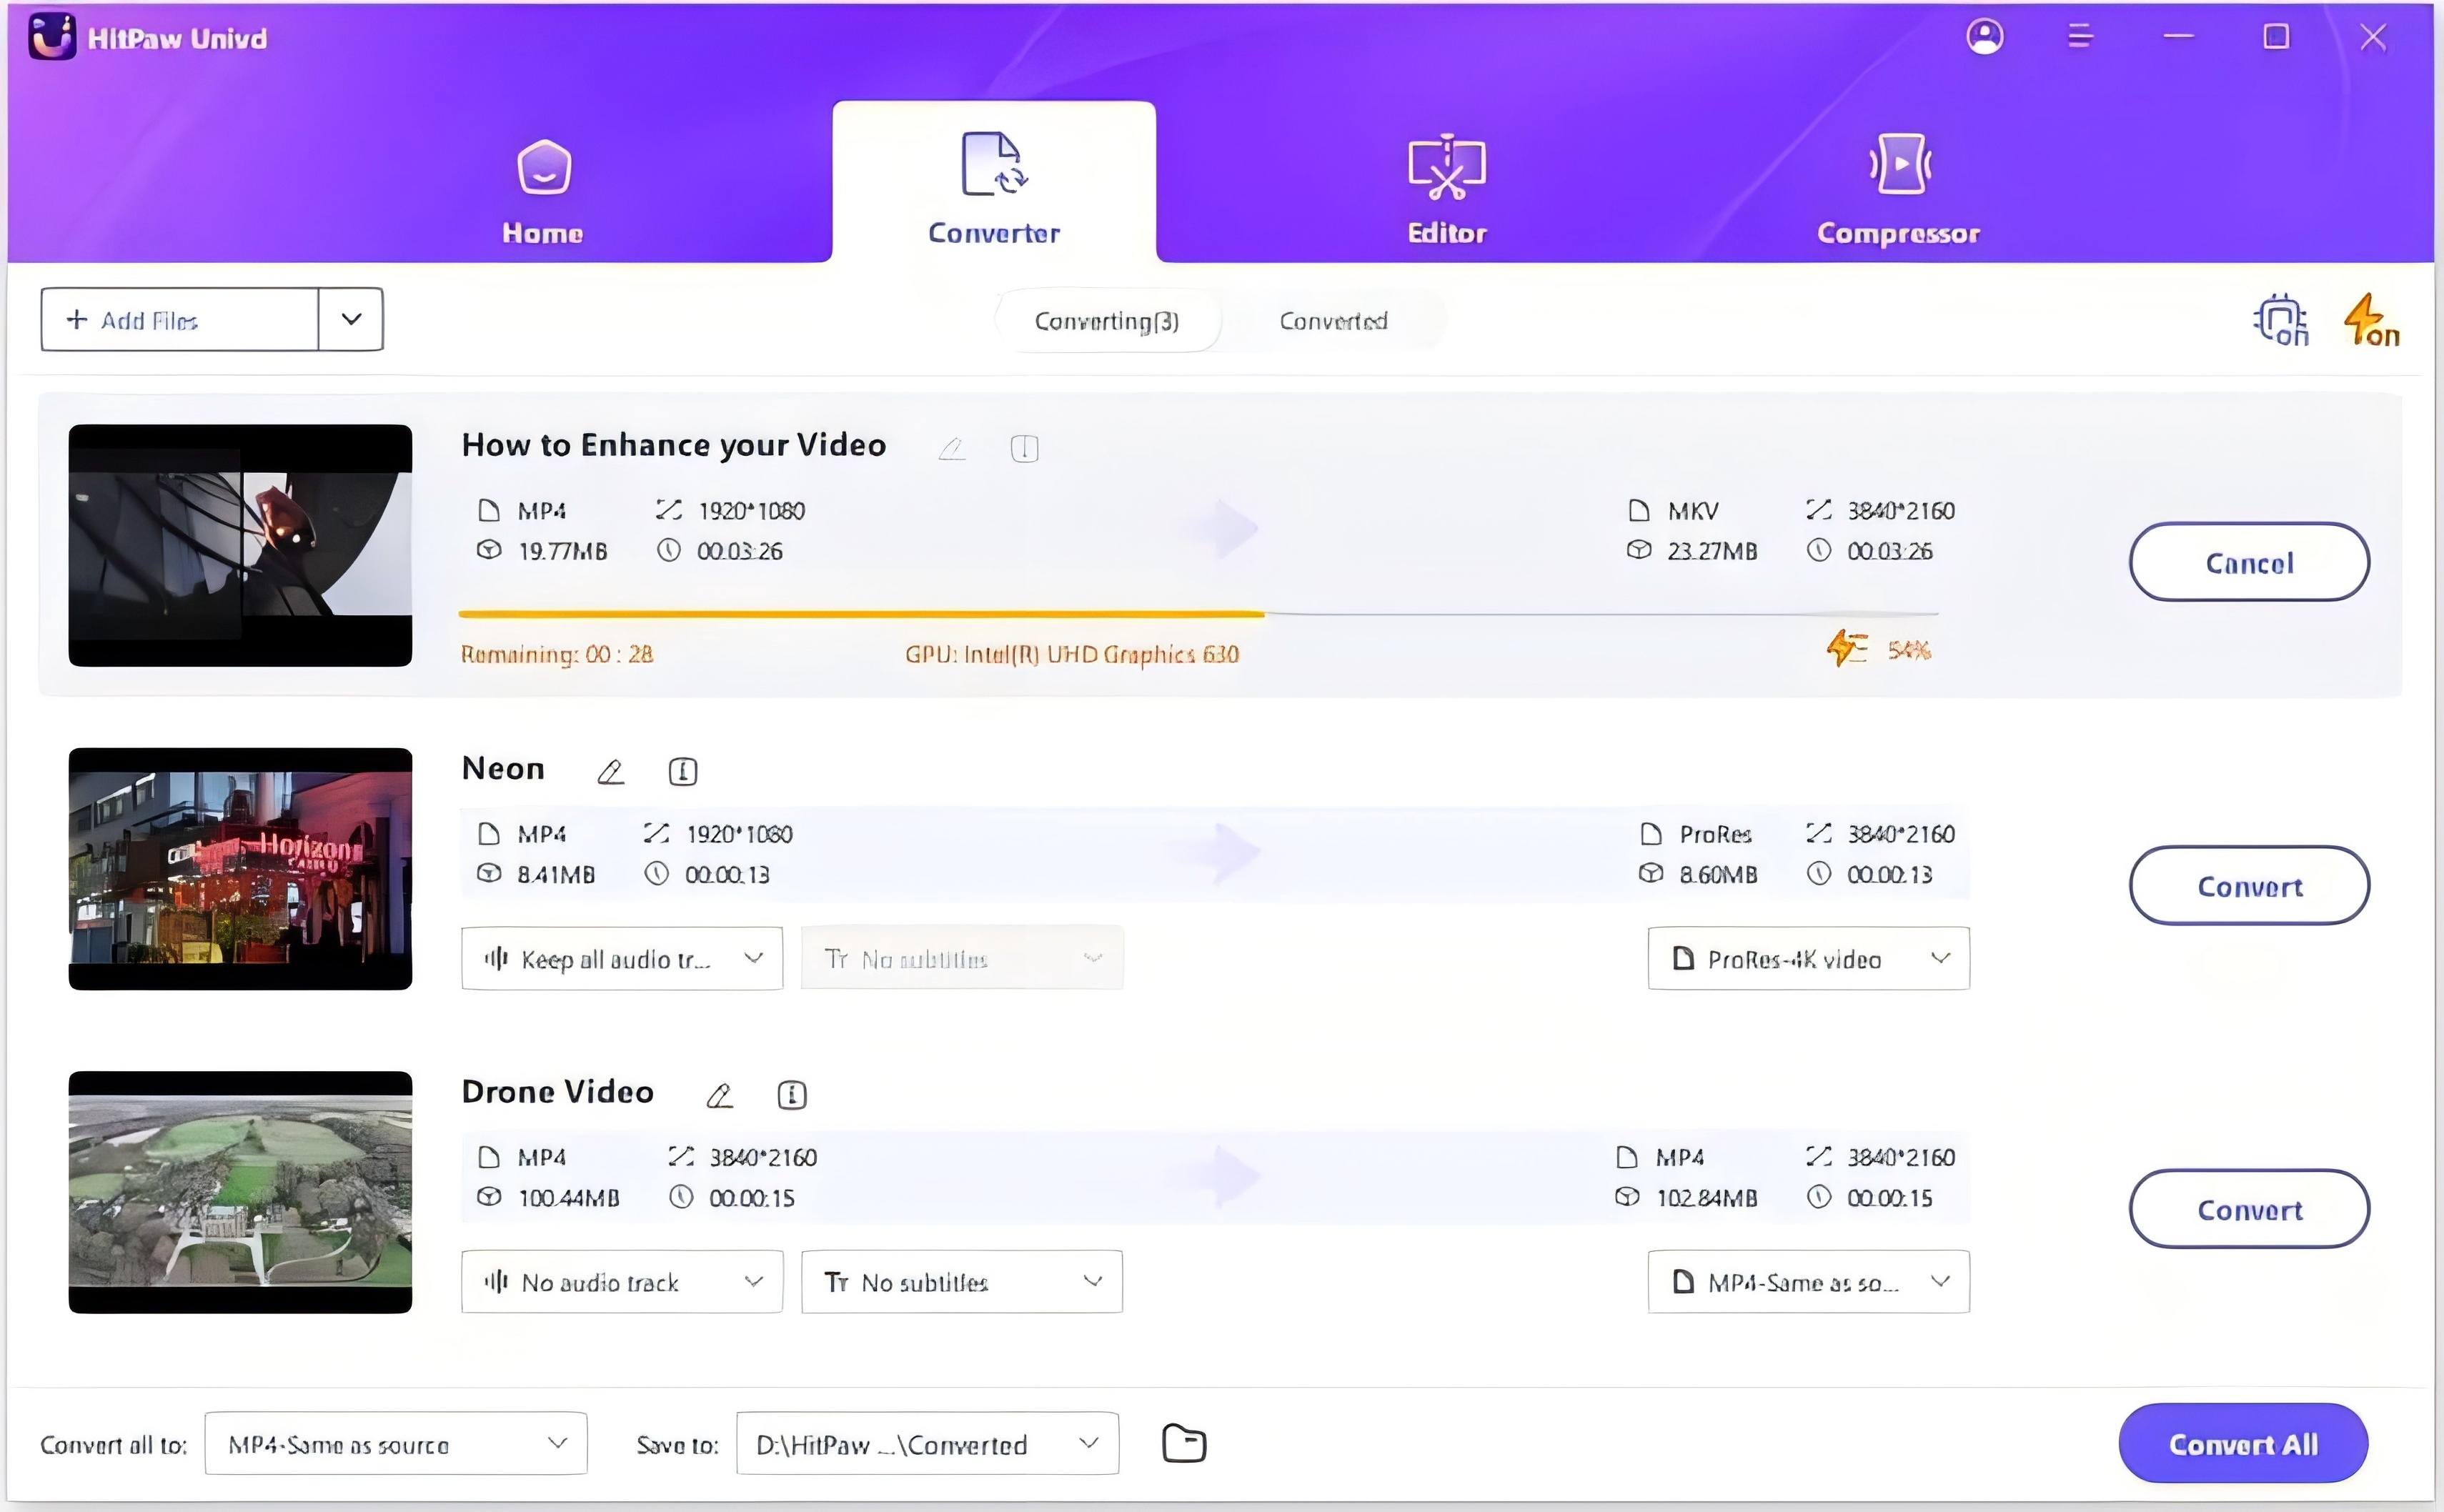
After attempting to repair AVI files with DivFix++ and VLC, you might want to convert it to a more stable format to ensure better compatibility and playback. HitPaw Univd is a versatile tool that converts video files and enhances them with a range of features. Whether you need to change the format for better compatibility or compress the file size, HitPaw Univd offers a simple, user-friendly interface to do the job efficiently.
Features
- HitPaw Univd supports converting AVI files to various popular formats, including MP4, MKV, MOV, WMV, and more.
- The software utilizes advanced algorithms to ensure fast and efficient conversion without compromising quality.
- You can convert multiple AVI files at once, saving time and effort. This is especially useful for large video libraries.
- The converter offers pre-configured settings optimized for various devices such as smartphones, tablets, gaming consoles
How to convert AVI file through HitPaw Univd?
Step 1: First, download and install the HitPaw Univd from the official website. After the installation is finished, launch the application.
Step 2: Click the "Add Files" button in the top left corner and select the AVI file you wish to convert. Additionally, you can just drag and drop the file into the program.

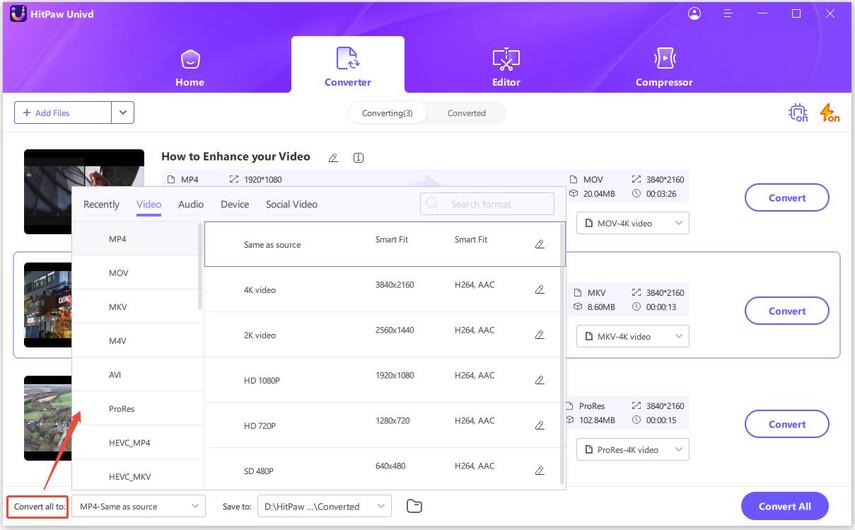
Step 3: Select the desired output format from the dropdown menu in the bottom panel. HitPaw Univd supports a wide range of formats, so choose one that best suits your needs.
Step 4: If needed, you can customize the output settings by clicking the "Settings" icon next to the format dropdown. Adjust parameters like resolution, bitrate, and frame rate according to your preferences.
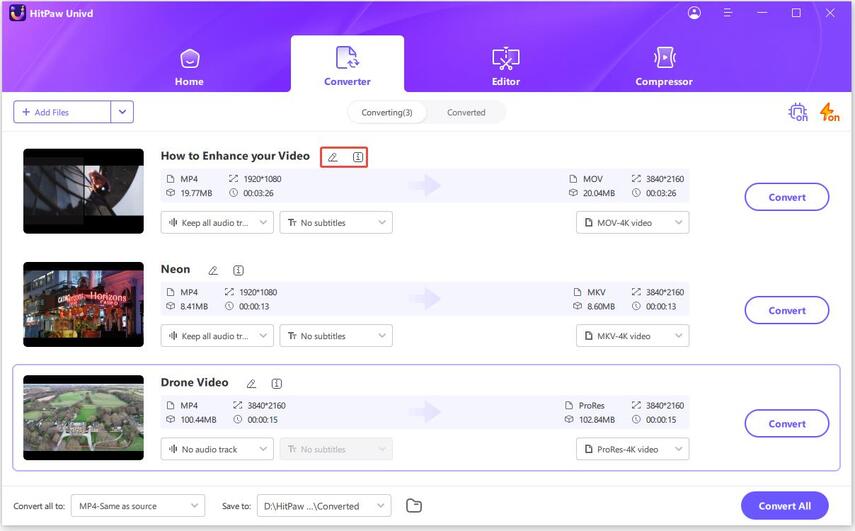
Step 5: Once everything is set, click the "Convert" button to start the conversion process. You can monitor the progress in the main window. The conversion time will vary depending on the file size and output settings.
In Conclusion
Repairing and converting AVI files can be essential to ensuring your video content remains accessible and playable across various devices and platforms. Tools like DivFix++ and VLC allow you to repair avi files by stripping out the old index and rebuilding a new one, providing a straightforward solution for minor file issues.
Once your AVI files are repaired, converting them to a more stable format is a prudent step. HitPaw Univd is a versatile and user-friendly tool for this purpose. With its wide range of supported formats, high-speed conversion, customizable output settings, and additional features like batch conversion, built-in video editing, and GPU acceleration, HitPaw Univd offers everything you need to efficiently manage and enhance your video files.


 HitPaw Edimakor
 HitPaw VikPea (Video Enhancer)


Share this article:
Select the product rating:
Joshua Hill
Editor-in-Chief
I have been working as a freelancer for more than five years. It always impresses me when I find new things and the latest knowledge. I think life is boundless but I know no bounds.
View all ArticlesLeave a Comment
Create your review for HitPaw articles