How to Compress Audio in Audacity
In the realm of audio editing, compression is a crucial technique that allows you to control the dynamic range of your audio files. Whether you're a musician, podcaster, or content creator, having a well-balanced and polished audio track can significantly enhance the overall listening experience for your audience. Audacity Compressor, a free and open-source audio editor, offers a powerful compression tool that can help you achieve this goal. In this comprehensive guide, we'll delve into the art of compressing audio in Audacity, exploring its settings and providing a step-by-step tutorial to help you master this essential skill.
Part 1. Compress Audio Audacity: Detailed Step-by-Step Tutorial
The Audacity compressor offers a user-friendly interface and a wealth of tools to enhance your audio files, and its compression feature is no exception. By following this step-by-step guide, you'll learn how to compress audio in Audacity with ease, ensuring that your audio tracks maintain a consistent volume level while preserving their natural dynamics.
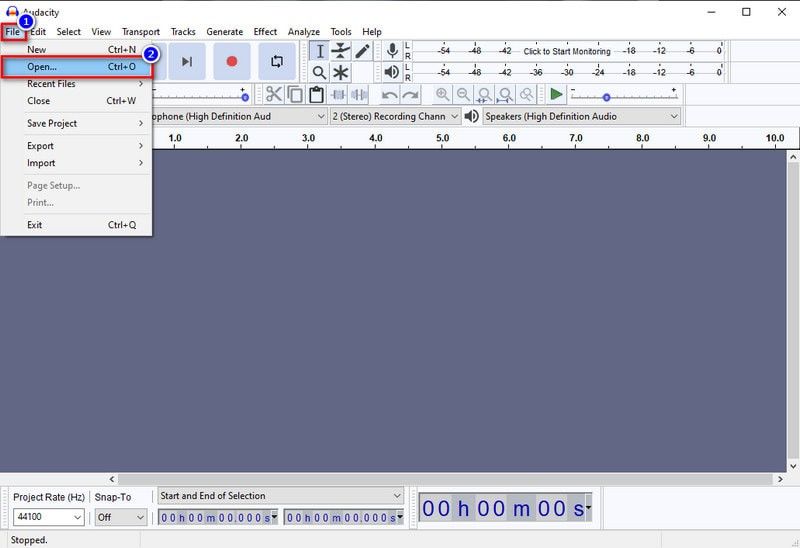
Step 1:Open Audacity and import your audio file by navigating to File > Open or using the keyboard shortcut (Ctrl+O on Windows or Cmd+O on Mac).

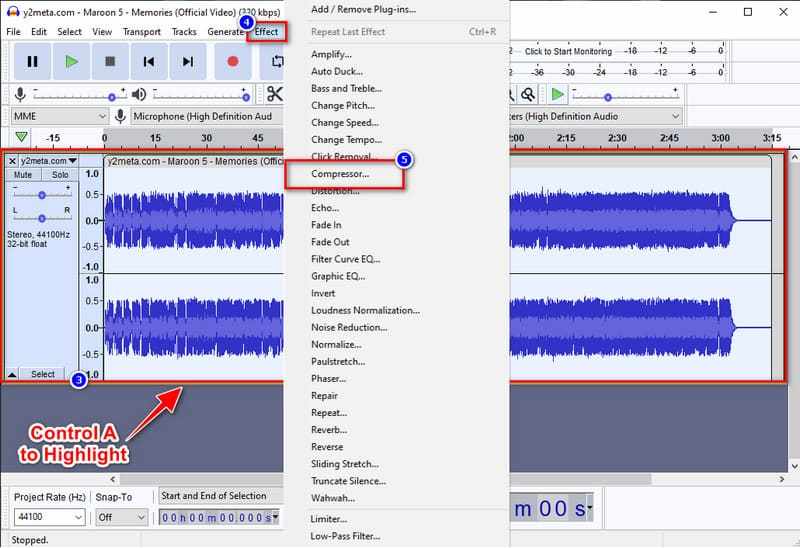
Step 2:Select the portion of the audio track you want to compress by clicking and dragging your mouse over the waveform.
Step 3:Access the Compressor effect by navigating to Effect > Compressor or using the keyboard shortcut (Ctrl+Shift+C on Windows or Cmd+Shift+C on Mac).

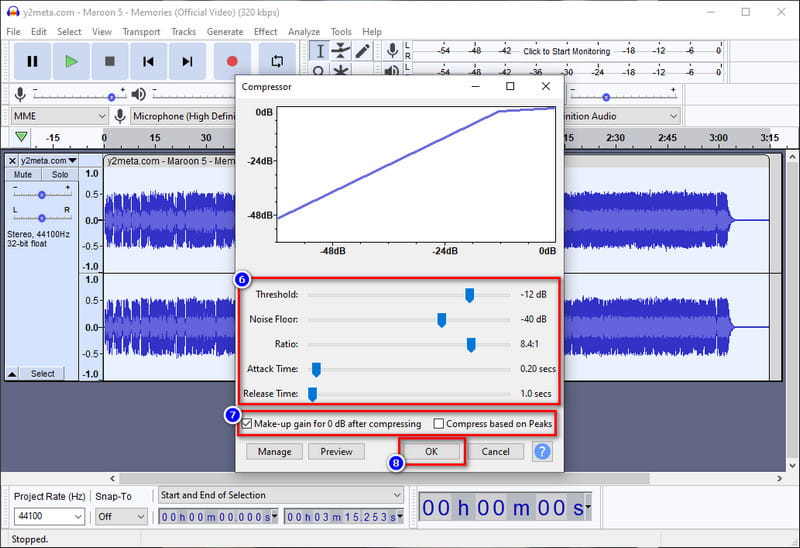
Step 4:In the Compressor dialogue box, you'll find various settings that allow you to fine-tune the compression process. Here, you can adjust the Threshold, Ratio, Attack, and Release times, among other parameters. We'll discuss these settings in detail in the next section.

Step 5:Experiment with different settings until you achieve the desired level of compression. You can use the preview function to listen to the changes in real time.
Step 6:Once you're satisfied with the results, click "OK" to apply the compression to your selected audio region.
Step 7:If you want to compress the entire audio track, select the entire waveform by pressing (Ctrl+A on Windows or Cmd+A on Mac) before applying the Compressor effect.
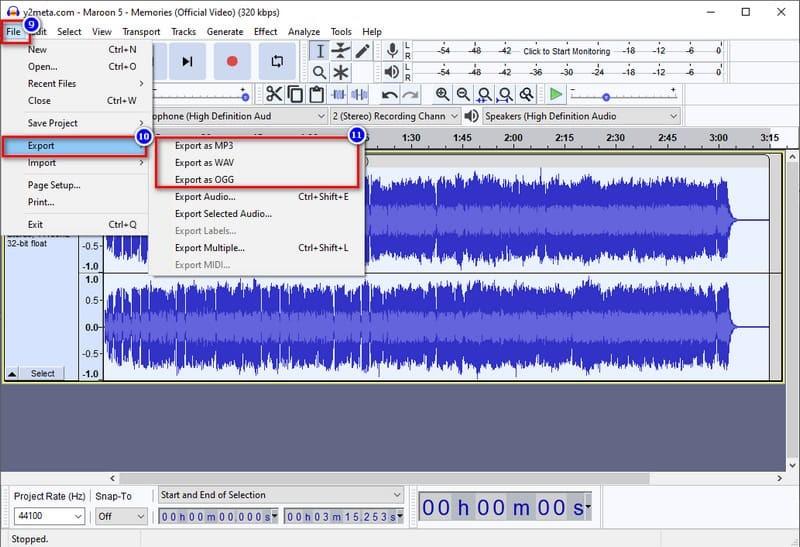
Step 8:After compressing your audio, you can export the compressed file by navigating to File > Export or using the keyboard shortcut (Ctrl+Shift+E on Windows or Cmd+Shift+E on Mac).

Part 2. Audacity Compressor Settings Explained
While the step-by-step tutorial provides a basic understanding of how to compress audio in an Audacity compressor, it's essential to have a deeper knowledge of the various settings within the Compressor tool. By mastering these settings, you'll be able to fine-tune the compression process and achieve the desired results for your audio tracks. Let's explore each setting in detail.
What is the Threshold?
The Threshold setting determines the level at which the compression begins to take effect. Any audio signal that exceeds the specified Threshold value will be compressed, while signals below the Threshold will remain unaffected. Adjusting the Threshold allows you to control the amount of compression applied to your audio.
Understanding the Noise Floor
The Noise Floor setting determines the level below which the audio signal will be ignored or attenuated. This setting is particularly useful when dealing with audio files that contain background noise or unwanted sounds. By setting an appropriate Noise Floor value, you can effectively reduce or eliminate these unwanted elements, resulting in a cleaner and more polished audio track.
Compression Ratio
The Compression Ratio setting controls the amount of compression applied to the audio signal that exceeds the Threshold. It's expressed as a ratio, such as 2:1 or 4:1. A higher ratio will result in more aggressive compression, effectively reducing the dynamic range of the audio.
Attack and Release Times
The Attack and Release times are crucial settings that determine how quickly the compressor reacts to changes in the audio signal. The Attack time controls how quickly the compressor engages when the audio signal exceeds the Threshold, while the Release time determines how quickly the compressor disengages after the signal drops below the Threshold.
Part 3. Best Audacity Alternatives for Audio Compression
While Audacity Compressor is an excellent free audio editor with powerful compression capabilities, some users may prefer alternative solutions that offer a more intuitive user experience or additional features. In this section, we'll explore one popular alternative for compressing audio: HitPaw Univd (HitPaw Video Converter) (a powerful desktop application).
Features of HitPaw Univd
In addition to its audio compression capabilities, HitPaw Univd offers a range of features that make it a powerful and versatile tool:
- Support for a wide variety of video and audio formats, including MP3, M4A, MP4, AVI, MKV, FLV, and more.
- Reduce audio size by adjusting the bit rate, sample rate, encoder, etc.
- Video and audio editing tools, such as trimming, cropping, and rotating.
- Ability to extract audio from video files.
- Batch conversion for multiple files simultaneously.
The Steps to Compress Audio without Losing Quality
HitPaw Univd is a versatile desktop application that not only allows you to compress audio files but also offers a wide range of video conversion and editing features. Here's a step-by-step guide on how to compress audio using this software:
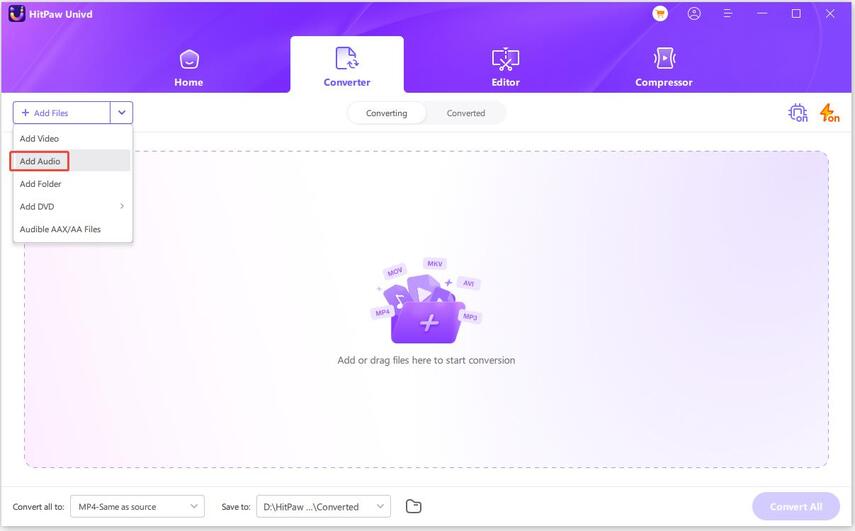
Step 1:Launch the HitPaw Univd software on your computer. In the main interface, click the "Add Audio" button located in the top-left corner. This will allow you to browse and select the audio files you want to compress.

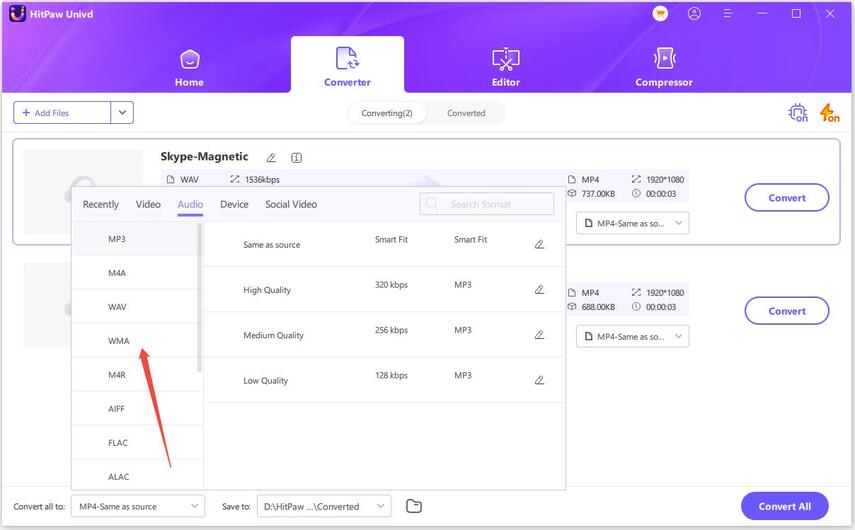
Step 2:Once your audio files are imported, you'll see them listed on the conversion board. Click the "Convert all to" button in the bottom-left corner to expand the output format. Switch to the Audio category to select an audio format.

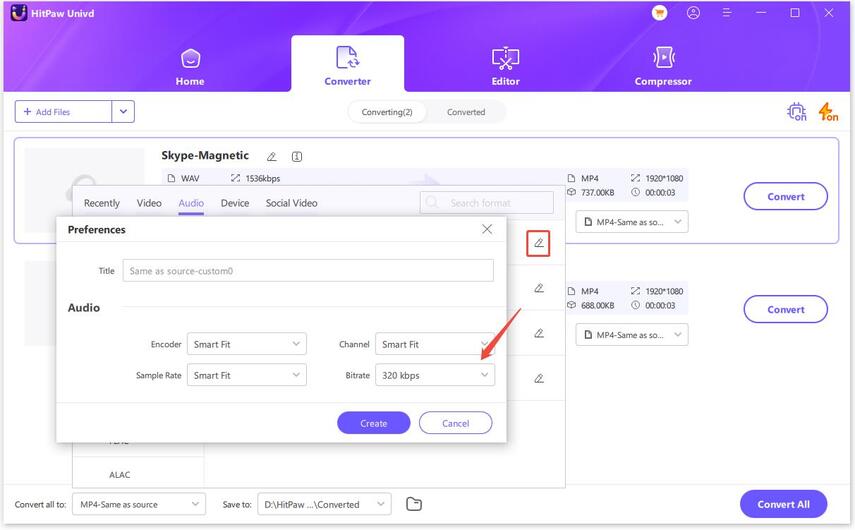
Step 3:When you choose an output format, you can click the edit icon to fine-tune specific parameters like the encoder, sample rate, or bit rate. The lower the bit rate is, the smaller the audio file size will be.

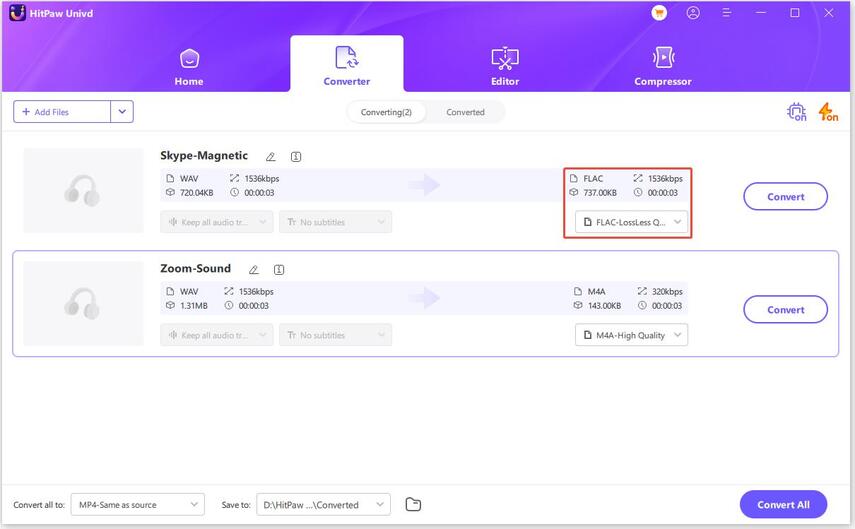
Save your changes and back to the main interface. You can preview the audio size.

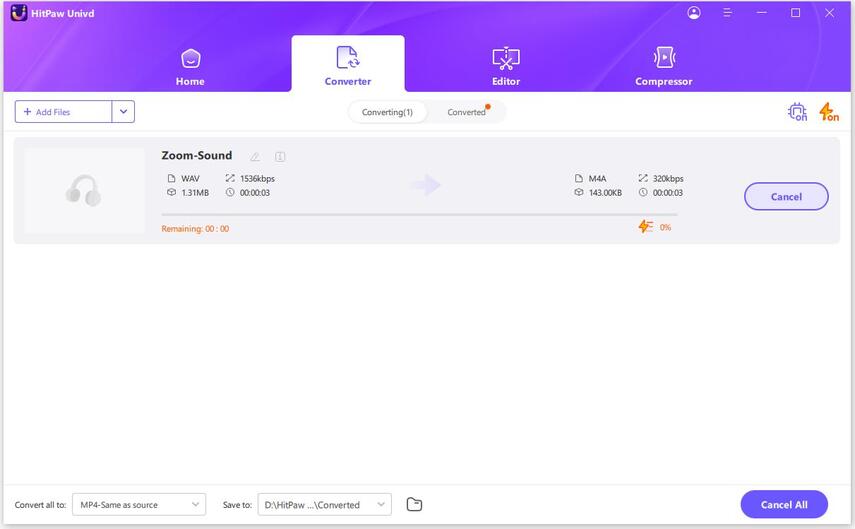
Step 4:Click the "Convert" button (or "Convert All" if you've selected multiple files) to initiate the conversion. It will start compressing your audio files while maintaining lossless quality, ensuring that you don't sacrifice audio fidelity during the compression process.

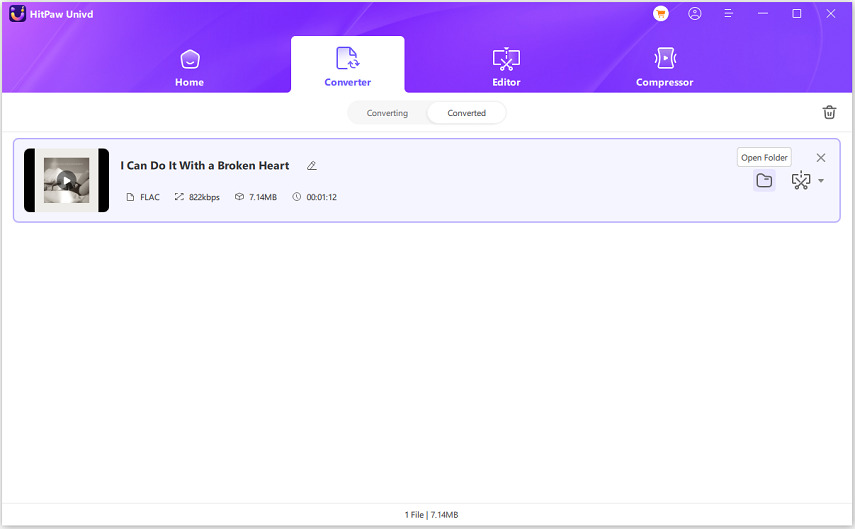
Step 5:Once the conversion is complete, navigate to the "Converted" tab at the top of the interface. Here, you'll find your newly compressed audio files. To locate and access the compressed files on your computer, click the "Open Folder" button. Alternatively, if you need to make additional edits or adjustments to your compressed audio files, click "Add to edit list" to import them back into the conversion board.

With its intuitive interface, diverse format support, and powerful compression capabilities, HitPaw Univd is an excellent choice for anyone looking to compress their audio files quickly and efficiently while maintaining high-quality output.
Conclusion
Mastering the art of audio compression is an invaluable skill for anyone working with audio content. By utilizing the powerful compression tools in Audacity compressor or exploring alternative solutions like HitPaw Univd, you can elevate the quality of your audio tracks, ensuring a consistent and polished listening experience. Embrace the power of compression and unlock the full potential of your audio projects.




 HitPaw Edimakor
 HitPaw VikPea (Video Enhancer)


Share this article:
Select the product rating:
Joshua Hill
Editor-in-Chief
I have been working as a freelancer for more than five years. It always impresses me when I find new things and the latest knowledge. I think life is boundless but I know no bounds.
View all ArticlesLeave a Comment
Create your review for HitPaw articles